Film emulation profiles
Normalization
Magnus L Andersson
This is a brief introduction to film emulations, profiles and how to make them available in Lightroom. To us, the use of profiles is a very nice way to spend less time in front of the computer to turn our originals into useful negatives. Since profiles are rather new and not that much advertised, many may not yet realized their usability.
In this the first part we provide some basics on color grading and outline how to normalize raw files to obtain useful originals, and in forthcoming posts, we will describe how to turn these into negatives emulating known analog films.
Not that long ago Adobe introduced Profiles allowing photographers to enter the world of color grading and Look-Up Tables (LUTs) in cinematography. By this, it became possible to build portfolios of “looks” to apply to originals. However, this technology is still rather unknown to the masses.
Color grading for black and white
If you like our work, you are more than welcome to follow us at Instagram or have a look at Fotosidan (Swedish site for photographers) or LFI (international site for mainly images captured by Leica equipment). You are also welcome to contact us at info@anderssoneklund.se for questions about our work, and to share links to this post.
Colors in black and white
We all know from the world of movies how important the colors are to establish the right look and feel, but not until recently the tools of color grading have been available to photographers and Lightroom by Profiles.
So, why are these things interesting to us as photographers? It saves time and will ensure an effective, efficient and consistent way of treating our originals to develop negatives. Deciding the “look” for a shot becomes like deciding on the analog film (emulation) to use. This is not really anything new and companies have been around for a while offering Photoshop Presets to achieve similar things, so what’s different now? It has become so much easier and, in our opinion, more natural to create a film profile for your intended purpose and to use them in Lightroom as part of the regular image processing routine.
For us with a keen interest in black and white photography, this development is still as important even though we don’t make of its full potential.
Outline
In this tab we present a number of YouTube videos to introduce the concept of Look-Up Tables (LUTs). In the Usage (negative icon) tab we show an example of the use of LUTs and in Details (computer icon) we describe our process, and in the last tab Additional (paper clip icon) we elaborate on further information on LUTs.
The essentials of color grading – LUTs
There is so much to know about color grading and it’s even an occupation, but here we will only focus on the basics needed to create film emulation profiles.
The most important thing to know about is a Look-Up Table (LUT) which is not more or less than a mapping from one set of values like colors to other values. To learn more about this concept we recommend this very good introduction produced by the developers of one of our favorite tools, the 3D LUT Creator. For our purposes, it’s enough to view the LUT as a description of how one color is to be replaced by another.
Color grading in Lightroom
A while ago Adobe introduced the ability to apply LUTs in Lightroom by so-called Profiles found in the Develop module. Among the profiles provided by Adobe one finds the Adobe Color and Adobe Monochrome. However, now you can also create your own, like an Ilford Delta 100 emulation for Leica M Monochrom raw files, and add them as presets.
A Profile is a static color mapping applied to an original, and any further tweaking using the functions in the Develop module are done on the mapped data. Hence, assume the Profile turns red into green, then any further adjustments to the green pixels will actually change the red ones in the original one.

Figure 1: Histogram with Ilford Delta 100 characteristic curve.
Not everything can be achieved with a LUT, but all those things that can be encoded as mappings of colors between, possibly different, color spaces in the whole original. Hence, no partial changes or features like emulations of film grains or lens artifacts can be achieved with LUTs. For those of you familiar with the technical specifications of analog films, you may view LUTs as a way to encode things like a characteristic curve for an Ilford Delta 100 film in the context of a Leica M Monochrom raw file (Figure 1).
From raw to original
As described in the post From raw to image we mentioned the importance of getting the right start when using Profiles that are by their name trying to elude to a given look and feel. For instance, naming a profile Ilford Delta 100 intents to indicate that the user may expect an outcome that in some way mimics an analog negative from this type of film. For instance, as someone described the film at the Internet as to be characterized by “[…] wide latitude, linear tonality with medium to low contrast, depending on development”.
So, why not then just take the characteristic curve from the fact sheet of the analog film and encode it as a LUT? There are two main reasons, with the first be due to that in the analog case the rays of light hit the film, but in the case of digital, they hit the sensor that may be viewed as a “digital” film with its own properties. Secondly, before being able to apply any Profile we need to read the raw file and import it, and this is actually a step that also will change the captured values of the rays of light. Hence, we need a way to for a given camera define our own emulations of films that will result in anticipated outcomes like wide latitude and linear tonality.
To reverse the impact of import
The raw file of data on your camera’s memory card is not imported by Lightroom as just a linear out=in LUT where nothing is changed. Instead, Adobe tries to apply LUTs like Color or Monochrome to get more out of the data based on its knowledge of the used camera and lens. In most cases, the outcome is very good, but as seen in the video on how to get more out of your raw files, there are many instances where you want another starting point for creative adjustments than the one offered by Adobe.
Another example is, as in our case, when you have access to a large repository of LUTs trying to emulate analog films, but all of them assume the input is normalized with respect to a given reference image. In this case, we need to begin by applying a LUT that will make our raw file to “look like” the reference and then on top of that apply the emulation LUT.
In the case of the Leica M Monochrom we know that the default Adobe Monochrome profile will make the original to resemble an Ilford Delta 100 negative (details). Moreover, our repository of emulations contains one which claims to also result in an Ilford Delta 100 negative. Assume we could create an “inverse” of this LUT and apply it on top of our imported data, then we would have a “normalized” original corresponding to the reference and the all the intentions of the emulations should hold.
Let’s take a minute to reflect on why this approach is possible, and the crucial aspect is that the Delta 100 profile is just a monotone curve (cf Figure 1). That is. from left to right it goes upwards all the time and thereby there is a mathematical unique inverse and the composition of the curve and its inverse is the straight line y=x. In layman language it means that we, given the characteristic curve and the resulting image, are able to return to the starting point, that is the reference image.
Conclusions
First of all, the introduction of LUTs offers a great opportunity to apply color grading in Lightroom and to establish effective, efficient and consistent processing of raw files to achieve anticipated effects.
Moreover, it opens up the possibility to re-use all the existing knowledge and resources from the world of cinematography in photography.
In the case of the Leica M Monochrom, and any other camera where it is possible to decide its default look in Lightroom with respect to a repository, we have by the LUTs a way to in one click turn a raw file into any known film emulation look.
In the Processing tab we present further practical details on this process using the image in the Camera tab, and in the next post we will discuss how to create a film emulation for a given camera.
An example
In the Processing tab we outline how to create a normalization profile for the Leica M Monochrom, but it’s the same principle for any camera where we are able to decide the look of an Adobe import with respect to a reference image.
The example – Please Dad
Figure 1 presents the raw file straight of the memory card (left) and the final outcome (right) applying the Kodak T-Max 400 emulation from the Affinity repository As seen there is quite some difference.


Figure 1: Raw file [left] vs Process imaged [right].
Background
This photo was taken by Magnus L Andersson in (/, ) using a Leica M Monochrom (M9) with a Leica Summilux-M 35 mm f/1.4 ASPH.
Settings
Shutter speed: sec
Focal length: mm
Aperture: f/
Exposure bias: EV 0
ISO rating:
Gear
Camera: Leica M Monochrom (M9) (Leica)
Lens: Leica Summilux-M 35 mm f/1.4 ASPH (Leica)
Filter: No
Medium: Memory Card Panasonic SDHC 16GB Gold Pro (Panasonic)
Flash:
Scanner: No
The process
At the core of our color grading processes, we have the Adobe Creative Suite with the Photoshop CC and Lightroom Classic applications together with the 3D LUT Creator color grading environment. The latter is a must for anyone interested in color grading, and considering what you get for the money it’s a real bargain.
The image is a screenshot from 3D LUT Creator that we will use to take you through how to create a normalization LUT, and a teaser on how to create a complete film emulation LUT.
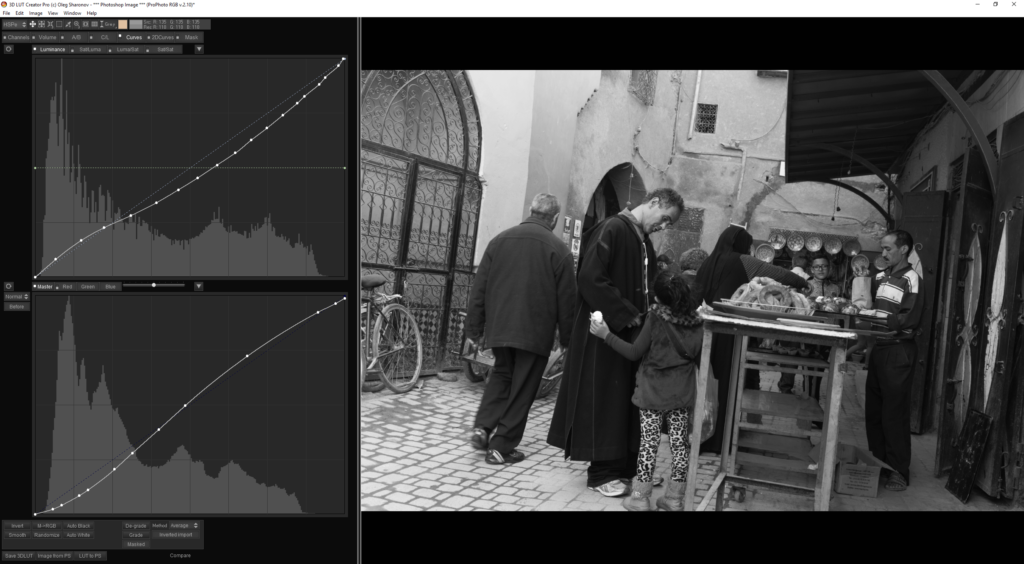
The normalization LUT
As discussed, we need to make sure our imported original is normalized with respect to the camera and repository for the film emulations. In our case, we know that the emulation for the Ilford Delta 100 is the one to base a normalization on.
In 3D LUT Creator we begin by loading the LUT for the Ilford Delta 100 as a so-called External LUT (hidden in the Mask tab), followed by extracting the RGB curves of the LUT. The outcome will look similar to the curve in the lower left graph above. Then we click M->RGB to create a Master curve from the extracted RGB curve, followed by Smooth and Invert to obtain the curve in the upper graph corresponding to the normalization curve. This curve we can export as a LUT and load into Lightroom via Photoshop as the new import Profile for Leica M Monochrom raw files.
To re-cap, the process consists of the following simple steps:
- Load the LUT to use to derive a normalization, that is, the one you want to use to give your original the correct reference look.
- Extract the RGB curve(s) from the LUT which describe of red, green and blue parts of a pixel are to be mapped to new red, green and blue values.
- Collapse the RGB curves into a single Master curve.
- Smooth and Inverse the Master Curve.
- Save the inverse curve as a LUT to be used for normalization.
There are a few reasons why this process actually works that also give its limitations. If we exclude the obvious one that you need a LUT to begin with, it needs to not differ in the way it treats the red, green and blue parts of a pixel to allow the Master to just equal one of the extracted channels. The second limitation is that we need a unique inverse of the Master, which can only be obtained if it’s monotone. The third limitation, due to some pecualrities in the implementation, is that we need to smooth the curve to only have at most 14 explicit values. Hence, the curve has to have a nice “shape” to not change to much when removing points used to define the curve.
For more details on using external LUTs in 3D LUT Creator we recommend the following, slightly technical, video:
The Lightroom Profile
The process to turn the saved normalization LUT into a Profile for Lightroom is slightly more difficult, and not that well described. However, there is a good introduction at YouTube that provides all the necessary know-how.
The Kodak T-Max 400 profile – a teaser
With the normalization graph in the upper graph above, the process to add a film emulation is just about doing the same thing once again. That is, load the film emulation as an external LUT and extract the RGB curve, followed by smoothing it to get the snapshot above. In this case, we don’t want to invert the film emulation and the two curves can jointly be saved as a LUT called Kodak T-Max 400 (Affinity) and used for Leica M Monochrom files to be imported by Photoshop or Lightroom. The application of this Profile will then result in the outcome seen in the snapshot. More on this part in a forthcoming post.
To learn more
Color grading is not an easy craft, and learnt by doing and not reading. Moreover, much of it is based on rather tricky mathematics – what ever you see there is always some maths to get it done.
To add to this, neither Adobe or 3D LUT Creator are top-class tutors and much has to be learnt by surfing the Internet. One such source is Youtube with a lot of tutorials on color grading, 3D LUT Creator and also some on Profiles start to pop up.
If you need further support, contact us via email, and we will also when time given add more information at this site.