Processing
From camera to web and print
Magnus L Andersson
This is an attempt to describe our process from the raw image on a memory card or film frame to images presented in social media or as prints. It is a description that naturally evolves over time, based on lessons learned and technological improvements.
We will present processes mainly for the pure black and white digital camera Leica M Monochrom (1st generation), the digital cameras Fujifilm X100S and Canon EOS 5D Mark II, the smartphone HTC U11 and scans of analog films by the Plustek Opticfilm 120 (1st generation). Even so, the process is possible to adapt to any camera or smartphone setup.
For all these setups the process begins with turning the raw file, or scanner outcome, into a manageable negative or slide to be developed into a positive and finally enlarged as an image for the web or print. Due to our background in analog photography, the process and its terminology will borrow from that world.
The background to this introduction is that we have not been able to find a useful one for the process from camera to print and presentation on the web, and a need to document our process to achieve consistency and a smooth process. It describes our way of doing things, and we don’t claim that it is any better than other approaches, and share it to possibly provide some ideas on how you may set up your process if you don’t already have one you’re happy with.
NOTE: This page is still very much a piece of work in progress, hence will most probably both change and expand over time.
In the beginning there was light
If you like our work, you are more than welcome to follow us at Instagram or have a look at Fotosidan (Swedish site for photographers) or LFI (international site for mainly images captured by Leica equipment). You are also welcome to contact us at info@anderssoneklund.se for questions about our work, and to share links to this post.
Contents
1. Introduction
Let’s begin with a brief introduction to some basic terminology we use, as we try to adopt a traditional analog process approach to both files from digital cameras and scans of analog films. However, this is in some cases not easy and we have to make use of terms with slightly different semantics than normally seen.
Why try adopting an analog process terminology to digital photography? The honest and simple answer is that our photographic journey started with long nights in the darkroom, and the acquired skills still influence our way of thinking and working.
In the case of a digital camera, its memory card contains files we call digital raw files. These can be read from the card and imported to Lightroom (denoted LR), and we call the resulting files digital slides since these, as their analog counterparts, can be seen as miniature transparent images. In the case of files originating from a scanning process of a negative or reversal film, we call them frames and they contain not only what we may call analog raw data, but also an additional layer describing existing dust and scratches. This layer cannot be edited in LR, therefore we create and import stripped analog raw instances we refer to as negatives and analog slides. But, we will still keep track of the frames in LR to ensure traceability from film strip to images.
Digital raw files are imported as digital slides, and frames, via analog raw files to remove the dust and scratch information, as negatives or analog slides.
The import of raw files and frames is the first part of the development process, which results in a positive that can be described as “a well-documented and archived picture of a given ratio ready for use, and with mitigated technical flaws and a certain film look”. Hence, a positive shall look like a picture on a contact sheet from a shot with a given analog (flawless) camera and film. This means that the development process needs to consist of corrections to care for technical flaws of, for instance, the lens and in the case of digital slides emulations to mimic analog films. Considering negatives that look like traditional film strips, the development also consists of a conversion step to make them look like slides. A positive may then be creatively manipulated through enlargement to obtain an image ready for print or the web.
Raw files are developed into positives by importing and manipulating negatives or slides to mimic a traditional analog contact sheet, which then can be enlarged to images for print or the Internet publication.
We will partly overload the term image to both mean the outcome of the enlargement process as well as to refer to any kind of “image” in a general setting, but the intended use shall be clear from the context.
It’s important to note that in almost all cases the import step using, for instance, the Adobe Camera Raw (denoted ACR) application alters the raw file to achieve a certain look, thereby the semantic difference between an unaltered slide and an altered positive. Moreover, it’s not straight forward to decide which manipulations are to be viewed as development or enlargement steps. Our view is that a positive shall be the starting point for creative manipulation, hence be good enough to be presented as an image on its own. Consequently, all types of adjustments and corrections to care for technical challenges with cameras, lenses, and scanners are to be viewed as part of the development process. This also holds for cropping of raw files and applying film emulations to digital raw files to mimic an analog film type. Considering the latter step as a development step follows from that, in our opinion, this step equals picking an analog film, and by this, we are able to treat positives in the same way independent of their origin and present them as traditional contact sheets.
The complete process from the raw file to an image is called the darkroom process, and in this manual, we will try to outline its steps as detailed as possible and also describe how the process is implemented using Lightroom, Photoshop (denoted PS) and color grading software like 3D LUT Creator (denoted 3DLC). In the case of analog raw files, we also rely on SilverFast Ai Studio 8 and SilverFast HDR Studio 8 for the scanning and the LR plug-in Negative Lab Pro (denoted NLP) for the conversion and metadata annotations.
Lightroom is the main solution to manage the inventory of frames, negatives, slides, positives, and images. It is also the main tool for edits like cropping and color management, and Photoshop is only used in cases where wanted effects like the addition of grains etc cannot be achieved in Lightroom.
As will be seen, one important part of the development is so-called color grading to (1) create positives of digital slides that often borrow features from analog photography’s use of different types of film or (2) to convert and adjust negatives to better mimic the “real” film look. One of the most important resources for this kind of task is a set of Look-Up Tables (denoted LUTs), that is, mappings from colors to colors, we call Affinity from its original purpose to provide film emulations for the Affinity software. These are based on the library of LUTs provided via G’Mic, and as CUBE files (link), trying to emulate different analog films with respect to a given reference image. Another resource is the commercially available set of professional LUTs from Lutify.Me. Both of these resources are the starting point for tuning LUTs to fit the purpose and characteristics of a given film or wanted look, and the 3D LUT Creator is the main tool to create LUTs which can be imported into Lightroom and Photoshop as so-called profiles. The third type of profiles we will use are ones we have created to reflect different types of analog development steps or to care for scanning deficiencies found in analog raw files. Consequently, the essence of the development process is a series of color grading steps and topological manipulations to care for lens distortions.
Using LR as the main management solution, we make use of its abilities like collections and naming of copies and labeling. To denote these types of concepts, and the values they are given, we use blue fonts in this presentation. For instance, “we set Copy Name to Negative” means that we assign the value Negative to the LR field named Copy Name. Consequently, we also say a file with a given Copy Name value to be of that type. For instance, a file with Copy Name equal to Positive is a positive.
In the first part of this manual, we describe the setup of collections used to manage the archive of files, as well as an overview of the process from raw files to images. The second part begins with a description of the process of importing raw files, followed by how these are manipulated to obtain positives. Then we describe the different enlargement methods to turn a positive into an image like a print or one intended for Internet publication. The last part of this manual details our approach to emulate different film-like features as part of the development and enlargement processes, and the treatment of analog films from strips to negatives and analog slides.
2. Collections
The Library is the total Collection of all imported and produced files. The management of this collection is, as far as possible, independent of the equipment used to create its content and is the basis for all processing. In our case, it is stored on a Network Area Storage (denoted NAS) Synology 1819+ server, which is also remotely accessible to allow management when being on the road.
A slide or negative that has been added to the Library and not been subject to any “distorting” treatment, by for instance ACR, has the Copy Name set to Slide or Negative as part of the first development step called import. If any kind of “creative” color grading has been applied during the import of a slide, the name is set to Positive and the resulting file is called a positive. Hence, any steps taken by the embedded camera or scanning process are considered to result in a slide or negative as long as they don’t alter the input in any creative way. In the case of analogs where the SilverFast solutions are used without any adjustments to scan the film frames, the outcome will be slides or negatives, and in the case of digitals where only linear profiles, that is, a mapping where each color is mapped to itself, are used the outcome will be slides.
When slides or negatives are subject to measures corresponding to what we would call development in the analog world, that is, application of film emulations etc, a positive is created with Copy Name set to Positive. Hence, the conversion of a negative to a positive using the NLP software is part of the development process, even though in theory it “creatively inverts” the colors of the negative.
Finally, an image is created with Copy Name set to Image when processing corresponding to the enlargement work takes place in a darkroom, that is, the majority of what is done in PS. The result can then be printed (Print) or produced for the Internet (Web), as indicated by the Copy Name.
It’s also important to remember that any of the types of files above may be in different stages of processing and we will use Color Label to indicate if a file needs to be cared for (To Do), is worked upon (Ongoing) or is Good to Use for next step of processing.
The Library consists of the imported Frames, Slides and Negatives, and the Positives and Images created by the development and enlargement processes.
2.1 Library
The Library is the set of all frames, slides, negatives, positives, and images divided into different sub-collections to reflect the different steps from raw file to the final image.
The foundation of the library is the Photos stored on the NAS and, in our case, being mapped to the Windows 10 file structure Z:/Photos. This part is organized according to the same principle as when importing based on year and date of capture (YYYY/YYYY-MM-DD) and here are all slides, negatives, positives, and images found considered worth keeping and to always be backed up. In our case, we use the Backblaze solution for all backups. As will be seen below, the sub-collection with the frames is not stored on the NAS due to performance issues with the scanner software and is instead stored in a set called Analogs residing on a faster drive than the NAS.
The files we want to be able to edit on an iPad to test different developments and enlargements are virtual copies called sketches stored in the collection Sketches, which is automatically synchronized via LR CC. Note, the sketches are only used to determine different parameters and do not constitute a direct part of the workflow, thereby to be deleted when not needed anymore.
The Library as a top-level collection is complemented by the Darkroom where the development and enlargement are captured, and this collection is described in connection with the corresponding processes below.
We will now briefly outline how the sub-collections of the Library are defined to allow a smooth and as automatic flow as possible.
- Not in archive contains all files that have not been rated as worth-to-use frames, negatives, slides, positives or images.
- Archive consists of all files that have been rated as worth-to-use frames, negatives, slides, positives or images.
- References consists of files used as references for development or enlargement purposes.
- Rejected are the files that have not passed the quality audit.
- Sketches are files used to try out different development and enlargement settings.
Note, as seen in the snapshot of the structure, we have introduced a numbered prefix to ensure wanted order of the collections in LR, but we exclude this fix in this document as it is only due to shortcomings in LR.
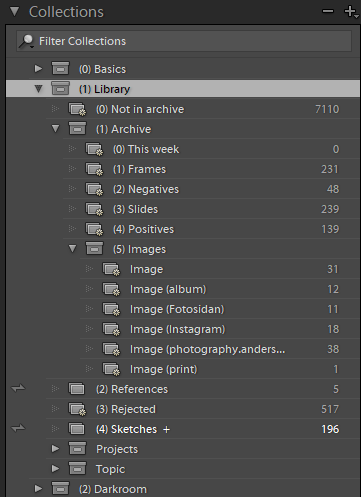
Library
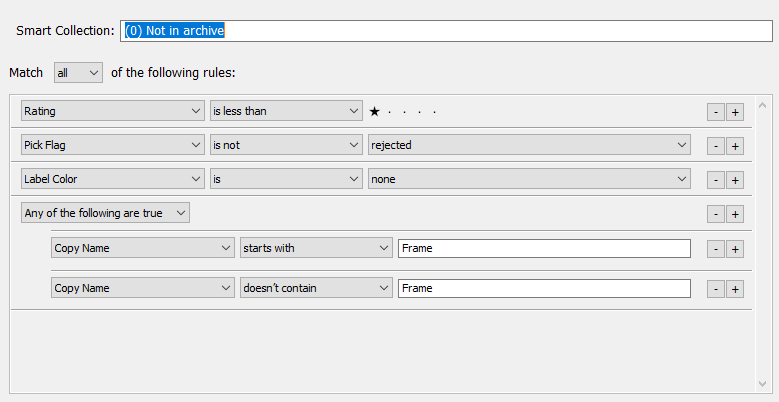
2.1.1 Not in archive
Files in the smart collection Not in archive are those that have no Rating, are not flagged as Rejected or being work in progress. The sub-rule regarding frames are only used to ensure these, as well as any other type of file. Consequently, this a collection that in the best of worlds shall be empty, or to be viewed as a fountain of unknown treasures.
Not in archive
2.1.2 Archive
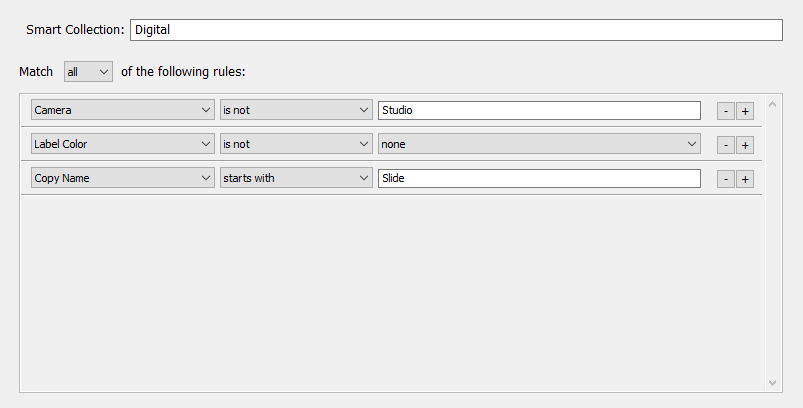
This is the main collection of files, divided per type (ie Copy Name), considered good enough to be used. The smart collection rules all follow the same setup with filtering on the location of the files and their type. Moreover, it’s required that a file has an assigned Rating and not being work in progress (ie Label Color not equal to None).
The following types of files exist in the archive: Frame, Negative, Slide, Positive, Image, Image (album), Image (Fotosidan), Image (Instagram), Image (photography.anderssoneklund.se) and Image (print). The image sub-collections cover the different channels we use for the presentation of images.
2.1.3 References
A Reference file is one we use for tuning development and enlargement processes, including different color grading profiles.
2.1.4 Rejected
This smart collection contains all files that are not considered worth saving, but which for some reason were previously saved as part of the Photos structure. In other words, on a regular basis, these are wiped from Photos in order to minimize its size and cheaper backup etc.
2.1.5 Sketches
A file we wish to evaluate using an iPad is stored as a virtual copy with Copy Name set to Sketch in this non-smart collection that is synchronized with LR CC. Thus, the desired development and enlargement can later be copied from the sketches and re-used in the basic processes. Hence, this is only a temporary collection and to be cleaned when the sketch has fulfilled its purpose.
The Photos of negatives, slides, positives and images are organized in the Library according to being in the Archive to be kept, and those being used in the Darkroom in a state as being work in progress as, for instance, Sketches or as Unevaluated ones for decision if to be archived.
3 Darkroom processes
The concept of a series of darkroom processes originates in our background of analog photography, and the steps of developing a negative and enlarge it to obtain an image as a print. This mindset is also used to describe our digital process beginning with reading a memory card or scanning a film strip to the point of printing or presenting an image on the Internet.
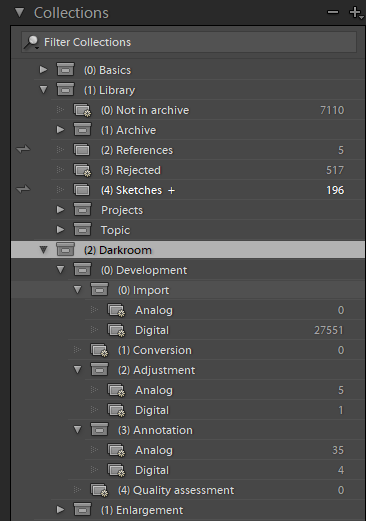
3.1 Darkroom collection
The darkroom process is supported by a collection called Darkroom which manages the files used in the steps from importing a raw file to produced image that is printed or presented on the Internet.
The Darkroom is divided into the Development and Enlargement collections, where the first has sub-collections for the Import, Conversion, Adjustment, Annotation, and Quality Assessment steps for analog and digital files. Hence, in each collection we find the files we either need to begin with, we’re working on or are ready for the next step.
Each of the sub-collections is described as part of the corresponding steps.
Darkroom
3.2 Development
As described in the introduction, the development begins with slides and negatives to be imported, possibly converted from a negative to a positive, to be corrected to care for technical shortcomings of cameras, lenses, and scanner and to be annotated with relevant metadata and rated if it’s worth to be saved for future use.
For a more streamlined presentation, the annotations are presented in relation to their corresponding actions like conversions, corrections etc.
3.2.1 Import of negatives, slides and frames
The development begins with an import of raw files, that is, the sensor readings that are stored by a camera, scanner, mobile etc on memory cards or net drives. When a raw file is imported to LR, a number of steps will be applied. Above all, it is worth noting that even the mandatory use of the ACR application adds a tone curve and color corrections, called the Digital Camera Profile (DCP), given the information available about the camera or scanner. Moreover, we may also want to apply additional corrections for different types of technology artifacts of the used camera lens etc. In other words, all photos seen in LR and PS. have undergone some form of processing even when they only been “added” to be managed by LR. These manipulations can sometimes distort the raw file in an undesirable manner, hence we want to keep track of all changes and to make sure that the negatives and slides are, as far as possible, true to their subject and used gear.
During 2018, Adobe introduced the concept of profiles as global scale color maps set in the Development/Basics module as a Profile. By this, all types of color corrections and adjustments can be seen as profiles and we may talk about correction, emulation, creative profiles. However, lens corrections, noise reductions, sharpening etc are not profiles, since they change the geometry and not only the colors.
As of the February 2020 release of Lightroom, it is possible as part of the Preset settings in Preferences to decide the profiles be the default ones to use when importing raw files from cameras or when clicking the Reset button in the Development module. To ensure maximal freedom in our process, the actual import settings are captured in import presets and the preference presets only to be used in the case of a need to reset settings of an already imported negative or slide.
However, at least in the case of the Leica M Monochrom, the settings in the snapshot actually results, for unknown reasons, in disabling the default Adobe Monochrome preset for being applied. Hence, for time being, we will not make use of the ability with import default presets.
By the 2018 and 2020 improvements, there are several ways to achieve a wanted look already as part of the import process. However, it’s important to note that both of these sets of improvements take place on top of any existing DCP, so to achieve an expected outcome we need to begin by ensuring this profile is the wanted one.
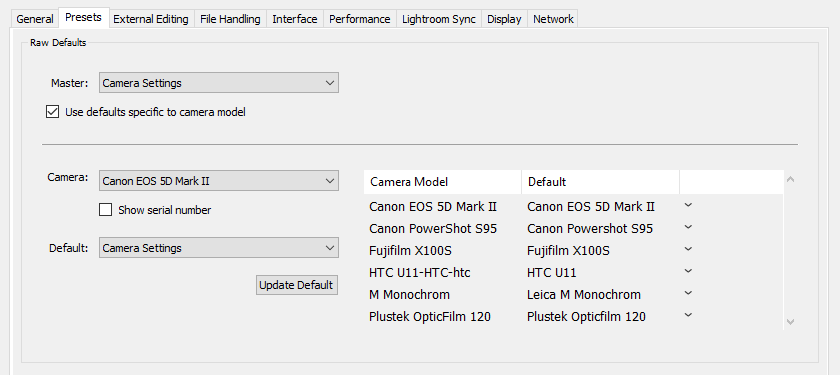
Default camera profiles
Depending on the degree of processing taking place during the import, the negative or slide will deviate more or less from the raw file. In cases where only metadata has changed and each pixel in the outcome has the same value as the one in the input, also called an application of a linear profile, we will consider the raw file to be imported as negatives or slides, and Copy Name set to Negative or Slide depending on its original being archived in the corresponding collections.
To achieve a linear profile as part of the import there are two options by either using a linear DCP or a non-DCP profile which “inverts” the out-of-the-box DCP. We call the process using profiles to achieve a linear mapping between raw and imported pixel values a linearization. As will be seen for the Leica M Monochrom, the first option is only available in the case of the existence of a specific DCP profile and for this camera, the second option has to be the linearization choice. But, when there is an available DCP, we will use a linear one as the starting point.
However, it’s more tricky how to address the question if, for instance, lens corrections are to lead to a degree of manipulation which should result in the file being tagged as a positive. We have decided that lens corrections and other adjustments that try to mitigate technology shortcomings are to be allowed as part of the import, hence still result in imported negatives and slides. For digital raw files, this implies that applying Lens Corrections and profiles that result in the outcome to equal the input are allowed. In the case of analog raw files, we allow lens corrections and profiles that attempt to care for scanner shortcomings. Each of these paths of import will be described in detail per camera below.
We also want to keep track of the frames underlying the negatives and analog slides, even though they are not editable in LR or PS, and those are imported as Frame using a strict linear profile without any further annotations to the corresponding archive.
After import, the negatives and slides are found in the sub-collection Import in the Darkroom and if one is considered to be of approved quality, its Label Color is to be changed from the default To Do to Good to Use. If more work is required, the negative or slide will keep Label Color set to To Do, or Ongoing if work is in progress.
As seen by the snapshots for the definitions of the collections of digital and analog imports, in the latter case the “camera” used for scans is called Studio, and in the former the imports only consist of slides. We will in the following sections describe the import steps for our different cameras in more detail.
Raw files are imported, using linearization and lens corrections, as Negatives and Slides to be rated and potentially placed in an Archive for future use. Frames are imported for bookkeeping to a its own archive.
Import – Digital

Import – Analog
After approved import, that is, Label Color set to Good to Use, a slide is annotated with keywords for equipment (Gear), location for image (Location) and if it contains known or other interesting people (People). Finally, its quality is graded with Rating and Label Color set to None, and the file is automatically moved to the collection Archive (slide) in the library containing the slides that are ready for development. In the case of a negative, this annotation takes place after it has been converted to a positive since it is difficult to judge the negative, and an approved outcome will be placed in the collection Archive (negative).
When a “roll” of slides or negatives have been imported they can easily be studied using the Print module preset called Contact Sheet. The aim of the contact sheet is, as for traditional analog photography, to provide an overview of the shots and be baseline for coming efforts.
3.2.1.1 Leica M Monochrom
Raw files from Leica M Monochrom lacks a DCP in ACR, so they will by default be imported using the Adobe Monochrome profile in Adobe Process Version 5 (PV5) which largely resembles the Ilford Delta 100 film according to our analysis (see below on verification of profile) and work by Erwin Putz (details) where he demonstrated that Adobe Process Version 2012 (PV3) resulted in this look. Hence, a linearization of a raw file can in this case be obtained by “subtracting” the film profile from the default Adobe profile. We call this type of linearization a normalization with respect to a film profile.
As part of the import, the raw file is normalized with respect to the Affinity reference image (see below on normalization of raw files), that is, the tone curve for this film is subtracted from the imported result using its LUT. Hence, the normalization will allow direct comparisons of the application of different film emulations from the Affinity library. That is, applying an Ilford Delta 100 (Affinity) film emulation to the slide will, more or less, equal the outcome of importing a raw file with the default Adobe Monochrome settings. Hence, the imported slide aims to mimic a linear profile if such had been available for the camera, and at the same time allow smooth applications of different film looks.
Memory card
Raw files are imported from a memory card with the LR preset Digital – [1] Import – Leica M Monochrom (see snapshot):
- Only Standard and no Smart Previews are created.
- No import is made of suspicious copies.
- Imported raw files are not added to any specific collection, but will be found in the collection Darkroom/Development/Import/Digital for further work.
- Imported raw files are named using the Template called Basic Filename (Leica M Monochrom) (see snapshot) according to a basic naming principle based on shot date, camera model and an index.
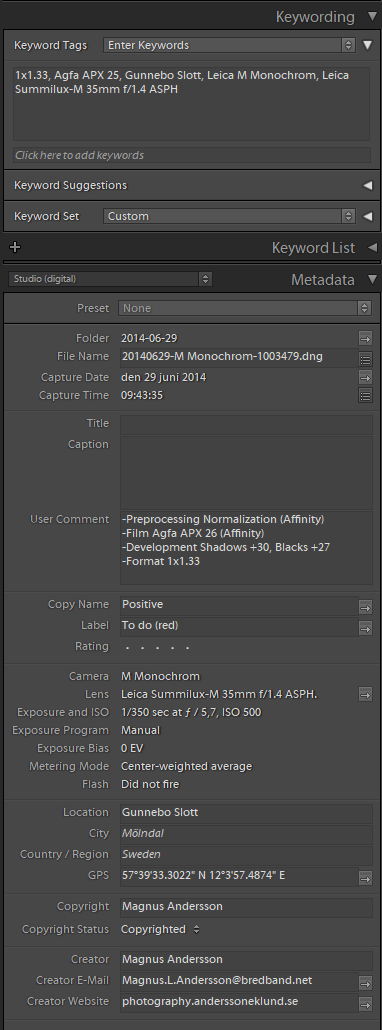
- Imported raw files are automatically annotated using the Metadata Preset called Digital – [1] Import – Leica M Monochrom (see snapshot) which adds basic IPTC Copyright and Creator information, and the tag -Preprocessing Normalization (Affinity) in Camera Info/User Comment to indicate that the the raw file is normalized.
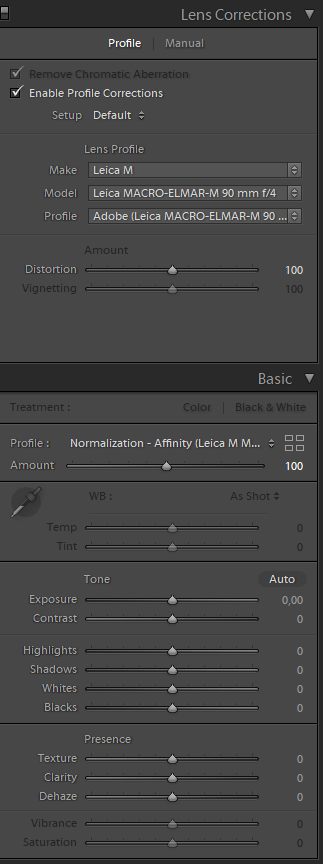
- Upon import, the Development Preset named Import/Leica M Monochrom (see snapshot; for details, see below on the development process and the appendix on emulation principles) is applied to normalize the input using the Affinity LUTs, thereby also better care for film emulations. The preset also applies a Lens Correction to the imported file.
- Since only normalization and lens correction take place in (6), Copy Name is set to Slide and Label Color to To Do.
- The keyword “Leica M Monochrom” is added when importing.
- The file is copied to Photos, and saved in a folder corresponding to the shooting date.
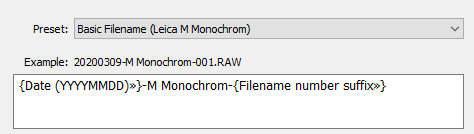
Filename – Leica M Monochrom
![Digital - [1] Import - Leica M Monochrom](http://photography.media.anderssoneklund.se/2020/03/Digital-1-Import-Leica-M-Monochrom-1.png)
Import preset – Leica M Monochrom
![Digital - [1] Import - Leica M Monochrom (Metadata)](http://photography.media.anderssoneklund.se/2020/03/Digital-1-Import-Leica-M-Monochrom-Metadata.png)
Metadata – Leica M Monochrom
Development Preset – Leica M Monochrom
3.2.1.2 Other digital cameras
Other cameras like the Fujifilm X100S and Canon EOS 5D Mark II follow the same procedure as in the case with Leica M Monochrom, but with presets to add camera-specific information.
Since it’s not possible to normalize the imported files with respect to a given film profile, a linear DCP (for details, see the appendix on emulation principles) is applied in addition to lens corrections.
3.2.1.3 Analog cameras
When scanning film strips as frames we obtain 64-bit raw (DNG) files, called HDRi files in SilverFast terminology, including infrared data on dust and scratches. However, even though LR is able to import these files it’s not possible to edit them, hence we need to import both the frames for archiving purposes and stripped 48-bit instances, called HDR files in SilverFast terminology, without the infrared data. The latter ones will be the files corresponding to the ones we get from digital cameras in the case of slides, but when it comes to “negatives” they look as weird as their physical counterparts. Hence, for those, they don’t become useful until they have been converted to positives looking like reversal film strips.
An obvious question is why we don’t rely on SilverFast HDR Studio 8 to do all the heavy-lifting and convert the “negatives” into “positives” before LR import. The main reason is that we want to streamline the process with LR as the main engine and to try to only use non-destructive operations allowing experimentation and traceability as far as possible. Moreover, the SilverFast solutions are known to be tricky to work with and to us often seen as a roadblock to get rid off.
The first step in the import process is to add the frames to a collection Analogs (E:/Photography/Analogs) in LR which resides on a different drive than Photos. This is due to the fact that the SilverFast processing gains by using faster drives instead of the NAS harboring the rest of all negatives, slides, positives, and images. For this, we use the most basic LR import preset Analog – [1] Import – Frame which only adds the frames to the Analogs and sets the Copy Name to Frame. The reason for importing them is to associate them with their raw files and all downstream processing and keep a trace from frame to negative, and they will be found in the smart collection Library/Archive/Frames.
The second import step is to use the Analog – [2] Import – Negative (see snapshot) and Analog – [2] Import – Slide presets to import the 48-bit raw files either looking like traditional “negatives” or “positives” (aka slides). In the case of “positives”, we make use of only the color correction and calibration available in the SilverFast HDR 8 Suite when generating the raw files. The preset adds similar IPTC Copyright and Creator metadata as for digital raw files, sets the Color Label to To Do and the Copy label to Slide or Negative. The basic keywords on used camera, lens and film are provided by HDR 8 Suite, but we also need to add metadata for the used Camera Model and Lens Model and to add relevant information on Film Stock and Film ISO and any other useful data (cf snapshot of negative metadata below).
![Analog - [2] Import - Negative](http://photography.media.anderssoneklund.se/2020/03/Analog-2-Import-Negative.png)
Metadata – Negative
3.2.2 Conversions, corrections, adjustments etc to positives
When a negative or slide has been imported, the next step consists of a number of different actions to turn it into a positive that is “true” to the used gear and subject:
- Conversion is a task we need to do to turn negatives into positives that look like slides to allow us to judge the outcome and use in enlargements, cf the creation of contact sheets in traditional analog photography.
- Corrections are tasks we carry out to care for the technical shortcoming of the used camera, lens or scanner, which were not already applied during the import of the negatives and slides.
- Adjustments such as sharpening (Detail/Sharpening), noise reduction (Detail/Noise Reduction) and cleaning (Spot Removal) to remove scratches and dust that are not of a creative nature and to normalize the input to allow consistent downstream processing (if not already done during the import).
- Features of (desired) camera, lens, filter, and film using color grading by tone curves and profiles.
- Development parameters that affect exposure (Basic/Tone) and contrast (Tone Curve/Point Curve) on top of the above.
- Format by cropping (Crop) to mimic any film strip ratios and/or handle poor initial cropping in the camera.
Clearly, many tasks can be carried out to develop negatives and slides into positives, but it’s important to emphasize that we want to keep them to a minimum and only produce a “contact sheet” to be used as a starting point for the creative enlargement process.
Hence, the corrections and adjustments aim at managing shortcomings of the used equipment, and to potentially normalize the input with respect to a given reference image. This can be compared to the 4th more creative step which tries to mimic features of a certain camera, lens, filter and film in analog photography, and the 5th one which mimics the analog development solutions and timings to achieve certain aspects like “pushing” and “pulling”.
In some cases, we choose to apply certain corrections, adjustments and features already at import, for example, to mitigate unwanted ACR properties that are introduced as part of the standard import procedure. For Leica M Monochrom, we choose to subtract the profile of the film Ilford Delta 100 and for the Fuji X100S a linear profile, and utilize established corrections for the used camera and lens, thereby trying to mitigate gear and import shortcomings. Hence, in those cases, the import of a raw file ends up as a slide, but if we also had decided to directly apply a certain film emulation then we would have ended up with a positive.
However, all of these steps, and the ones to be described below, are useless if you don’t have a properly calibrated monitor. This will not lead to that anyone watching an image on an iPad will see the same things as you, but at it will at least make it possible for you to know how it would look like in the case of it being viewed on a calibrated device. We use an Eizo CG275W (not for sale anymore) monitor that is calibrated with respect to the type of work we are doing. For instance, for all basic development and enlargement for the Internet, the settings target brightness of 100 cd/m2 with a white point of 5500 K and a Gamma of 2.2. In the case of work aiming at printing we lower the brightness to 80 cd/m2 and the temperature to 5000 K to give a more “natural” view of the future print.
The snapshot presents the metadata captured as part of the process from a raw file to a positive. For instance, we can conclude the slide was taken with a Leica M Monochrom, normalized with respect to the Affinity library, applied an Agfa APX 25 film look, tone curve adjusted and finally end up as a positive formatted to the ratio 1×1.33. Note, the redundant capture of this information in the User Comment and Keywording to allow smoother local organization of all objects and at the same time facilitate sharing of information on the Internet.
Metadata – Positive
With an archived slide, the process follows a common thread with first making a virtual copy of the slide and set its Copy Name to Positive. Its Color Label is then set to either To Do (red) or Ongoing (Yellow) and any existing Rating is deleted. If it’s a digital positive it will end up in the Darkroom/Development/Correction to Formatting/Digital collection and in the case of an analog positive it will end up in the Analog counterpart. The positives will stay in this collection until the keyword -Format is found in the User Comment field to indicate that the last step, formatting the positive, is finished.
In the case of archived negatives, setting the Copy Name to Positive leads to the positive to be found in Darkroom/Development/Conversion collection ready for the conversion step, and when converted it will be found in the Analog collection above for further processing.
When formatting of the positive is done, the it will end up in the sub-collection Annotation/Digital of the Darkroom/Development collection to indicate there are some missing information regarding the mandatory User Comment annotations -Film or -Format, missing GPS Data, or Gear or Location keywords in the case of a digital positive, or Annotation/Analog if the analog positive is also lacking User Comment regarding -Development or any data for the fields Camera Model, Lens Model, Film Stock or Film ISO. If there is no missing information the positive will be found in the Quality Assessment sub-collection to indicate that only optional Rating and setting the Color Flag to None is missing before the positive ends up in the Archive (Positive) collection, or as unarchived in the case of it was not considered worth archiving.
The development tries to care for shortcomings by conversions, corrections, adjustments, features, development parameters and formatting to generate a positive which is “true” to the used gear and subject.
3.2.2.1 Conversion of negatives
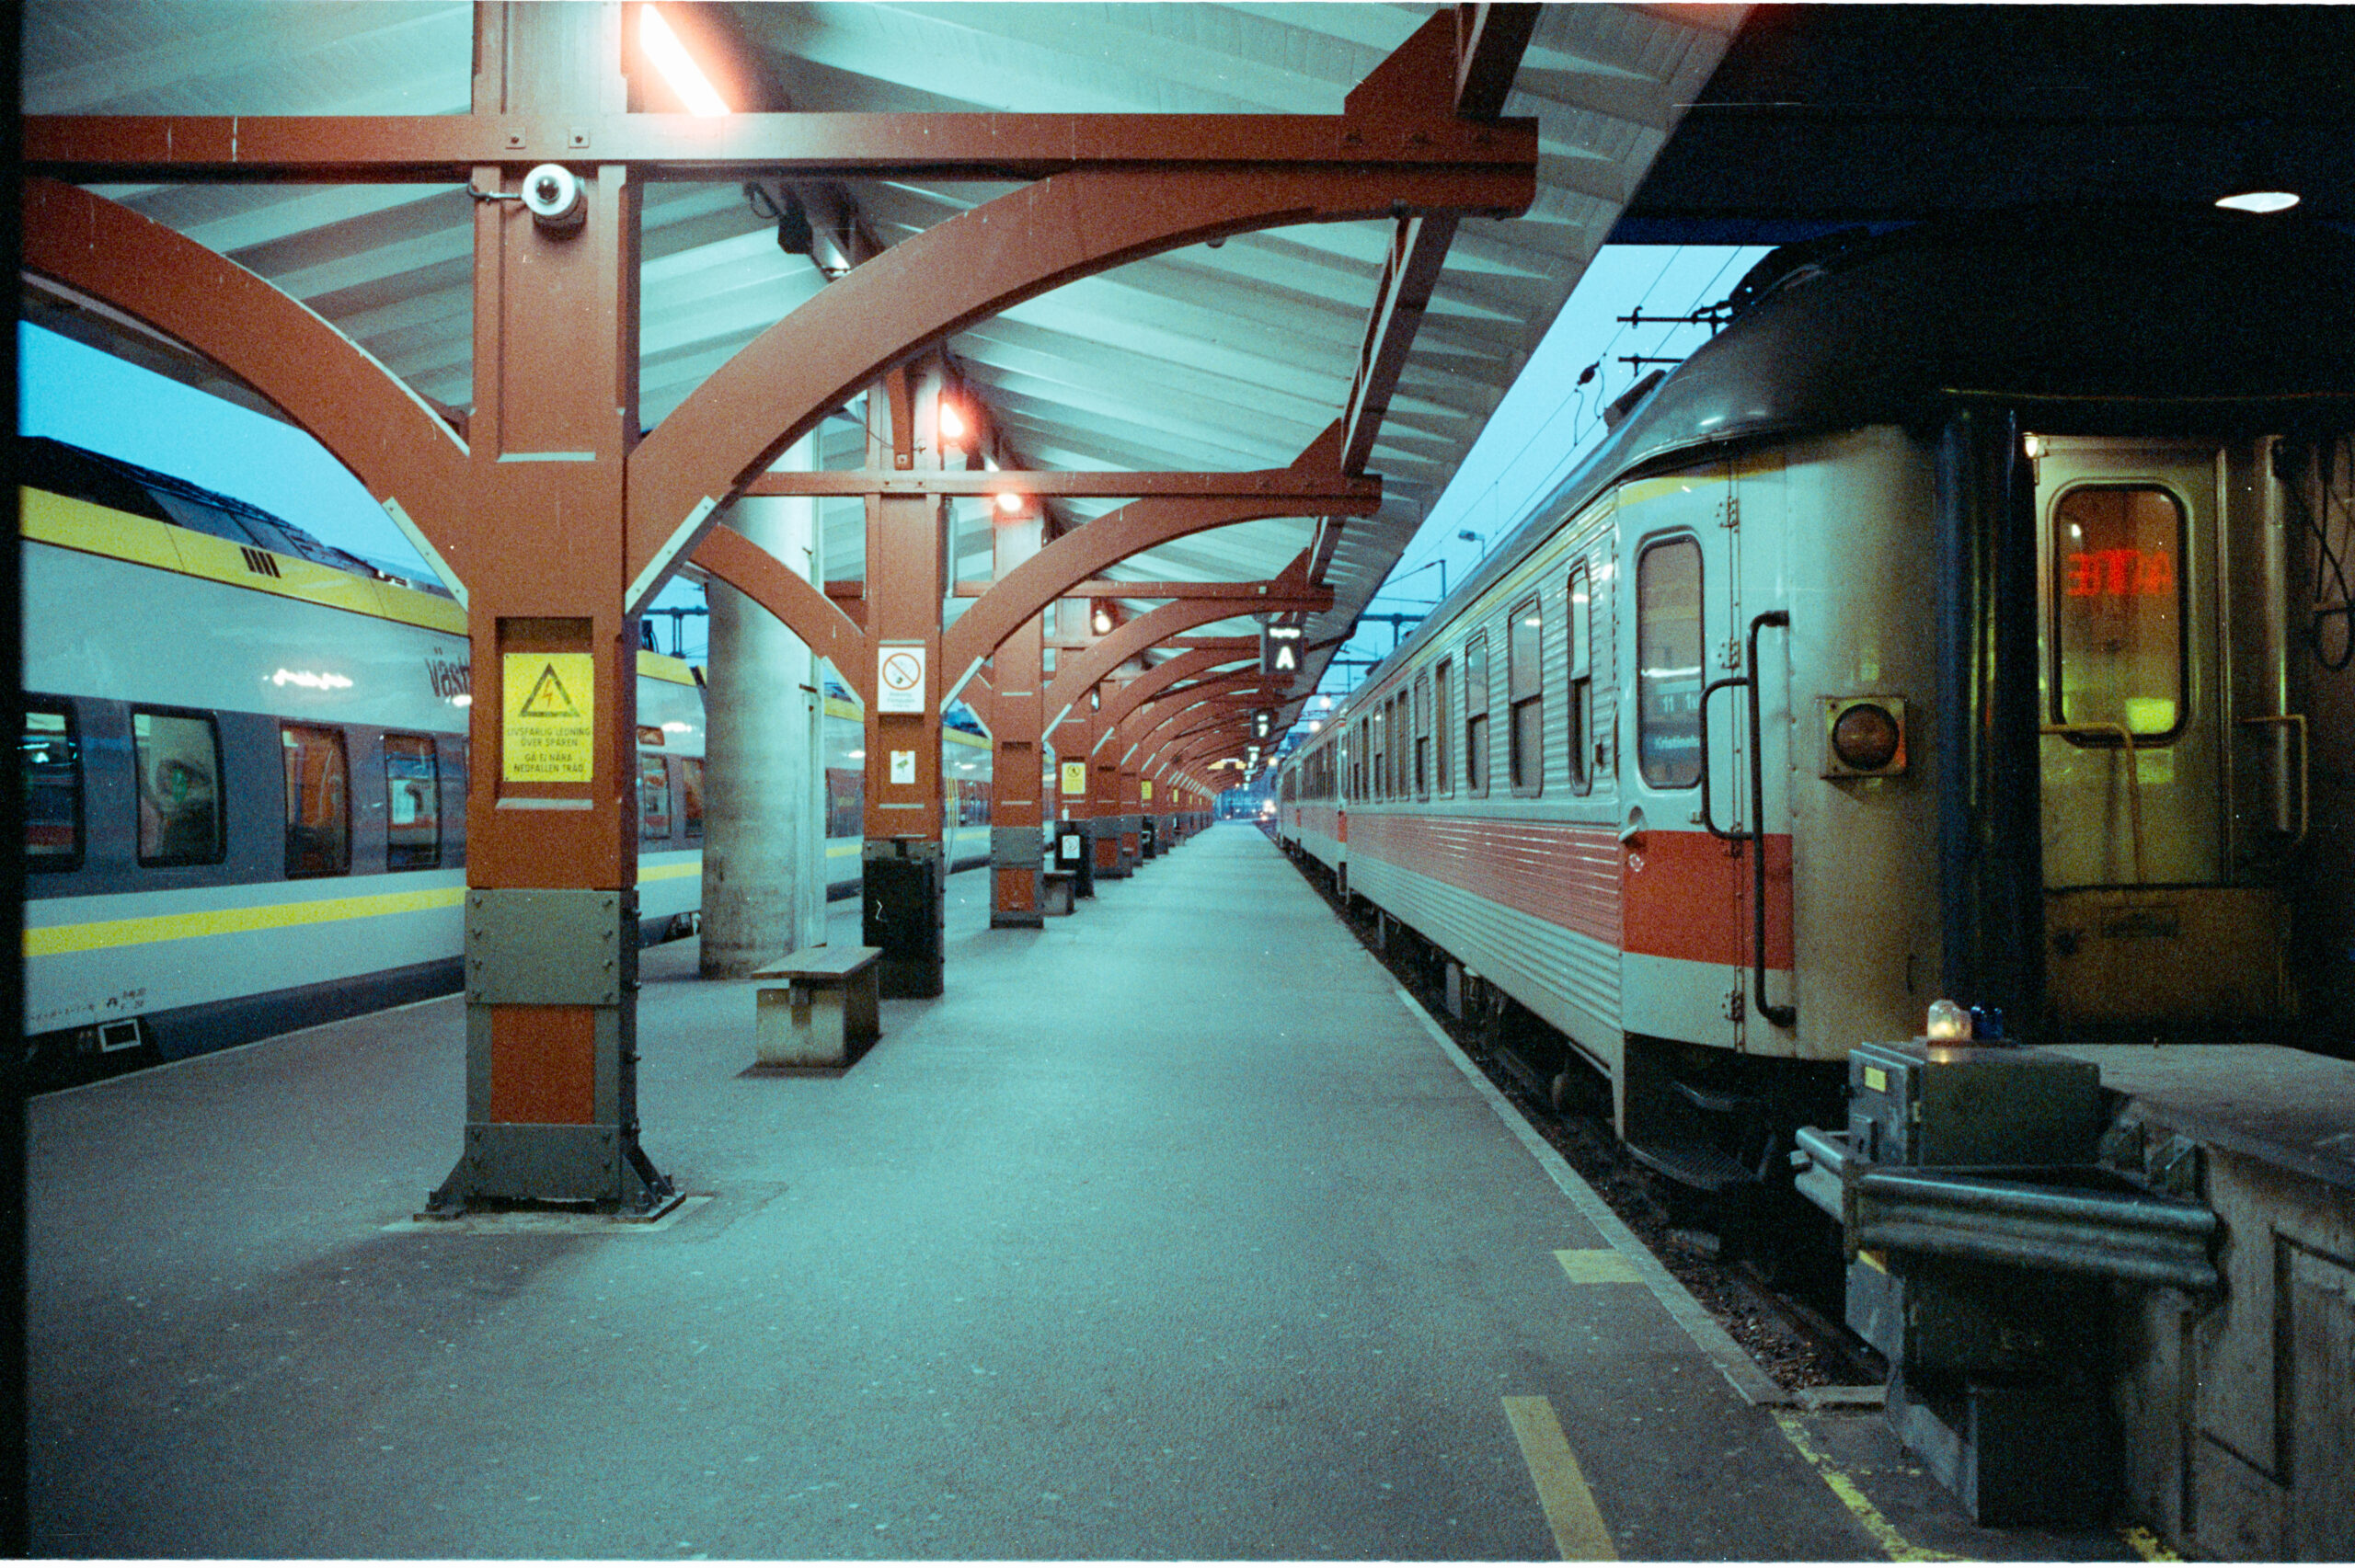
For a selected series of negatives, we begin by making a virtual copy with Copy Name set to Positive and apply the Development Preset in the Analog Studio group called Negative Lab Pro (reset) to the first one which will turn off all adjustments and corrections. Then we manually add the Lens Corrections used for the given lens. For each of the positives with visible frame borders, we use the White Balance Selector (eyedropper) to measure and adjust the White Balance. The development settings will then be synced across all originals. By this, we have made the files ready for conversion to become positives.
The NLP plug-in for LR helps convert negatives into positives, including basic color and film adjustments and to simulate different professional laboratory scanner looks like Fuji Noritsu and Fuji Frontier.
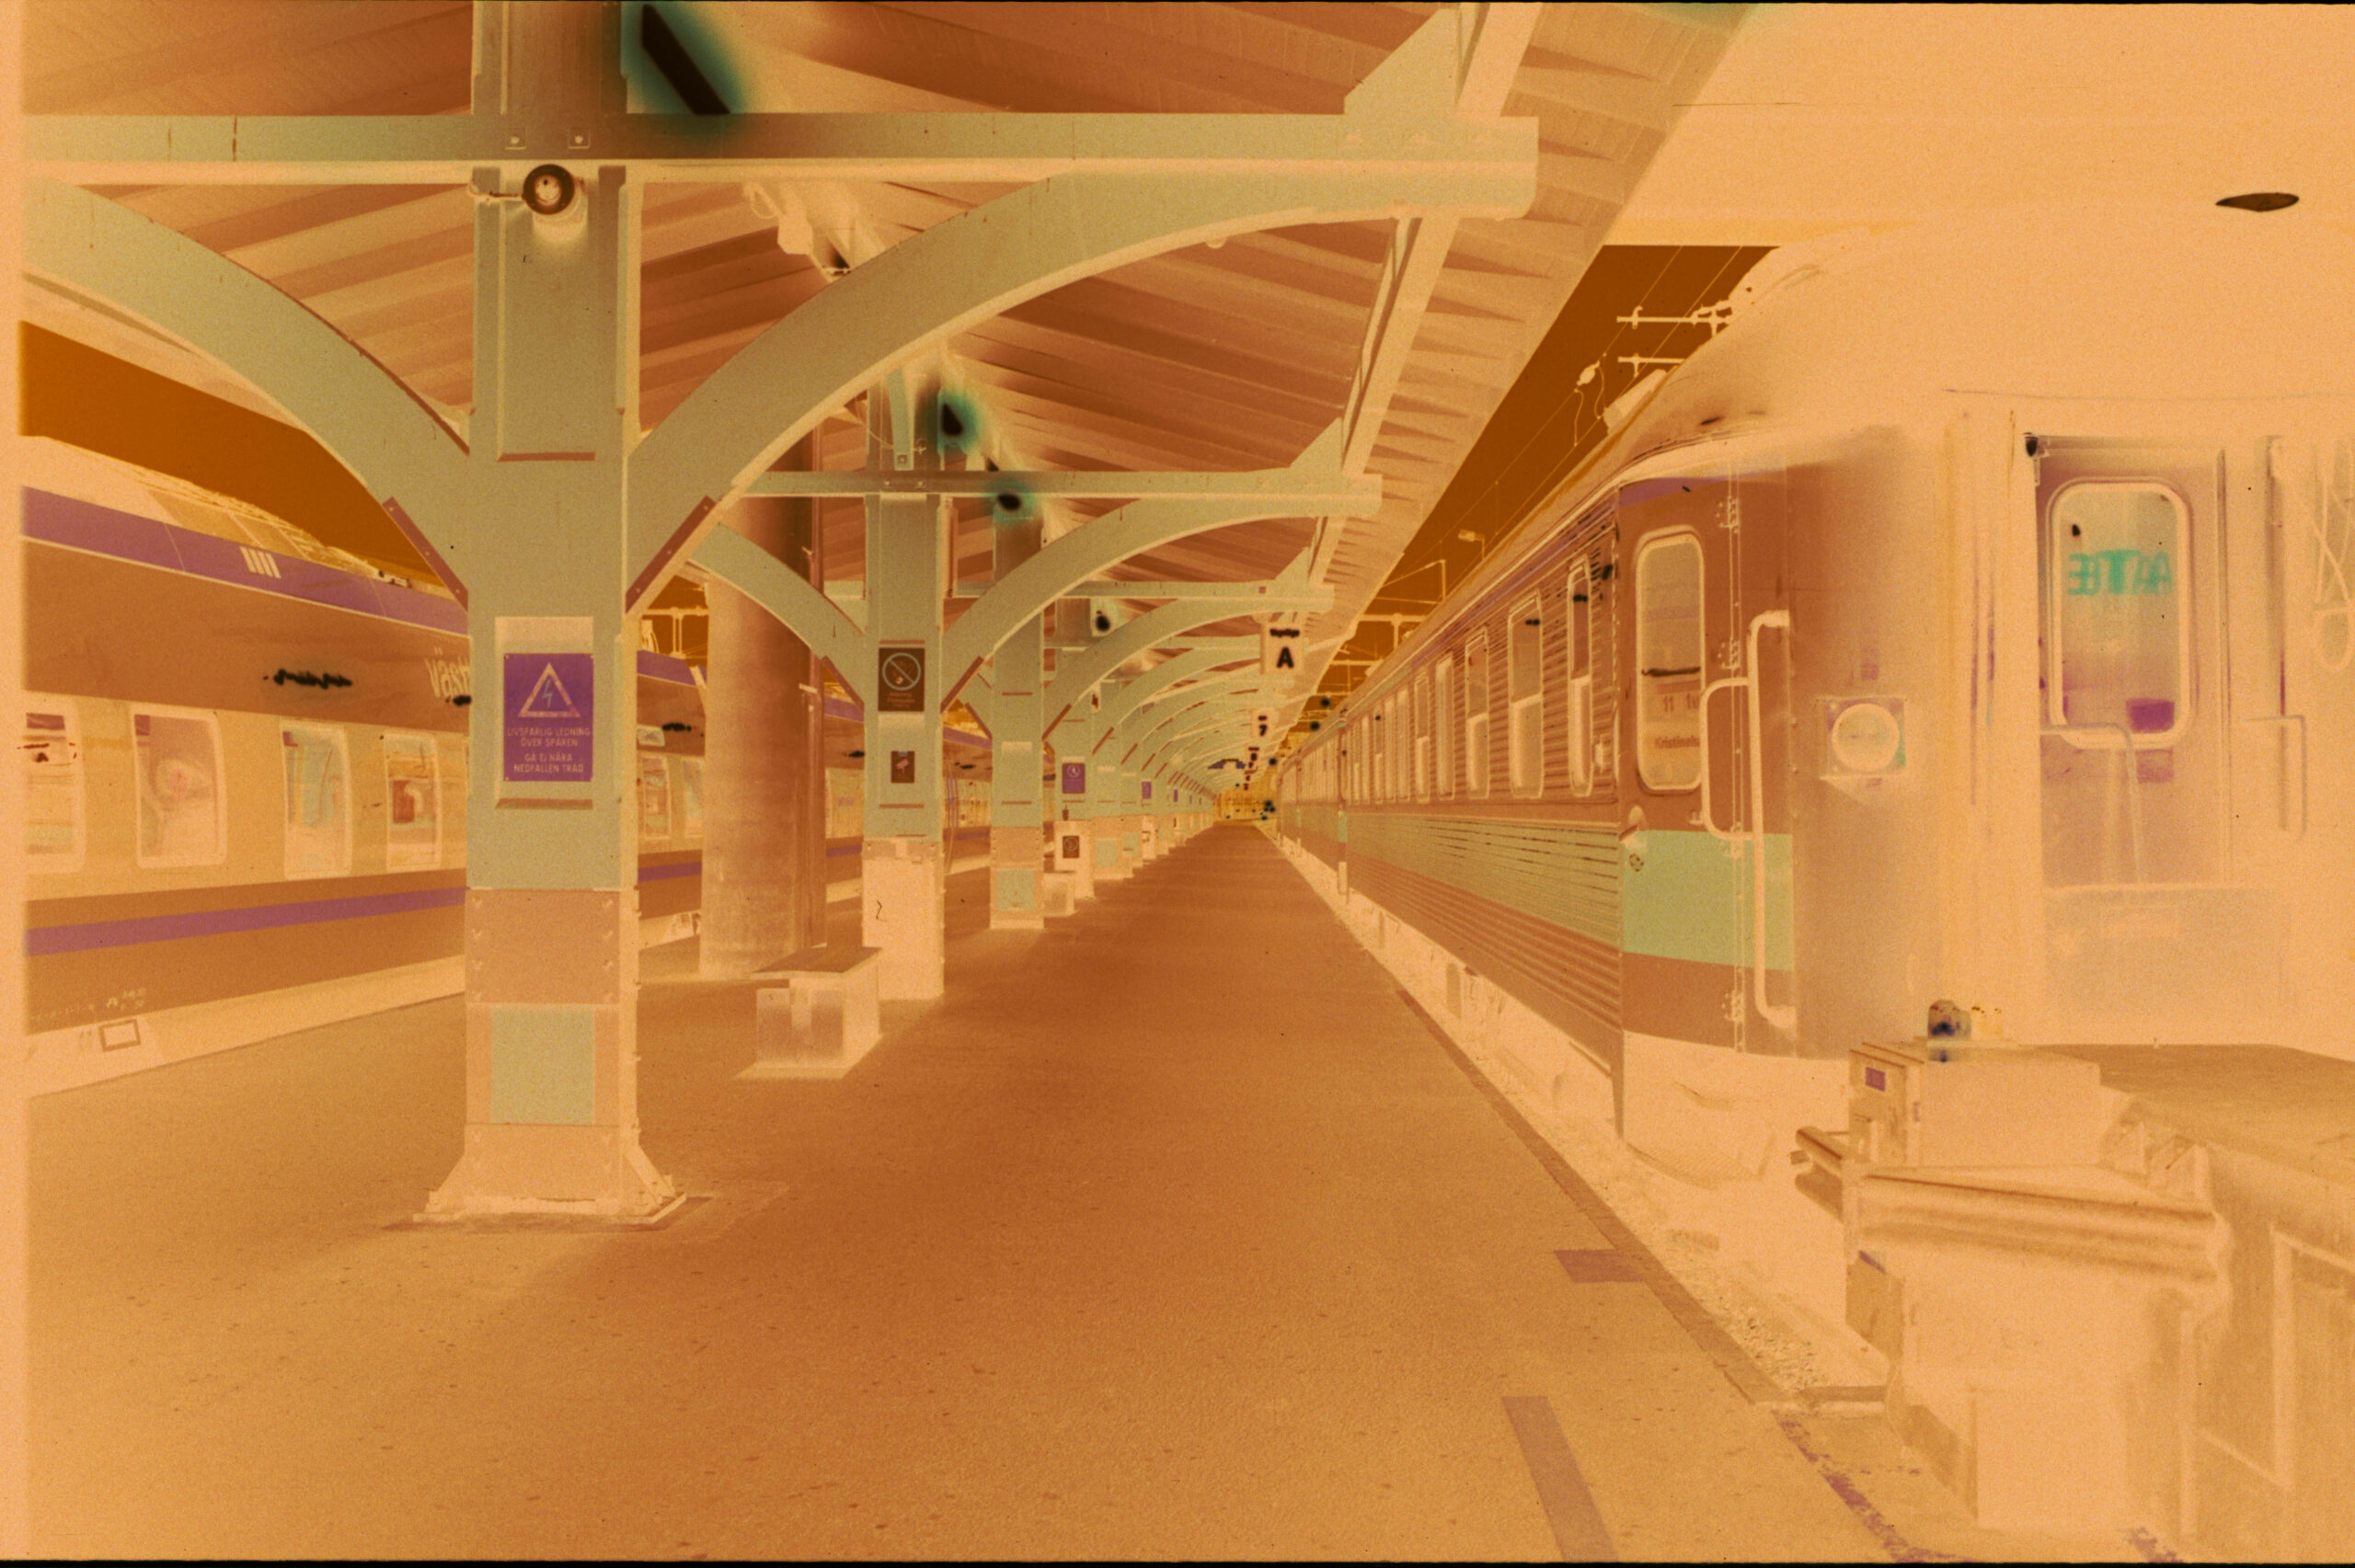
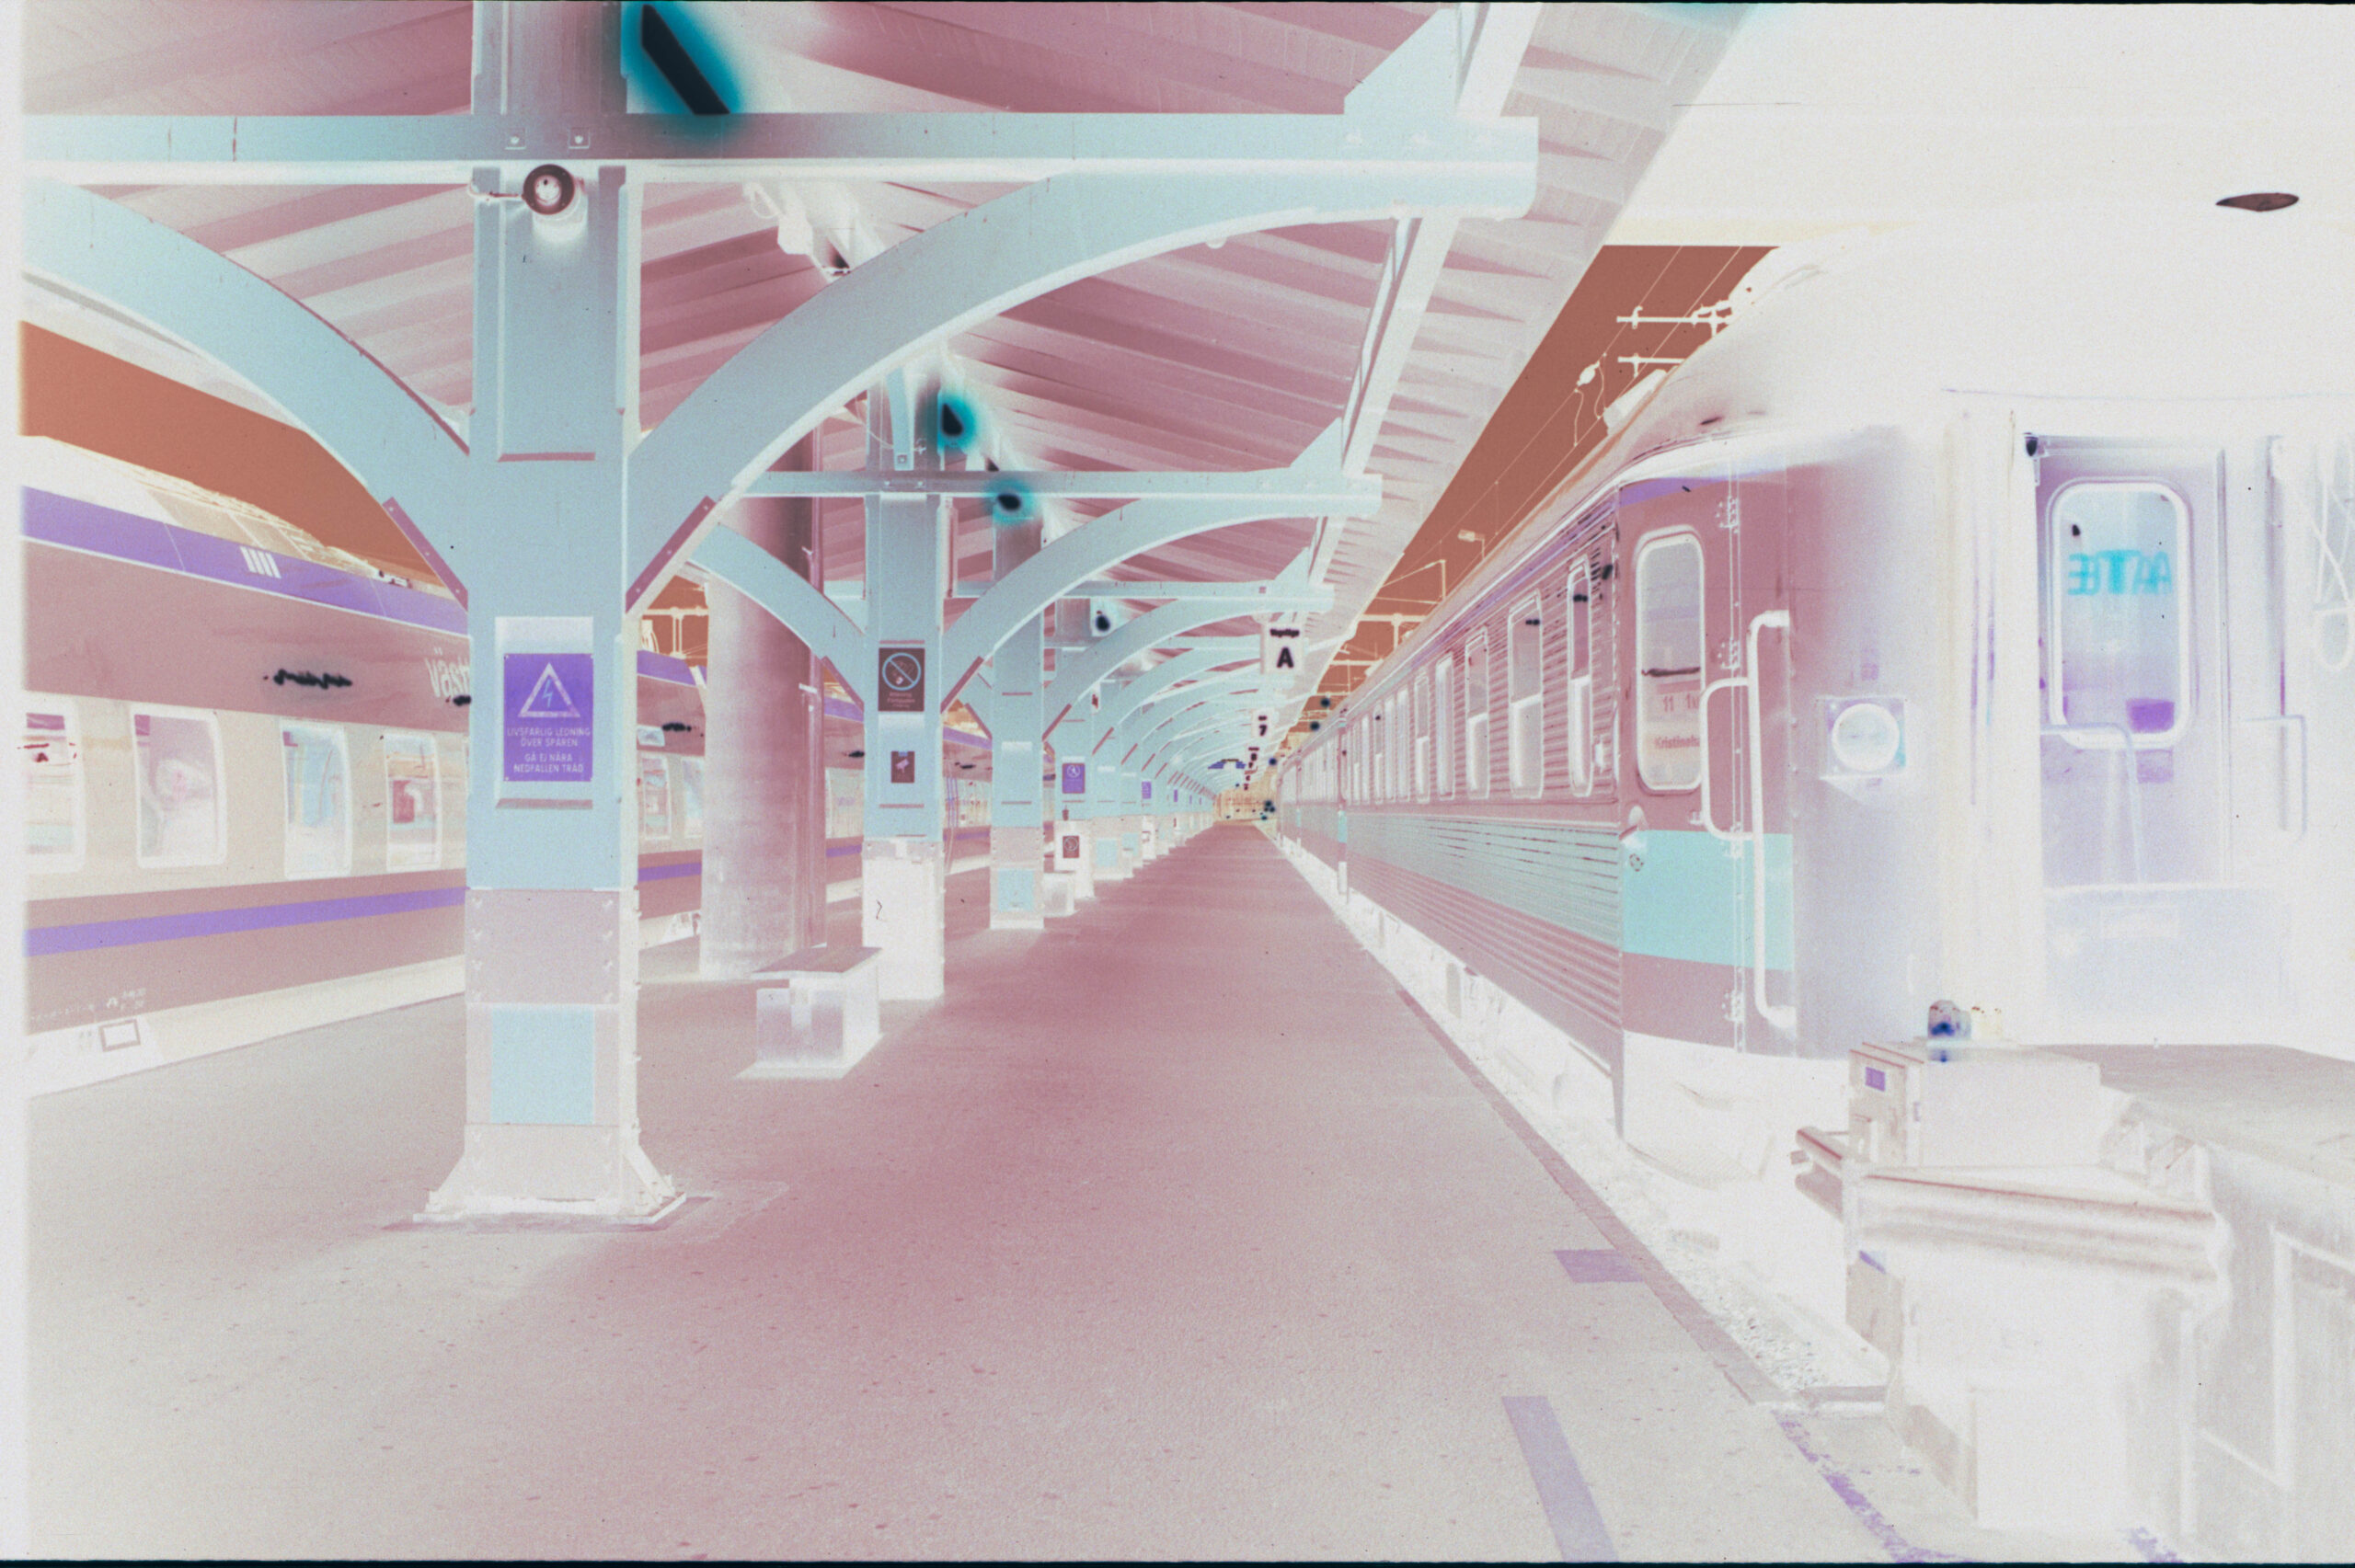
Without border WB (left) vs With border WB (right)
With a positive selected, the NLP plug-in is opened in LR (see snapshot). Depending on the value of the DNG tag named <UniqueCameraModel> in the raw file, in our case “HDR Studio”, the correct Digital Camera Profile (DCP) will be used by the plug-in and applied as a Development Profile in LR.
We have modified the DCP called SilverFast Raw by NLP to be triggered by the raw files by setting the <UniqueCameraModelRestriction> tag to “HDR Studio”. Based on this information the Source is automatically set to Vuescan/SF DNG and normally we set the ColorModel to Noritsu and Pre-Saturation to 3-Default in the plug-in. The Color Mode results in a look that resembles the Fuji Noritsu scanner with a cooler look than the Fuji Frontier (see example). An increased Pre-Saturation would result in cooler hues and more vividness and less saturation to warmer hues and less vividness. We also include a Border Buffer of 5% to ensure no frame border affects the process. When hitting the Convert button the conversion of the originals will be done automatically on a one-by-one basis and the outcome will correspond to a “digital” original.
We also add the tag -Preprocessing NLP on the format <Color Model>, <Pre-Saturation>, for instance, -Preprocessing NLP Noritsu, 3-Default to indicate the conversion mimics a Fuji Noritsu scanner with default pre-saturation, to the User Comment field.
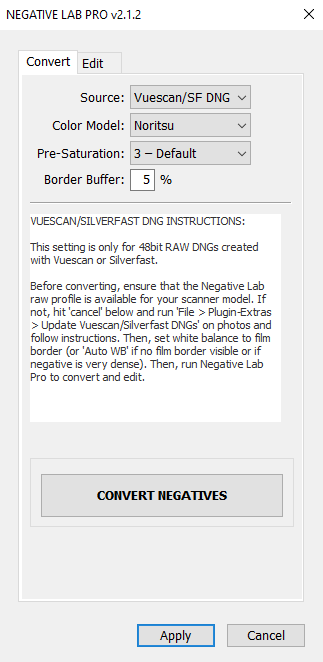
NLP Conversion

NLP Noritsu (left) vs NLP Frontier (right)
After the conversion, the NLP plug-in allows tuning of basic settings like Brightness and Contrast to adjustments of tone curves to better reflect, for instance, a Cinestill film. However, we set the Tones to Linear and all adjustments to zero, the Soft Highs and Lows are unchecked, Color is NONE, Hue and Strength are zero and Sharpen is off. In other words, the positive is kept as “neutral” as possible.
As in the case with the slides, we also need to add the metadata for the used Camera Model, Lens Model and film information (Film Stock, Film ISO) (see snapshot).
The snapshot shows that in this case the pre-processing consisted of utilizing the Noritsu Color Model, default Pre-Saturation, a linear Tone Preset and no Color Preset. Hence, our default settings for developing negatives. It’s also worth noting that the metadata is both captured in the User Comment field and as fields by the NLP solution. The former is used to ensure the information to be transferred when publishing images on the Internet, as often additional fields like these don’t tend to be transferred.
Follwing the conversion the positive is found in the Darkroom/Development/Correction to Formatting/Analog collection for further processing.
![Analog - [3] Conversion - Raw - Negative](http://photography.media.anderssoneklund.se/2020/03/Analog-3-Conversion-Raw-Negative.png)
Positive – Metadata
3.2.2.2 Corrections and adjustments of positives
Corrections and adjustments aim at mitigating technical artifacts or to normalize a slide or positive with respect to a given reference look to allow smooth downstream development. If possible, these steps are carried out with LUTs and the functionality offered in LR so they in the future may be carried out on mobile platforms like LR CC and Photoshop CC.
When dealing with positives being the output of the NLP plug-in, there is already a profile in place and trying to use many of the LR adjustments will result in weird behaviors due to the underlying imported file to be a “negative” in tones of black and orange. Hence, as much as possible of the corrections and adjustments need to take place using the plug-in adjustment features.
The most important corrections are Lens Correction and color Calibration, and these are as much as possible carried out as part of the import or conversion steps.
By default, no adjustments are made to reduce the noise or sharpening at this point, and being deferred to the steps of feature selection.
We have already in the section on import introduced the concept of slides and positives to be normalized with respect to a reference look, thereby lay a foundation for application of film emulations like the ones which can obtained free of charge via the RawTherapee Film Simulation Collection (link) in the form of over 300 Hald CLUTs for the Affinity software or commercial ones like the ones from Lutify.Me. The aim of the normalization is to adjust a slide or positive to have the same look as any reference image used in the creation of the emulations. For instance, for Leica M Monochrom it has been found that the raw file imported using the ACR profile Adobe Monochrome gives a result similar to a picture resulting from a traditional Ilford Delta 100 film strip being developed and enlarged. Hence, if we take the emulation for this look and “inverts” it and applies it to our raw file we would, in theory, end up with a look resembling the reference one of the emulations.
However, it is important to remember that these film emulations are not interesting based on what film they are trying to mimic but because they offer a variety of predetermined changes that come together under a name like the Ilford Delta 100 with well-known tone curves. Many photographers can describe the characteristics of an image taken with a particular film, so through this procedure, we can talk about “Ilford Delta 100” development and achieve an understanding of the type of changes that have been made. For instance, we often make use of the emulation Polaroid 665 Negative HC (see example) since it results in increased contrast by brightening the mid-tones, and then make any final adjustments to the shadows and highlights as part of the enlargement.
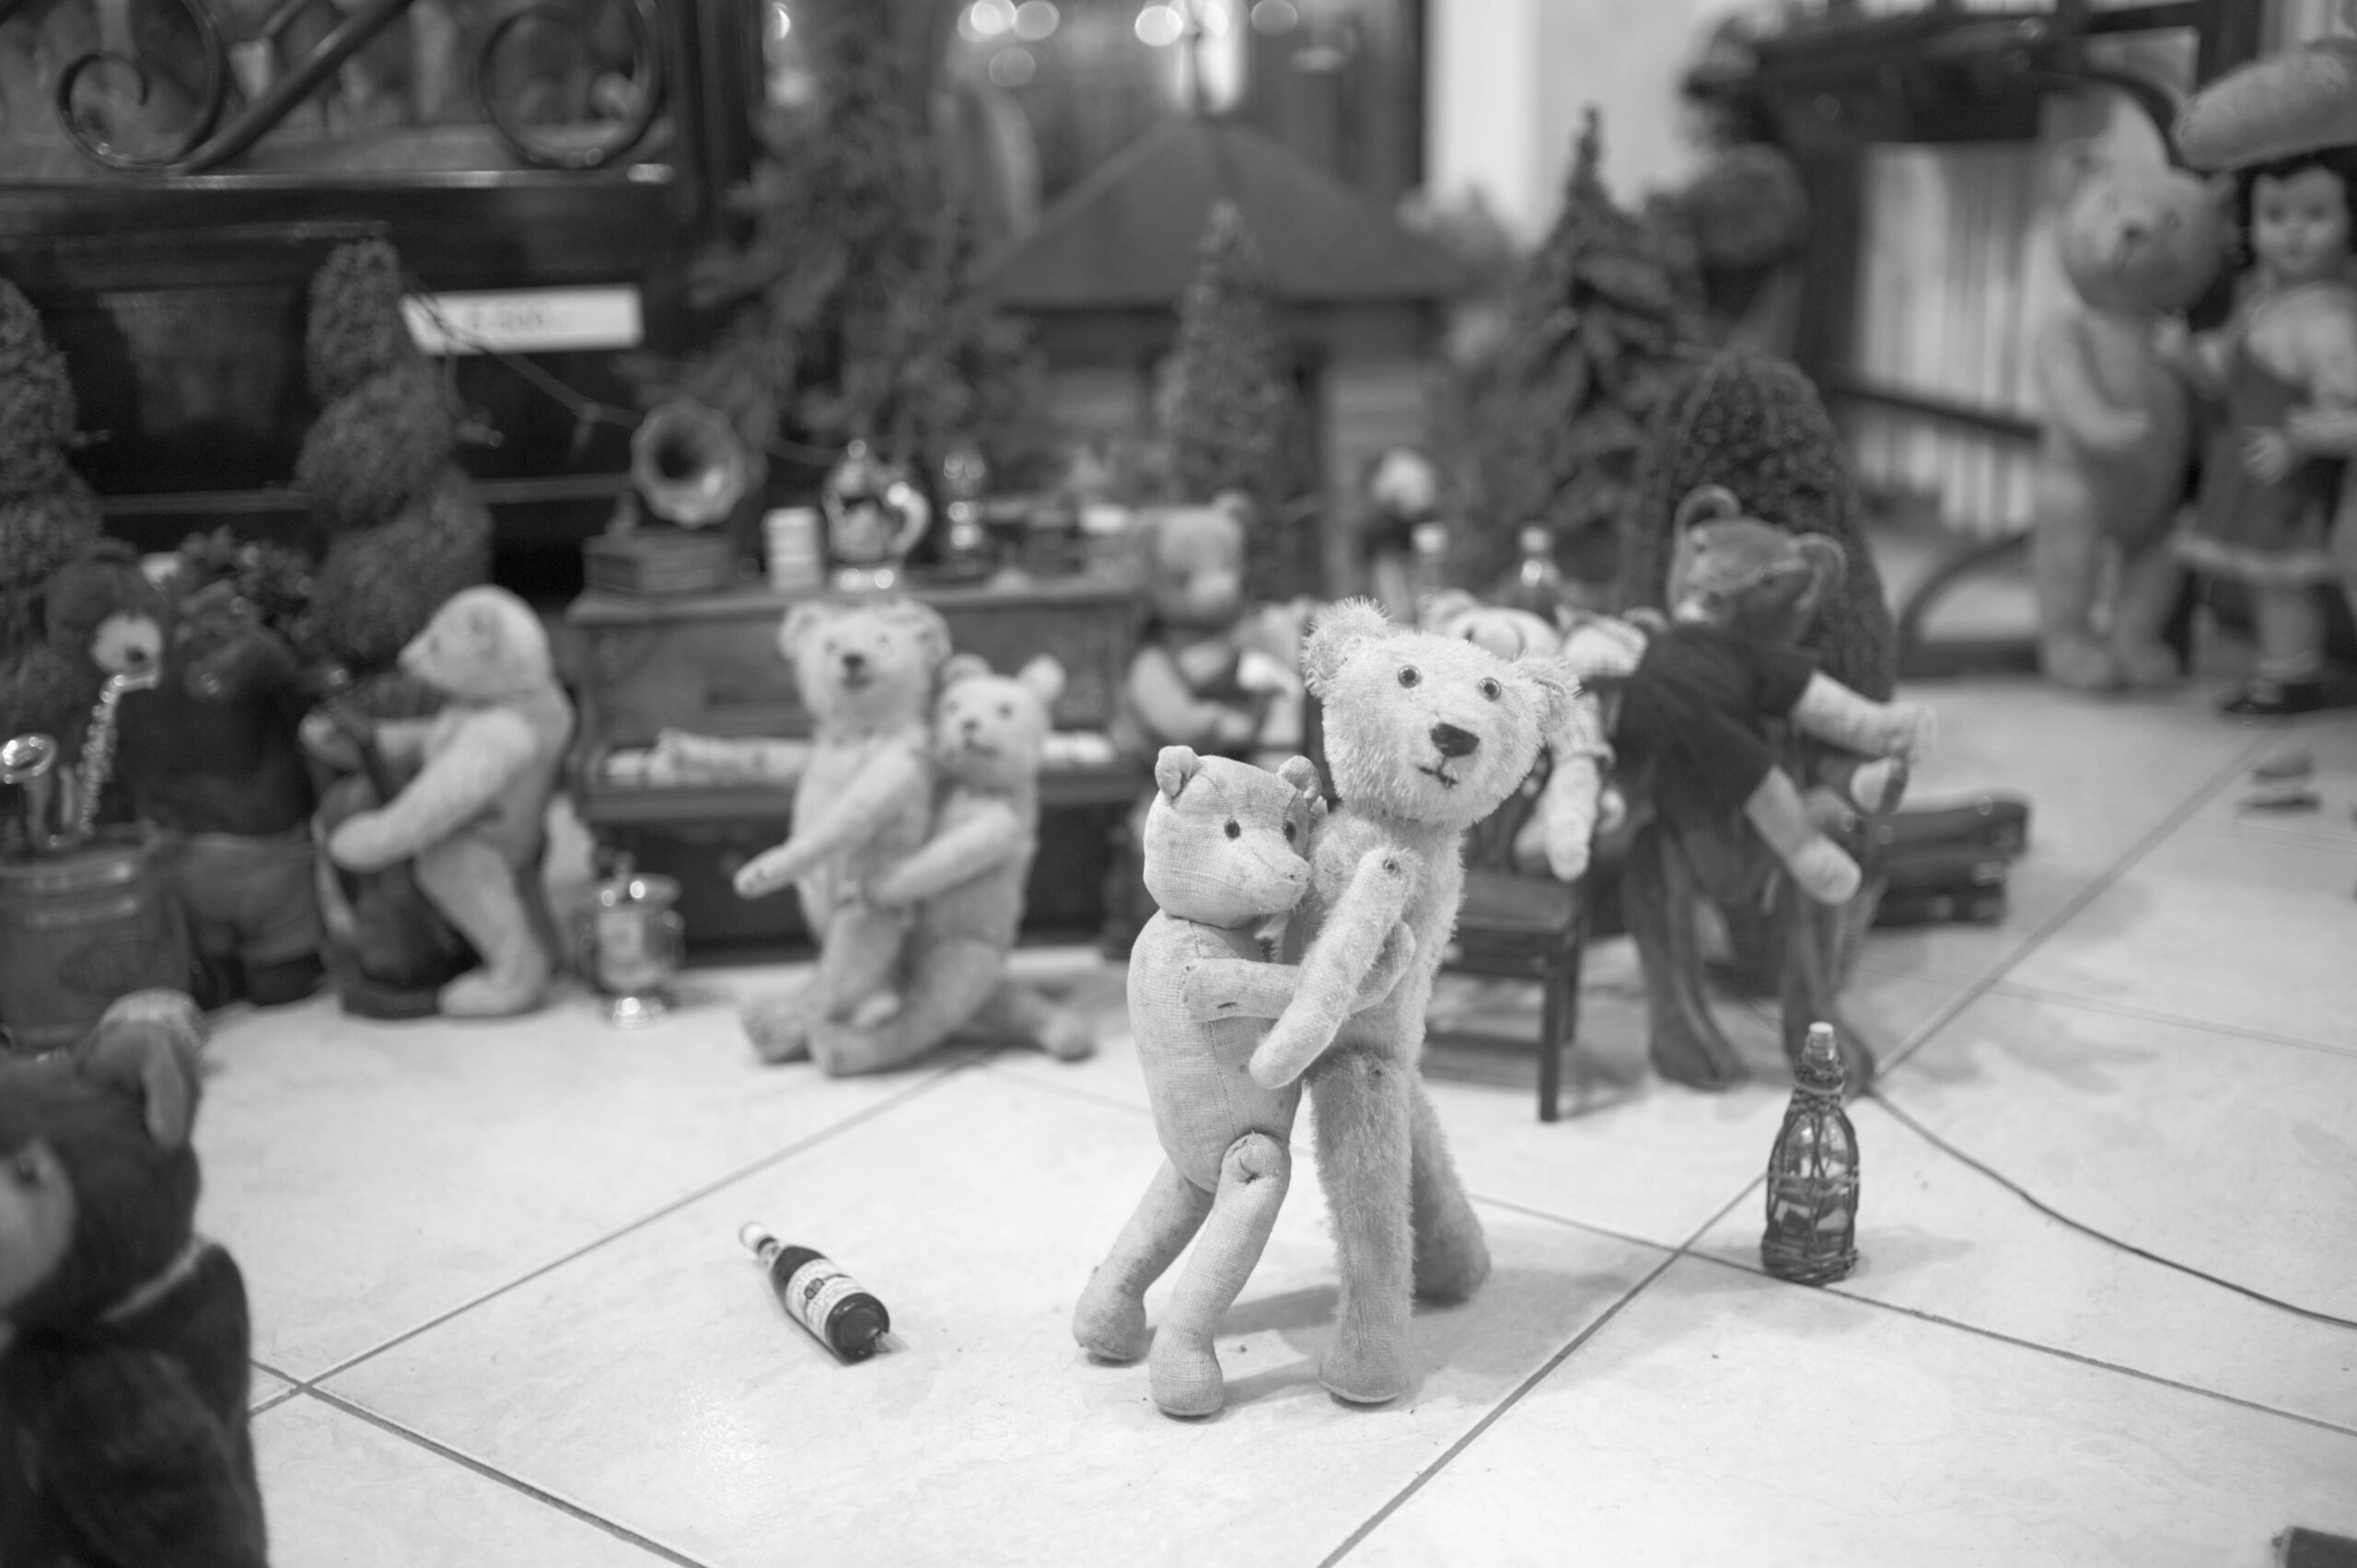
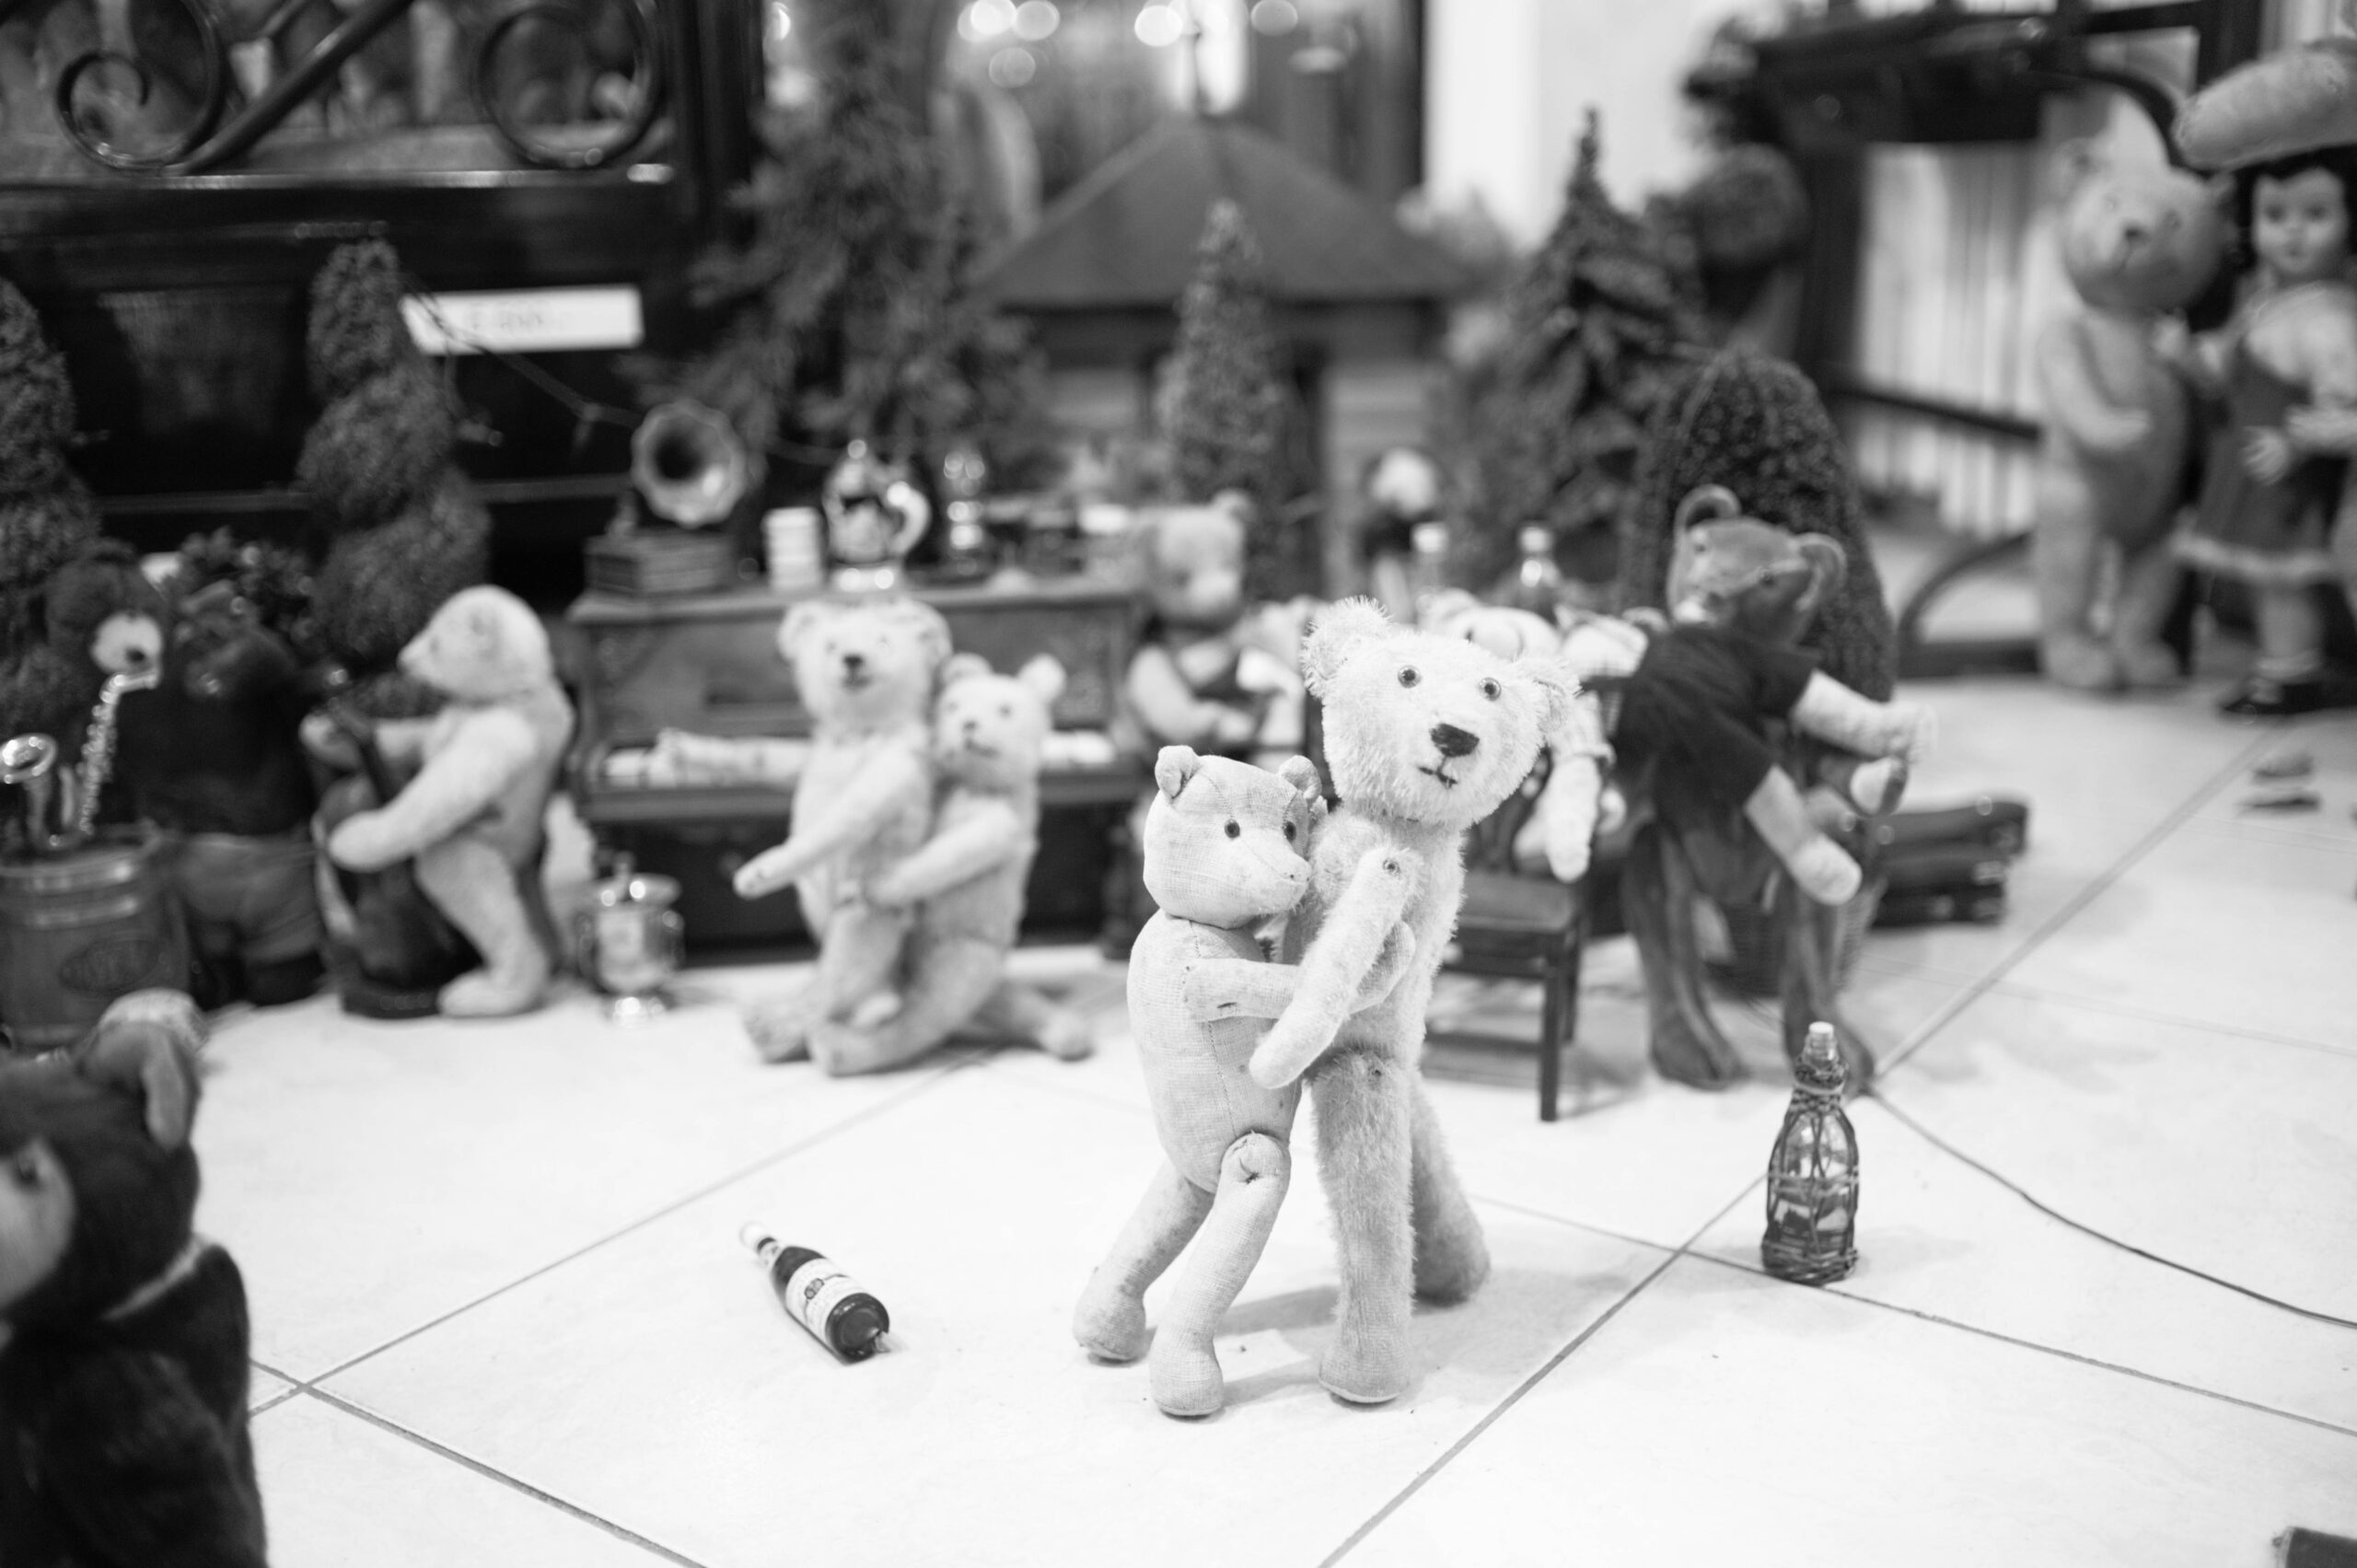
Normalized (left) vs Polaroid 665 Negative HC (right)
Unfortunately, this approach is not possible for the Fujifilm X100S and Canon EOS 5D Mark II, instead we start from a linear profile, that is, try not to affect the results via ACR. In the case of the HTC U11 there is no available camera profile and we start with the Adobe Color profile which is the standard when importing. In the case of the import of analogs, when it is a positive it can be treated in the same way as the HTC U11 since there is no available ACR profile for the Plustek Opticfilm 120 scanner.
This part of the development process begins with a positive found in the Analog or Digital sub-collection of the Darkroom/Development/Correction to Formatting collection.
The aim of applying a film emulation is not to mimic a given analog film, but to achieve an understanding of the type of tone curve changes that have been applied.
Leica M Monochrom
In this case, there are lens correction profiles for both the used camera and available lenses, as well as Adobe Process Version 5 (PV5) calibrations.
However, for Leica M Monochrom there exists no specific camera profile, thus ACR uses the Adobe Monochrome profile upon import. Its tone curve is reminiscent of the one for the Ilford Delta 100 and when we want to take advantage of the film emulations offered through Affinity, we choose to normalize the default profile using the Ilford Delta 100 (Affinity) inverse. The bottom curve in the snapshot is the tone curve for the Ilford Delta 100, hence similar to the Adobe Monochrome profile, and the upper its inverse.
As seen by the curves, the Ilford Delta 100 profile, as well as the Adobe Monochrome, slightly lowers exposure for the shadows and increases the mid-tones and highlights. Hence, the inverse does the opposite which is in line with knowing the higher risk of blowing highlights than losing shadows.
This inverse is available as a CUBE LUT by the name Normalization – Affinity (Leica M Monochrom) which is then stored as a PS Profile with the same name to be used as a preset profile in LR. For details on how to obtain and install profiles, see the appendix on emulation principles.
A Leica M Monochrom import with the Profile named Adobe Monochrome emulates the use of an Ilford Delta 100 film, hence by first applying its inverse the application of Affinity profiles will result in negatives mimicking the use of different types of films.
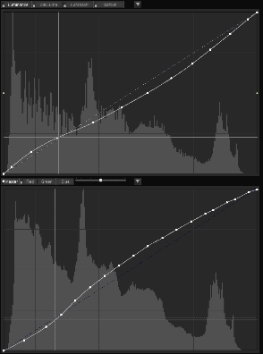
Tone Curves (Leica M Monochrom)
Other digital cameras
Sadly, it’s not possible to adjust the imports from other cameras to fit the Affinity collection of LUTs as well as in the case of the Leica M Monochrom, but in these cases, a strict linear camera profile is applied as part of the import process. For details on this, see the appendix on emulation principles.
Analogs
As discussed above, positive analogs don’t differ from digitals and can be treated as such. However, for those trying to emulate a film is not the goal using profiles. Instead, it is to mimic the different development features discussed below. Negative analogs, on the other hand, suffers from already having an assigned profile to convert negative raw files to originals, and since LR does not allow stacking of profiles mimicking development features have to treated as an enlargement step requiring PS as when, for instance, introducing grains to a digital positive.
Analogs need to be cleaned from scratches and dust and we do it using the Spot Removal brush in LR, and add the tag -Cleaned to the User Comment field.
3.2.2.3 Adding features to positives
When corrections and adjustments are done to care for technical flaws and to lay a foundation by tone curve normalizations, the next step is to apply LUTs and tone curve changes to mimic anticipated camera, lens, filters or film looks.
Two types of features that are better suited than camera and lens aspects for implementation using LUTs are emulations of different film types and filters since both are at large about how rays of light are to be captured on a medium. However, in the case of film, aspects like grains fall into the category of modifications better treated as part of the enlargement process together with topological aspects like camera and lens behaviors.
Basically, the emulation of different films and development parameters (see below) are easy to encode using the 3DLC software based on existing emulation profiles like the ones provided by Affinity or by just interpret data sheets of films in terms of tone curves and color mappings. The process of achieving this is described in the appendix on emulation principles below.
Whenever a film emulation is applied as part of the development, a note shall be added to the User Comment field stating -Film followed by the used emulation. For instance, the comments -Film Polaroid 665 Negative HC (Affinity) indicate an emulation of key tone curve features of a Polaroid 665 high-contrast negative emulation in the Affinity library. We also add the film choice to the Keywording to allow easier organization.
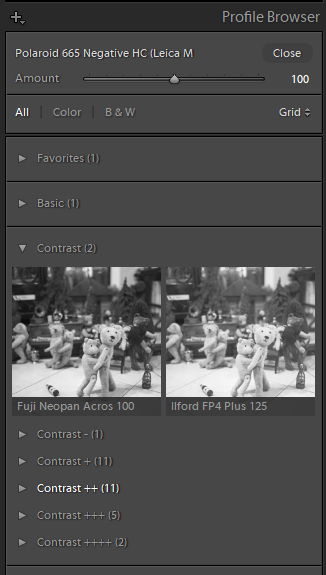
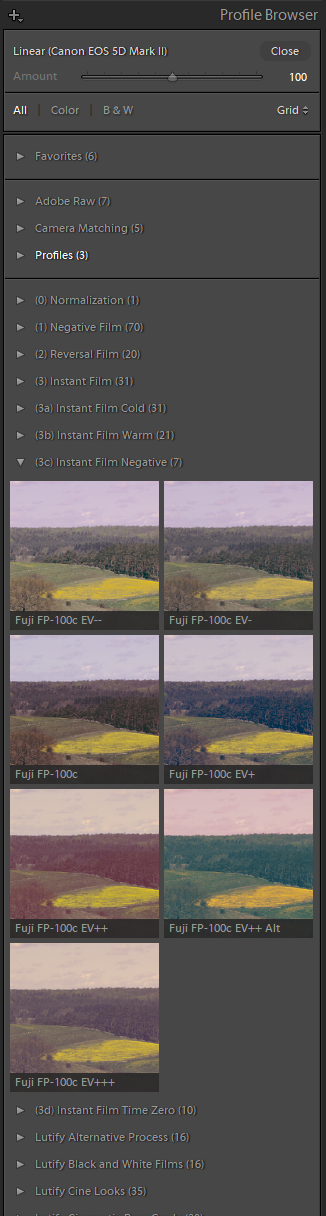
In cases where we want to apply a certain type of film emulation based on a slide or positive, they are found as profiles in the Develop module (see snapshot). The available profiles will differ based on the camera model associated with the slide/positive., assuming the basic underlying camera profiles as Monochrome for Leica M Monochrom and a strict linear profile for the other digital cameras.
The snapshot shows that given a linear camera profile for the Canon EOS 5D Mark II there are many different available film looks organized with respect to the type of film. In each category, we have also tried to sort and name the profiles based on overall contrast and exposure. In this example we see that there are seven available instances of the instant film negative Fuji FP-100c with exposures reaching from 2- to 3+.
In the case of the Leica M Monochrom the broswer looks different (see snapshot) with the B/W film emulations divided into groups based on contrast change within Zone II (the darkest part where the structure can be discerned) to VIII (the lightest part where the structure can be discerned) from Contrast – to Contrast ++++ where Contrast contains those with the same contrast curve as the normalization profile. Within each group, the profiles are sorted from those with the largest total exposure reduction to those with the greatest increase in Zone 0 to X. hence, the example the main window shows the image with the Polaroid 665 Negative HC preset within contrast group #2 and the small images show the look for two different films with a contrast similar to the normalized slide, that is, the Adobe Monochrom profile.
Profiles (Leica M Monochrom)
Profiles (Canon EOS 5D Mark II)
3.2.2.4 Development parameters for positives
In the good old days of analog photography, any tweaking of development times, temperature etc to care for poor exposure had do be done before knowing if it was needed for all frames, or being able to foresee the outcome. Today, we are able to review every slide and negative before deciding any adjustments as part of developing it into a positive.
We want to keep things as simple as possible and the only development adjustments carried out are to control and care for exposure by the principles of Adams’ Zone System, that is, placing shadows, mid-tones and highlights in the motive at the wanted places on the tone curve. However, we try to avoid changing the contrast to achieve a wanted creative effect corresponding to applying a characteristic curve of a film.
We have already described that normalization with respect to a reference image and correction for shortcomings of the used camera and lens was applied already during the import and creation of the slide and negative, and we add to the generation of a positive the application of basic exposure control. Hence, any positive with adjustments in the Lightroom Develop module Basic/Tone and Tone Curve/Point Curve reflect ones to mitigate poor exposure, that is, a photographer that should do better the next time. Any changes of the tone or contrast, the curve of an original are viewed as part of the development of a positive, and noted in the User Comment field by –Development followed by a brief description.
An obvious question may be why we first apply features like a film emulation and then any development parameters. The reason is that it follows the analog principle that first you decide on the film to use, and then we need to care for any poor exposure choices or, for instance, to push or pull the film. Hence, the better we become on setting exposure parameters, the less efforts are needed for adjustments.
If features of the used gears are better covered as part of the enlargement process, ones corresponding to different development solutions, timings etc are better managed via LUTs using, for instance, the 3DLC software. The principles of this is covered in the appendix on emulations, hence if possible, changed tone curves are encoded and packaged as part of preset Profiles like Kodak T-Max 400 +1 (Leica M Monochrom) to represent a 1 stop overexposure of a Kodak T-Max 400 film in the context of raw files generated by the Leica M Monochrom.
Since we want to keep negatives as “neutral” as possible as a result of the NLP conversion, Tones are set to Linear and all adjustments to zero, the Soft Highs and Lows left unchecked, Color set to NONE, Hue and Strength to be zero and Sharpen turned off. However, it is difficult to say when a change to any of these parameters are to be considered a development or an enlargement step, but we have decided that as many of the parameters intend to mimic certain laboratory scanner looks or to care for film characteristics changes to Tones, Soft Highs and Lows, Color and Sharpen are to viewed as development parameters as longs the intention is to mimic the look of the used film and scanner. The used settings are also captured in the User Comment field using the tag -Development and a brief description on the form <Tones>, <Soft Highs>/<Soft Lows>, <Color>, <Sharpen>, for instance, -Development Standard, Soft Highs, Fuji, Lab to indicate that the standard look scanners is mimicked with softer fading for the highlights and laboratory sharpening assuming a Fuji film.
3.2.2.5 Formatting positives
The concept of format, or size, is not only about the height and width of an image, but also its resolution and if it is going to be printed or presented on the Internet. An obvious question is which types of cropping that are to be considered part of the development process, and we have decided to use the following formats (and their rotations) 1 x 1, 1 x 1.33 (3 x 4), 1 x 1.5 (2 x 3), 1x 1.67 (6 x 7), 1 x 2, 1 x 2.83 (6 x 17) and 1 x 4.. In other words the formats of frames obtained by traditional, possibly panoramic, analog 135 and 120 films.
However, at Internet there are limitations like Instagram allowing horizontal images up to 1.91 x 1 and vertical ones up to 1 x 1.25 (4 x 5) and with a width of 1080 px and height between 566 (1 x 1.91) and 1350 (1 x 1.25) px.. Other common site, Facebook, suggests images to be uploaded at the resolution 1200 x 628 px, hence ratio 1.91 x 1. These limitations are, if needed, applied during the enlargement, and not development.
Whenever a cropping is applied as part of the development it is noted in the User Comments field as -Format 1x followed by the ratio of the longer side, and we also include any needed alignment adjustments in this step. For instance, -Format 1×1.25 indicate a negative with the size ratio 4×5. In the case of analogs, formatting also includes removing any existing frame borders. We also add the format to the Keywording to allow easier organization.
This is implemented as a step in the development process, but in this case no changes are made to the resolution or aspects like sharpening if they aren’t intended to reflect features of a given type of film.
The positive is the outcome of applying film emulations and creative tone curve adjustments, and mimicking gear features and cropping, to a negative and slide to correspond to a choice of gear, film and development parameters in an analog terminology. It also includes the cleaning process of analogs to remove dust and scratches..
3.3 Enlargement
The development of a raw file resulted in a positive with adjustments like camera and lens corrections and possibly a film emulation, development parameters, and cropping. With a background in analog photography, one may say that we try to follow a digital counterpart of the steps described in the book “Negative” by Ansel Adams in 1981 (a must-read for every photographer).
The next step is then to carry out the tasks needed to present the positive as an image in print or on the Internet, corresponding to the steps in the “Print” by Adams or the more advanced descriptions by Lambrecht & Woodhouse in “Way Beyond Monochrome”. Hence, the choice of presentation medium, the “dodging” and “burning” and decision on enlargement parameters.
Current solutions like Lightroom and Photoshop, and color grading tools as 3DLC, offer tremendous abilities for, more or less, creative processing. We have like everyone else been going through the phases of trying out every possible modification, but ended up with sticking to different film-like emulations and possibly some “dodging” of shadows and “burning” lighter ones.
We divide the enlargement process into a basic part that is independent of the choice of medium, one that targets printing, and one aiming to result in publishable images on the Internet. Each of these is then divided into different sub-process, mainly when it comes to Internet publications at different social platforms.
3.3.1 Basic enlargement
When we have developed a positive it is found in Archive (Positives) and the first phase of the enlargement aims to create an image that can be archived as a basis for both prints and Internet publication. The process in LR starts with “moving” a copy of the negative to the Darkroom/Enlargement/Basic collection by i) creating a virtual copy named Image, ii) set the Color Label to To do and iii) the Rating to 0.
Since we want a smooth process that will work in a mobile setting using, for instance, Photoshop CC for iPads, we prefer if possible to make use of Profiles to achieve a consistent look and feel among negatives.
The process begins with setting the Color Label to Ongoing and to ensure the positive is normalized with respect to the wanted reference image. Before browsing and comparing profiles in Lightroom or Photoshop to find the wanted look, it is important that any shortcomings in the positive due to, for instance, incorrect exposure have been handled if not done during the development.
Then any dodging or burning is carried out with the regular tools, and when done the Label Color is set to Good to Use, its quality is graded with Rating and Label Color set to None, to allow the image to be automatically moved to the collection Archive (image) in the library containing the images ready to finished for printing or the Internet.
Different types of enlargements will be described below (forthcoming), but a description is provided in the User Comments field as -Enlargement followed by a brief summary or tag like Tone/Auto to indicate that auto-toning was applied.
An interesting question is if any introduction of noise in the sense of “film grains” is to be done as part of this step or in the finishing one, and we have decided that it’s better suited for the latter as it’s not the grain in the archived image that is of interest, but the perception in the print or the Internet.
3.3.3.1 Enlargement options
[This section will describe the different enlargement options we make use of.]
3.3.2 Internet publication
Today, visibility on the Internet has taken over the rule of the family album of photos you gathered around in the past. However, each arena of social media has its own ins and outs and requires dedicated steps to obtain the wanted results, for instance, to care for the brightness and color temperature of the viewing devices and resolutions of Internet images.
Whenever any enlargement takes place, the used monitor calibration is noted in the User Comment field as -View followed by a brief summary like 100 cd/m2, 5500 K, Gamma 2.2 to support external viewing the intended way. Hence, when an image is published it will contain metadata on used pre-processing, film emulation, format, enlargement process and intended monitor settings for viewing.
Here we will only cover our three main media – this website, Instagram and Fotosidan (a Swedish site for photographers).
3.3.2.1 Our portfolio and blog
At this website the two main parts with images are image and blog posts. The first one corresponding to, in WordPress language, the media attachment files, and as featured images in blog posts.
Creating images for the website takes the same road as described above by creating a virtual copy of an image in the Archive (Image), that is, the basis for Internet and printing, rename it as Image (Website), label it as Ongoing, carry out the wanted enlargement steps and the finishing management steps and it will end up in the archive of images in the sub-collection Image (photography.anderssoneklund.se).
In the case of publishing at this site, we base our decisions on images viewed at 100 cd/m2. 5500 K and Gamma 2.2 and the results are slightly sharpened and saved as jpg at the doubled size as to be viewed. That is at least, if possible, a width of 4096 px when intended for “retina” viewing of normal 1024 px images.
The flow from Lightroom to this WordPress site is implemented using the Meow app WP/LR Sync to transfer images from Photos to the Media Library at the site. With Media Library Assistant and Advanced Custom Fields we have then created a Layout in Divi (Elegant Themes) that is used to easily establish a post per new image and associate it as the Media Attachment. This process is seamless and takes just a few minutes from image in LR to a fully annotated image at the site, where the time spent is to provide information like description, background and comments for the image.
3.3.2.2 Instagram
In the case of Instagram we make use of the LR/Instagram plug-in for LR to transfer images that are named Image (Instagram) and created as virtual copies of ones named Image.
However due to the size limitations of Instagram, we often re-crop the images to 1×1 or 1×1.25 format to better suit the medium. Moreover, since we also extract some basics like geographical information from the images as part of the publishing, we also need to remove spaces in names of places.
Fotosidan
[Work in progress]
3.3.3 Printing
As in the case of publishing on the Internet, printing processes depend on the used printer, paper and intended viewing, and in our case, we only print for ourselves and friends using an Epson 3880 and the Imageprint 10 (newer versions exist) printing solution.
[Work in progress]
A. Emulation principles
This appendix describes the different types of emulations used to reproduce film (including developer parameters), camera, lens, and filter features. The semantics of the term film emulation is in this context to mean “an attempt to mimic the tone curves and color mappings of an analog film with respect to a given reference image”. For instance, the Affinity library of emulations is a collection of CUBE-files which based on a given reference image will result in an outcome with a look like a traditional analog film. Hence, if our slide has a red tint due to the used camera or the import process and the emulation tones down reds, it will also affect the tint even though it’s an artifact and not found in the subject of the photo. But if we had used the corresponding analog film this may not have happened. Thereby, it is important, if possible, to normalize the slide with respect to the basis for the emulations, or at least try to avoid import settings like non-linear DCPs which on their own try to mimic a certain look.
The principle is to package the wanted features, or looks, in a number of reusable LUTs and tone curves (.acv) that can be combined in 3DLC to finished LUTs or with the help of LR. Thereby, applying a LUT will be like choosing a certain film or filter and then any development or enlargement adjustments can be applied on top of the obtained look.
It is important to emphasize that the aim of applying a film emulation is not to mimic a given analog film, but to convey an understanding of the type of tone curve changes that have been applied. Hence, even in the case of a linear DCP an emulation will make sense when analyzing the outcome of the development process.
Thye blog post From raw file to image presents an example of our process for Leicca M Monochrom raw files and Film emulation profiles introduces some of the key concepts of color grading.
A.1 Film emulation
In order to mimic, or emulate, a particular film and its features, a positive needs to be normalized vis-à-vis a reference if possible. This is currently possible for slides from Leica M Monochrom where we know that import by ACR using the Adobe Monochrome profile gives a result similar to the Ilford Delta 100 film. But unfortunately, this is not possble for any of our other digital cameras. One could of course, take the same shots in similar conditions with a digital and analog camera and then establish a mapping between them which will make the digital slide to look like its analog counterpart, and then use the “inverse” of this mapping to normalize the analog slide. However, we have not yet followed this path due to time constraints and rely on a linear profile for other digital cameras than the Leica M Monochrom.
In the case of Leica M Monochrom we can, using the Affinity film profiles and 3DLC, create an inverse to the emulation of the Ilford Delta 100 and apply it when importing raw files and obtain a normalized slide. Similarly, we can package this normalization with an Affinity film profile and thereby obtain a means to turn slides into positives with a desired film look, and also include different types of developer parameters.
In cases where it is not possible to normalize vis-à-vis a reference, the application of a film profile will correspond to the underlying tone changes of the film, so if possible we start with a linear camera profile.
A.1.1 Normalization vis-à-vis a reference film
If we know, or can show, that the default import of a raw file has a result corresponding to a particular film profile, its tone curve and color map can be “inverted” and the resulting LUT is used to create a normalized positive.
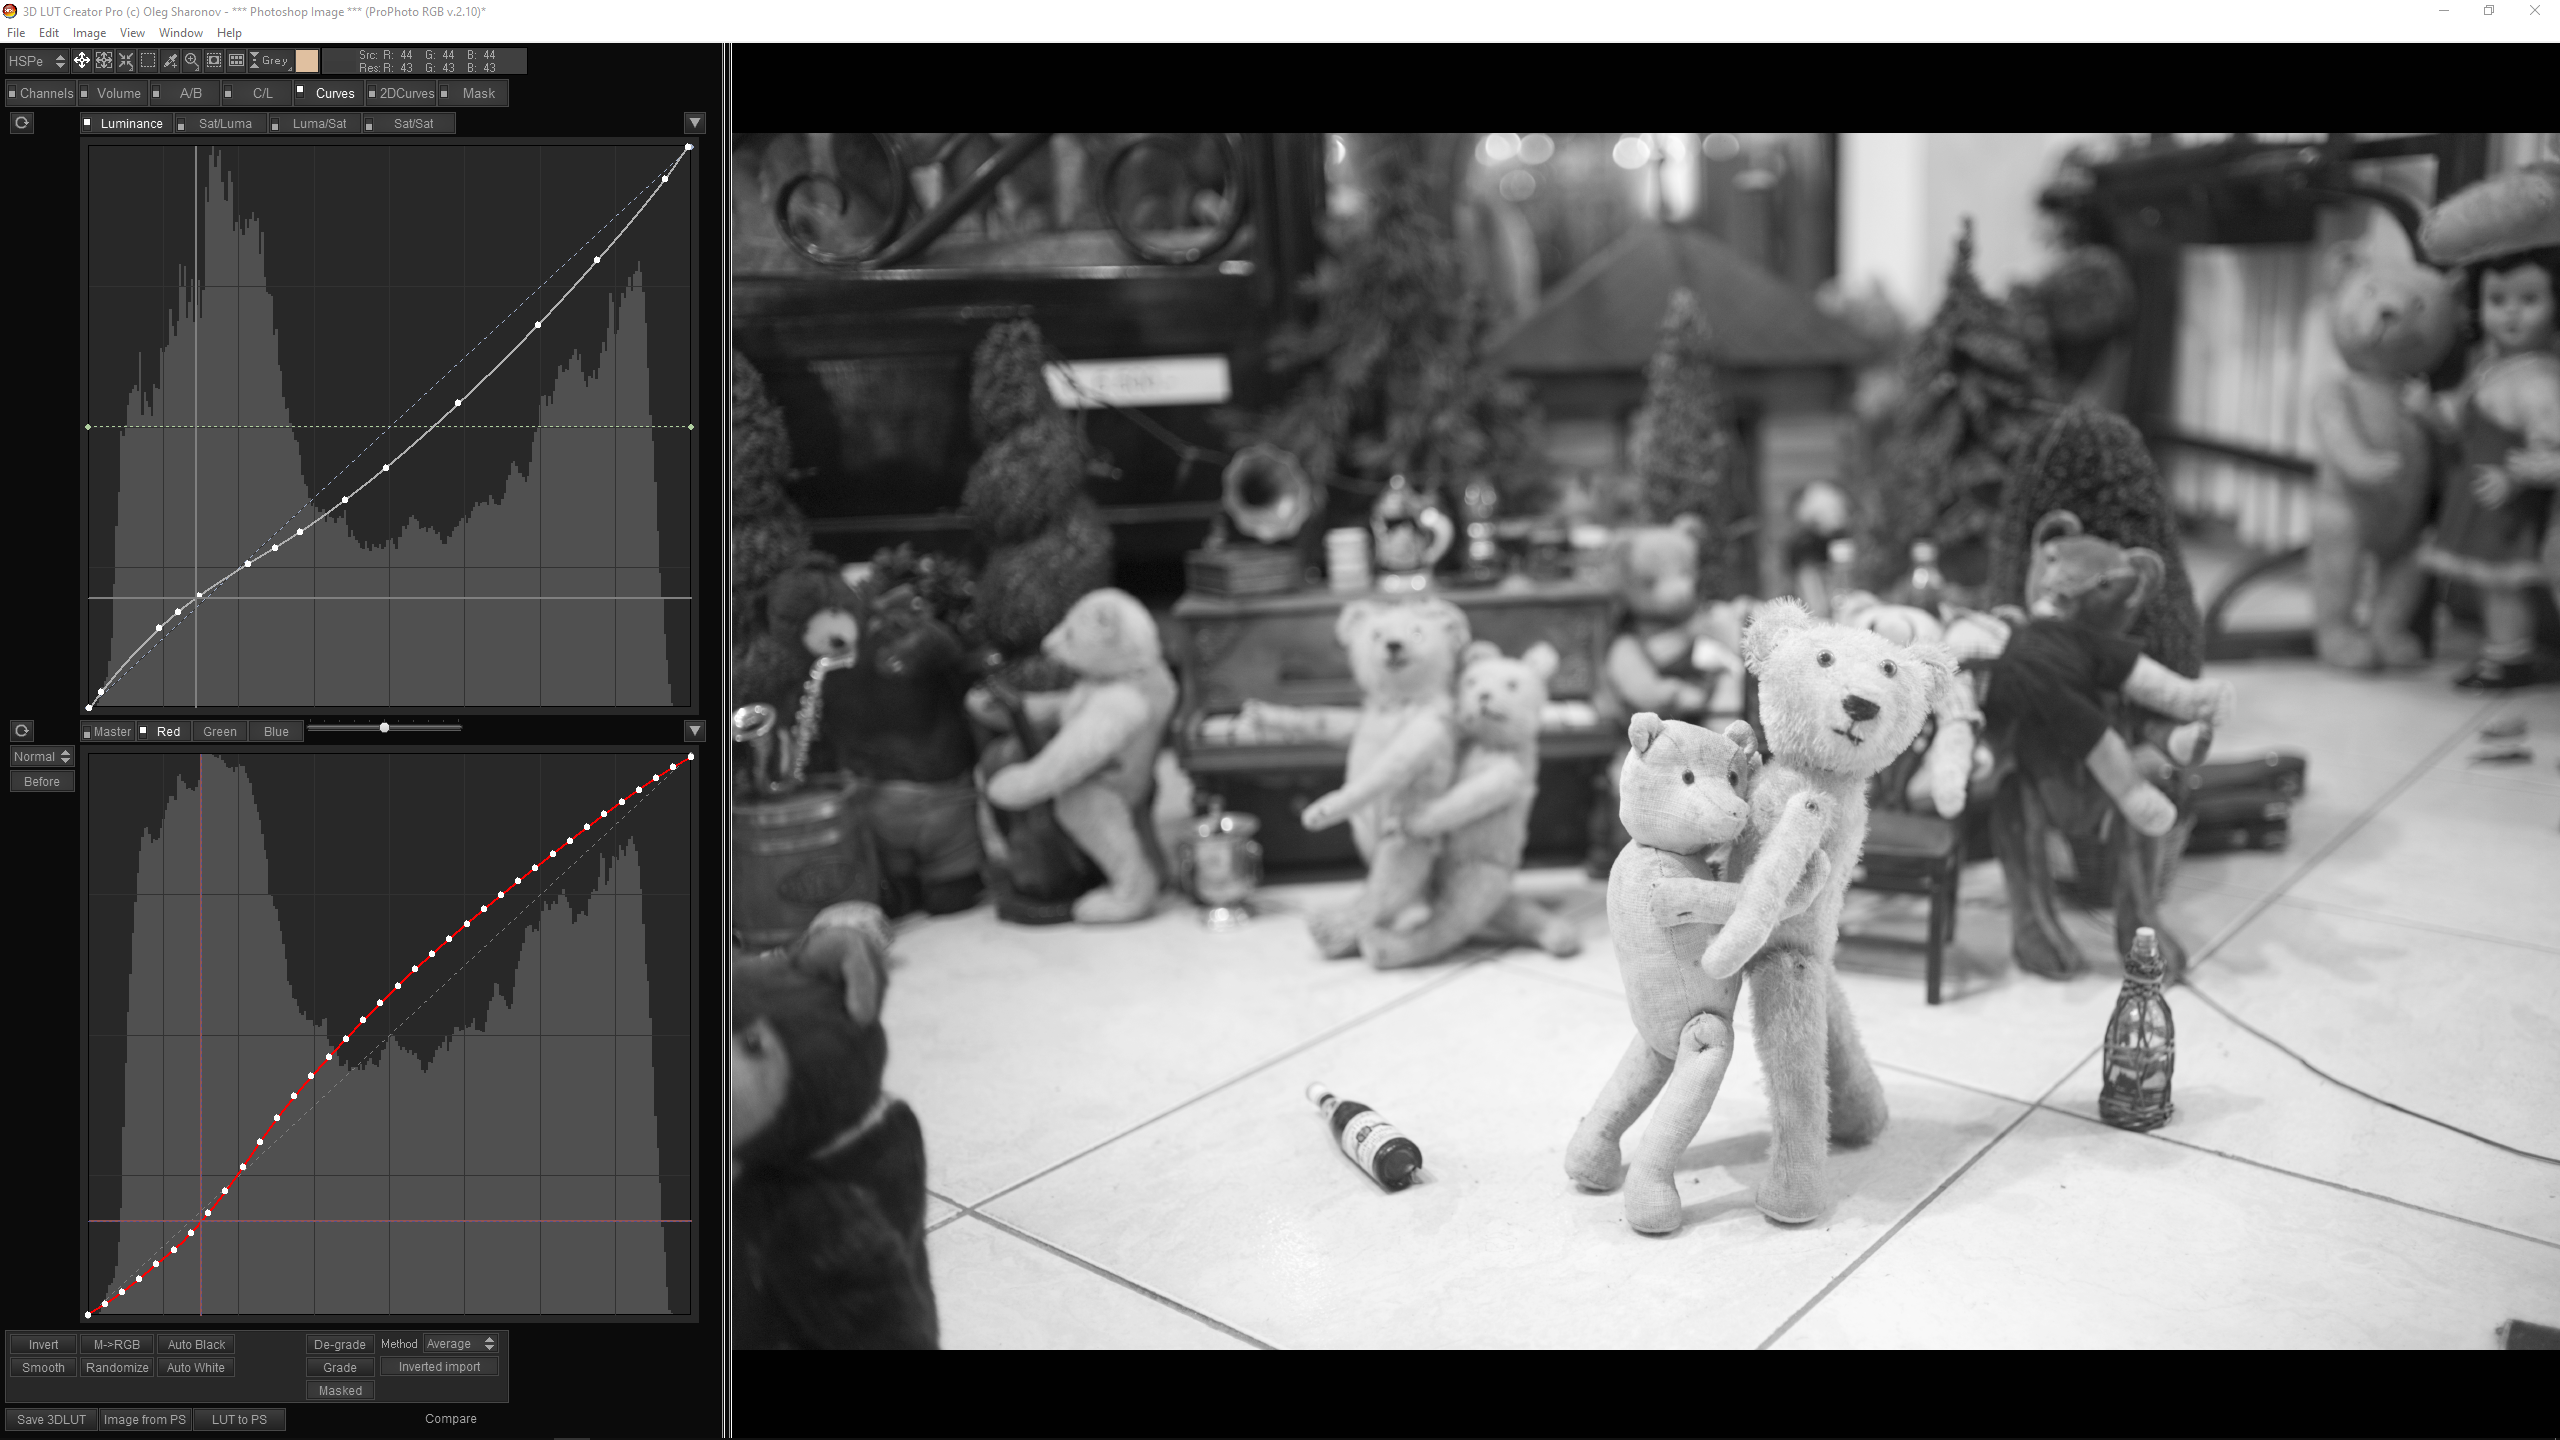
The snapshot from 3DLC presents a positive opened with an applied Adobe Monochrome profile. Then, the upper tone curve was applied, which is the inverse of the lower, and then the lower one being the Ilford Delta 100 tone curve from Affinity was applied. Hence, the presented look equals the one with the Adobe Monochrome profile, and if we disable the lower one we will have a look which as will be seen below corresponds to the reference look for Affinity.
To conclude, the principle behind a normalization vis-a-vis a reference film corresponds to for a slide with a look known to resemble a certain film apply the inverse of the look to obtain the normalized look.
Normalization – Leica M Monochrom
A.1.1.1 Leica M Monochrom
Since a raw file imported with the Adobe Monochrome profile is considered to result in an original corresponding to an Ilford Delta 100 look, we can create a normalization LUT by inverting the profile of Ilford Delta 100 in 3DLC.
Verification of an Ilford Delta 100 look
Erwin Putz (link) offers a color chart image for Leica M Monochrom in LR 4.1 (ACR 7.1 = PV3 2012), here called Monochrom-100, and one for Ilford Delta 100, here called Delta-100.
To verify that the past Adobe Monochrome profile and today’s ACR import process result in similar outcomes as presented by Putz, we loaded the Delta-100 image into 3DLC and created an 8×6 Custom Matching palette and saved it as the color chart Delta 100.cie. Hence, we just created our own color “passport” with 48 colors based on the Ilford Delta 1oo image. Then we loaded the image Monochrom-100 and matched it against the palette. It gave a linear transformation Curve (RGB) with y = x, that is, Putz’ results still hold and Leica M Monochrom imports can be equated with using an Ilford Delta 100 film.
Then we needed to verify that these results also hold with the current Adobe Monochrome profile. To achieve this we used an image taken with an X-Rite Color Passport called Color Chart (Sunny) – Original in PS with Calibration PV3 (2012) and transferred it to 3DLC. Then we created a 50×50 Custom Matching palette called PV3 50×50 which was saved as the color chart PV3.cie. The Open “Color Chart (Sunny) – Original was opened in PS again, but this time with the Calibration PV5 (2018) setting and we carried out a match to the existing palette. The resulting Curve (RGB) gave a tone mapping for PV5 to Delta-100, which turned out to be linear y = x. That is, the ACR (PV5 = Monochrome) provides an image that can be equated to the Ilford Delta 100 for Leica M Monochrom.
In conclusion, we have shown that the current standard import via ACR with PV5 calibration and the profile Adobe Monochrome gives a result similar to the Ilford Delta 100 film as provided by Affinity.
Normalization LUT
Given the current standard import process by ACR for Leica M Monochrom results in an outcome similar to applying an Ilford Delta 100 emulation, it was straight forward in 3DLC to open the Affinity LUT Ilford Delta 100 as a so called external LUT and extract and save the Channel Mixer and RGB Curve. By this we have decoded the film profile into its RGB curves, and by Switch Master and Curve RGB with M -> RGB and Smooth RGB Curve until the number of points in Master was max 14 (3DLC limitation) we obtained an invertable Ilford Delta 100 profile. We inverted the curve and saved it as Normalization – Affinity (Leica M Monochrom). Thereby we obtained the curve and LUT to apply as part of import of Leica M Monochrom raw files, or as the Luminance Curve in 3DLC when creating new film profiles based on Affinity for direct application as a part of the development of a raw file to obtain a negative with given film features.
A.1.2 Linear normalizations
In some cases like for the Fujifilm X100S and Canon EOS 5D Mark II it’s not possible to normalize the raw file with respect to a given reference image. In those cases, we make use of a strict linear camera profile, and simplest way yo create one is to use the Adobe DNG Profile Editor.
- Open any image in LR and make sure to choose the Adobe Standard profile under Camera Calibration in the Develop module.
- Export the image as a DNG (Export to DNG under LR Presets).
- Open the DNG using the DNG Profile Editor.
- Under the Tone Curve tab, set the Base Tone Curve to Linear.
- Go to File > Export <Your camera> profile… (this should default to the correct folder) and click Save.
- Quit and reopen LR to find the new profile in the Camera Calibration tab.
A.1.2 Creating new film emulations
Emulation collections like Affinity are based on the existence of a reference image and then comparing it to different film negatives to obtain the tone curves, or LUTs, needed to transform the first into the latter. Hence, when it’s, as in the case of the Leica M Monochrom, we start off with normalized original the application of the emulations becomes more “realistic”.
As described above, using the 3DLC application it’s trivial to create LUTs for any kind of emulation and then import it as a Profile to be used in LR and PS. The principle is to import the film emulation in the application and divide it into its tone curve and channel mixer. Then we may add the normalization tone curve as the first step of applying a luminosity curve, and the two curves and channel mixer exported as a LUT to be used instead of the normalization LUT used at import.
The snapshot shows the result of on top the default Adobe Monochrome preset for a Leica M Monochrom apply the normalization curve (top) with respect to the Affinity emulation collection, followed by the Rollei Retro 100 Tonal profile (bottom). The two profiles can then be exported as the LUT Rollei Retro 100 Tonal (Leica M Monochrom) to be directly applied as a Profile on slides with the given camera to obtain positives inheriting the tone curve properties of the film.
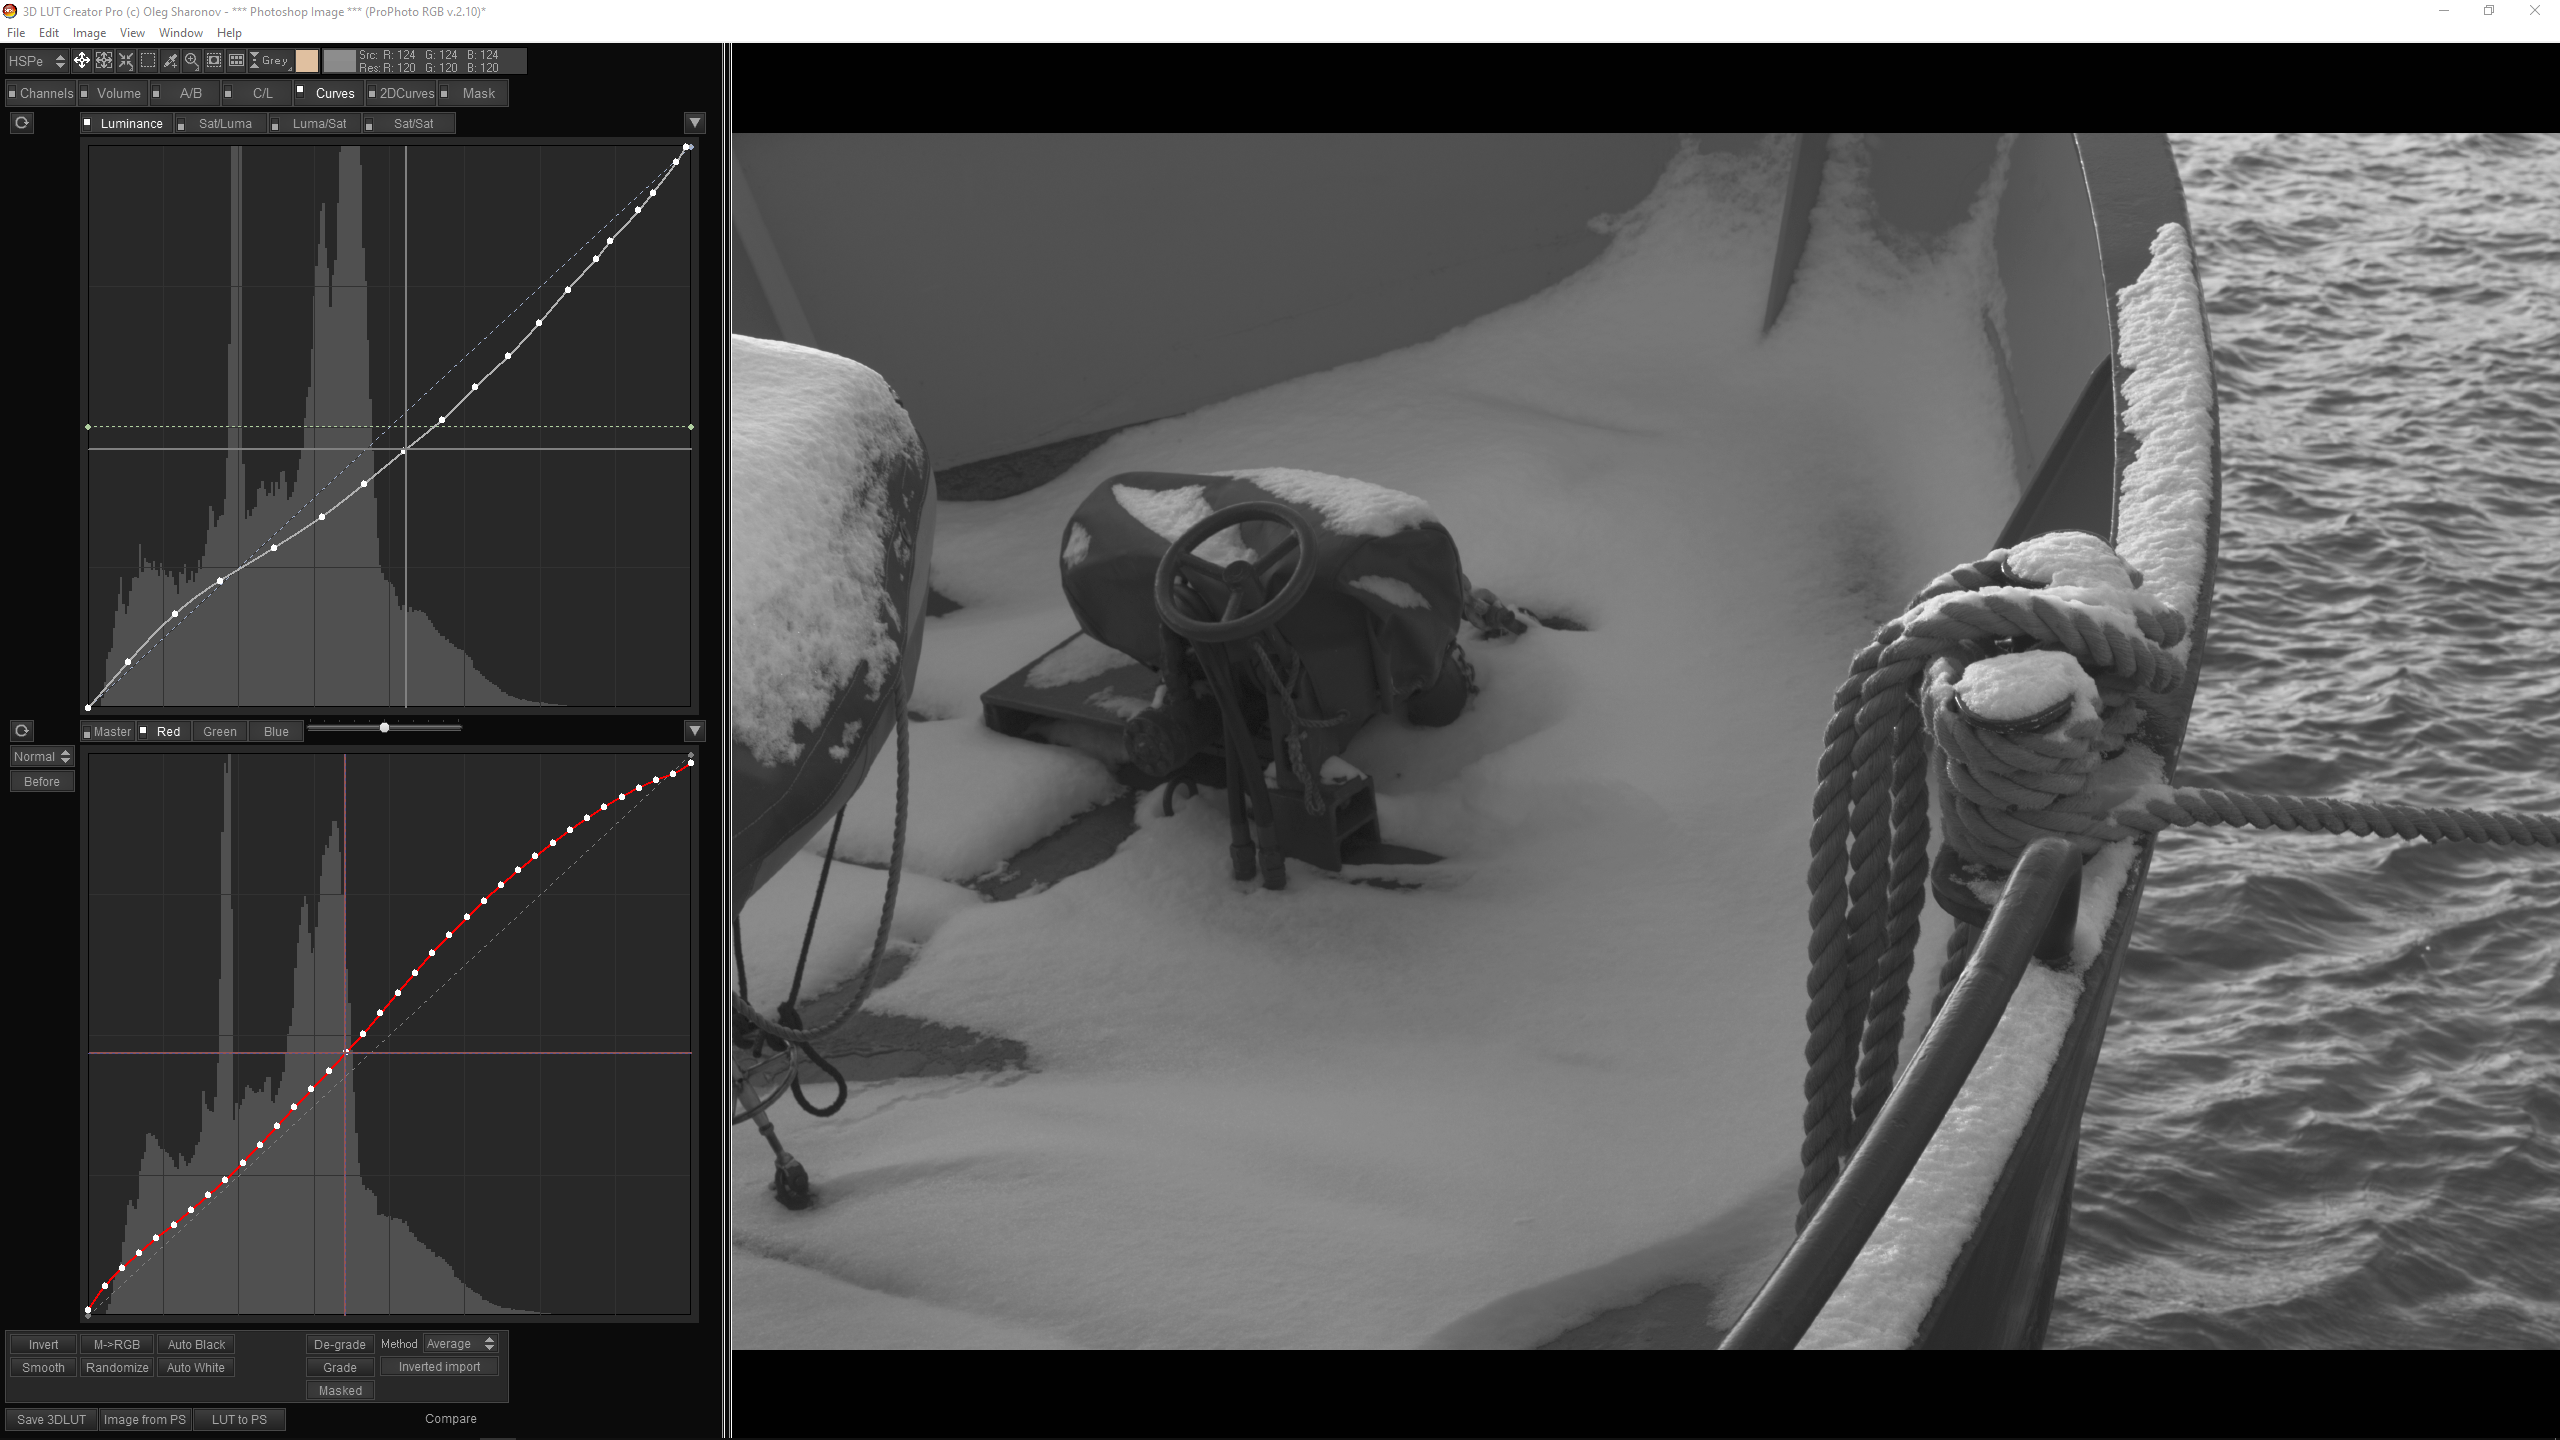
Rollei Retro 100 Tonal – Leica M Monochrom
A.2 Filter emulation
[Work in progress]
B. Scanning of analog frames
In this appendix, we describe the process of setting up and scanning 135 film strips using the Plustek Opticfilm 120 (1st generation) scanner and the SilverFast Ai Studio 8 and HDR Studio 8 software.
Currently, only 135 negatives are covered, and positives (aka slides) are to be added in the future.
B.1 Scanner setup
To begin, we need to place the negatives in the scanner, and no scanners look the same. In our case, we use the first generation of the Plustek Opticfilm 120 scanner. It has some nice looking holders for 6 frames per strip, and for this setup, the first steps are as follows:
- Always use gloves (eg Kinetronics Anti-Static Gloves) when treating the negatives.
- Use a light board (eg Art Slim Light Board) to better review frames and place them in the holder.
- Try to clean the strips with a blower (eg Giotto Rocket Air) before placing the them in the holder, since the holder limits the ability to clean the strips.
- Place the strips with the duller side facing down and with the first frame of the first strip at the lower-left corner (has a white marker out-of-the-box) and with the holder fringe at the top of the holder.
- Re-clean the strips with the side being cleaned down-facing to better get rid of dust.
- Gently place the holder in the scanner.
This is not intended to be a review of the scanner, but it has a fixed focus which is known to be a risk for out-of-focus issues, hence always try to keep the strips under pressure for a couple of days before scanning them to reduce the risk. Moreover, the scanner is terribly slow and noisy, but that’s the price to pay when you want one which also works with other formats than 135.
B.2 Software setup
We use the latest version of the SilverFast Archive Suite 8 with the solutions Ai Studio 8 and HDR Studio 8. The first is used for the actual scanning of so-called HDRi files, frames in our terminology, and the latter for processing these to generate analog raw files to be imported by LR.
In this section, we focus on the use of the Ai Studio 8 solution to scan the film strips, and we need to admit that the SilverFast software is far from the easiest one to use with often useless manuals and you have to learn by trial-and-error. However, this will not be a training session, and we will only highlight our way of working.
There are several different types of settings, many that can be saved as presets, even though they have a tendency to work in a random fashion, and here we will cover the main ones found under the tab Edit/Preferences (Ctrl-,) to set up the overall behavior of the software and scanner.
B.2.1 General
The first tab under Preferences deals with General settings and the key settings are that the Color Model is set to RGB, the Default Setting to be 135_Negative_HDRi which is our default frame settings for scanning (see below) and the Persistent tool dialogs preset set to 135_HDRi which makes sure all dialogs to look the same whenever we use the software. The HDR RAW option shall also be turned on to save files to be processed by the HDR Studio 8.
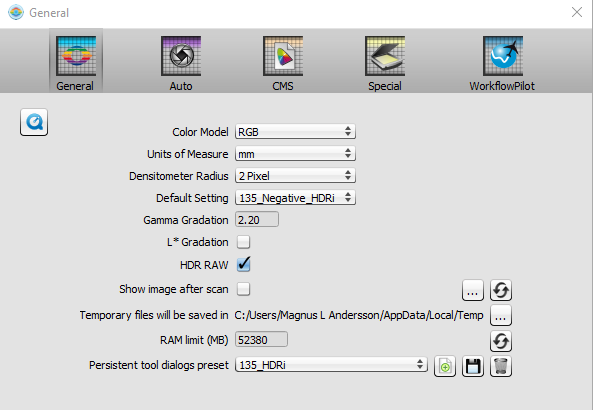
Ai Studio 8 – Preferences – General
B.2.2 Auto
We are currently not using the Auto settings intended to push-button color correction of negatives, since we hand over all post-processing to the HDR Studio 8 application.
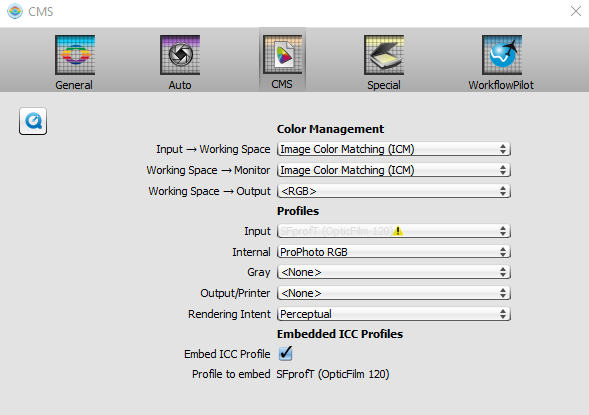
B.2.3 CMS
The Color Management Settings (CMS) are important and the Working and Monitor Spaces are set to Image Color Matching to ensure alignment with the rest of the image processing solution and hardware, and the Output space is set to RGB.
The Internal color space is set to ProPhoto RGB and the Rendering Intent to be Perceptual, with an embedded ICC profile.
However, our current process does not really make use of any of these aspects as it passes all processing to the HDR Suite 8.
Ai Studio 8 – Preferences – CMS
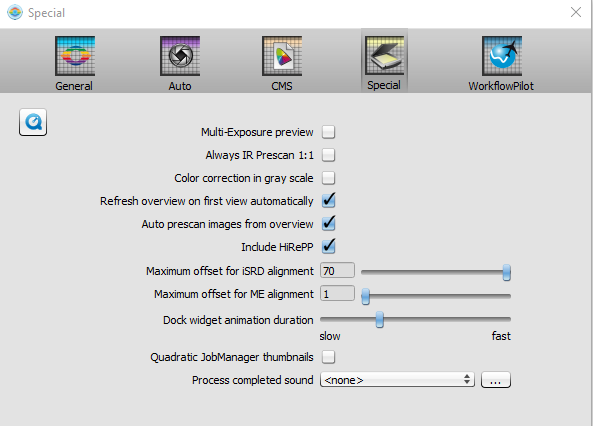
B.2.4 Special
The Special tab consists of several options and we have turned off Multi-Exposure preview as it improves performance. Moreover, the HiRePP option is turned on to decrease the loading time of images in the HDR Studio 8.
Ai Studio 8 – Preferences – Special
B.2.5 WorkflowPilot
This tab is used to set up workflows to automatize parts of the scanning process, but we have not yet made use of it.
B.3 Default settings
We will in this section highlight the most important settings we normally make use of to scan 135 film strips.
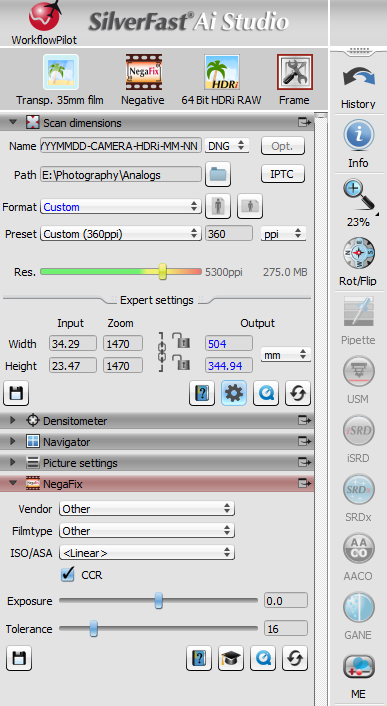
B.3.1 Main settings
The most important settings are to make sure the Scanmode is set to Transparency 35mm film, the Image Type to be Negative and the Color Depth to be 64 bit HDRi RAW.
Another core concept in the SilverFast solutions is the Frame used to define certain parameters of one or several frames, called a FrameSet, to be scanned. However, using a scanner like ours with a fixed holder, this option is mainly used to save a snapshot of other settings to be used as Default Settings in the Preferences for the startup.
We have defined a Frame setting preset called 135_Negative_HDRi which will load presets for all important settings including Scan dimensions (incl naming conventions). However, it will for an unknown reason not load the default NegaFix settings (see below).
The Multi-Exposure (ME) option shall always be turned on to further improve the scanning quality.
However, due to our setup, the only one of these settings that actually matters is the last one as the raw analog is saved as part of the HDRi file to be processed by the HDR Studio 8.
An obvious question is why we save the HDRi using Scanmode set to Negative when we will export it as Positive from HDR Studio 8, and the reason is that by this we are able to judge the image already at scanning to see if it is worth to proceed with.
Ai Studio 8 – Default Settings
B.3.2 Scan dimensions
The Scan dimensions options cover naming and formatting of outputs, as well as basic IPTC data to be saved together with the image.
To begin with, the basic naming format for the field Name is YYYYMMDD-CAMERA-HDRi-MM-NN, where the date information is either the shooting data or scanning date depending on the circumstances, the MM to be the film and NN the frame indices. The camera information follows the standard used in Lightroom with the string Leica MA for the Leica M-A which is our main analog camera. The film index is normally 01 and only used in the case of several films with the same date stamp. Finally, the frame index starts with 01 and reflects the frame identifiers on the film strips. Hence, the Name is a unique identifier to a given scanned frame.
The Path for analogs resulting from the scanning is not set to Photos, but instead a faster hard-drive E:\Photography\Analogs for post-processing than the NAS harboring the Photos. Before scanning a set of frames a new sub-folder has to be created corresponding to the date of the frames.
The Resolution is set to 5300ppi and the output Format to be the one obtained when maximizing the frame (Alt-A), thereby resulting in a huge file of around 300 MB to be used as the starting point for the post-processing in HDR Studio 8. The reason for taking this approach with negatives is that if possible we want to keep as much frame border as possible to improve the color corrections during the conversion to positives in LR.
The settings above are saved as a preset called 135_Negative_HDRi to allow consistent management of 135 negatives.
In addition to the physical settings of the frame to be scanned, this tab also contains settings for IPTC data to be saved as metadata in the output. The metadata fields deal with Caption, Keywords, Credits (not used), Origin and Copyright and we make use of them to both add crucial date information, but also to pass information to facilitate more smooth management in LR when adding EXIF data using the NLP plug-in. Hence, we have one IPTC preset per camera, lens and film accordingly named on the format CAMERA-LENS-FILM.
A default IPTC preset has for the Caption section the fields Caption Writer set to Magnus L Andersson and the Special Instructions set to the name of the film, for instance, FUJICOLOR PRO 400H. The Keywords follow the ones used for Gear in Lightroom, for instance, Leica M-A, Leica Summilux-M 35mm f/1.4 ASPH and Fujicolor Pro 400H. It is important to set the origin information since it will be used in LR to Date Created and, if wanted, City, Province, and Country. We also add basic Copyright information to the file.
B.3.3 NegaFix
The NegaFix tab is used to set the Vendor, Filmtype and ISO/ASA of the negative to be scanned. By default, the setting is Other, Other and <Linear>, respectively. By this setting, we get a “neutral” presentation of the raw data without any attempts to corrections with respect to a given film. Normally, no Exposure compensation or Tolerance (default is 16) adjustment are applied and the automatic color cast correction CCR is turned on. The latter two are used to try to remove any dominant color cast from the negative. Note, it’s important the frame is inside the image part of the negative to preview the corrections.
However, since we scan the negative as an HDRi raw file these settings are only for preview and can be changed in the post-processing of the scan in HDR Studio 8.
B.4 Batch scan
When the setup is done it is time to begin the actual scanning by adding all the frames in the scan to a frame set, starting by clicking the Overview icon to load a preview of all frames. Whenever the frames have some white margins on the left or right side, this can be fixed by clicking the arrows beneath the frames. Then Add Selection is clicked to add the frames to the Job Manager. This pre-scan of the images does take quite long.
When the loading of previews is done in the Job Manager, we re-load the frame default settings 135_Negative_HDRi to ensure we get the right starting point. Then we need to add the correct filename on the format YYYYMMDD-CAMERA-HDRi-MM-, where, for instance, CAMERA is set to Leica MA. The correct IPTC has to be loaded, created by copying and adjusting an existing preset, and the Date Created, City and Country Name to be set.
It’s also important to make sure the ME option is turned on and the NegaFix set to reflect the given film for accurate preview before scanning begins or to use the default settings for a “neutral” look.
Thereafter the settings above are copied to all frames using the Job Manager, and the necessary adjustments are done to every frame id in the filename and any other IPTC fields. Moreover, the frames may have to be rotated and maximized with respect to each frame.
Finally, we select all frames in the Job Manager and begin the scanning, and wait for very long until the batch is done.
B.5 Post-processing of scans
When the frames are scanned and archived as HDRi files, the next step us to turn them into files that can be managed in LR. To achieve this we use the SilverFast HDR Studio 8 to extract the core frame readings without any adjustments and save it as a 48-bit raw DNG file. By this, we will have two files with one being the HDRi file of all core and infrared data and necessary IPTC data, and the other being a striped instance intended for LR and to create images for the web or print.
B.5.1 Setup and settings
The setup is straightforward since all data is obtained from the HDRi file and the only thing that needs to be done is to set the Image Type to Positive, the Color Depth to 48 Bit HDR RAW HDR and the file format to be DNG, then to remove the “i” in “HDRi” of the file names, ensure the frame is of maximal size (Alt-A) and the Path to be to the corresponding folder in Photos. If need, as in the case with the first scanning step, we have created a Scan Dimensions and Frame presets named 135_Negative_HDR to ensure consistent naming of files etc.
All the HDRi files are then added to the Job Manager and processed to add the set of raw files in the right place ready to be added to the LR Library.