From raw to image
Quick processing using LUTs
Magnus L Andersson
This is a brief introduction to how Look-Up Tables (LUTs) may be used to establish a fast and consistent process from a raw file to an image based on traditional film emulations. The example is based on a raw file originating from a Lecia M Monochrom, but holds in principle for any raw file.
Way back, much time was spent in the darkroom, and a few years ago I ended up spending as much in front of a computer instead of taking photos. Hence, I wanted to change that and decided to come up with a way of working that would free up time. This is the first attempt to achieve this. Right now I’m happy with it, but as always things can always be improved.
Content is not everything, but a good start
If you like our work, you are more than welcome to follow us at Instagram or have a look at Fotosidan (Swedish site for photographers) or LFI (international site for mainly images captured by Leica equipment). You are also welcome to contact us at info@anderssoneklund.se for questions about our work, and to share links to this post.
Photography = post-processing?
Much of my life has been in front of a computer screen, and photography intended to be a break from that. Hence, I want to spend as little time as possible doing post-processing, still being able to achieve consistent good-enough quality in the outcomes.
As described in another post, this site and writing this post are part of fresh start trying to find my way back to photography. But to achieve this, I knew I had to invest in getting things right from the beginning.
A poor raw file will never become good whatever you do with it, hence focus shall be on the actual process of taking photos. But, then with a smooth process to follow, I will not get bored and lose energy to be used to take more photos.
This post is a brief introduction to my current way of dealing with raw files in Lightroom, and further details on this can be found at this page of posts on image processing.
Outline
At this tab you find an overview from the raw file to the anticipated outcome and the final result. The Usage tab, indicated by a film negative, contains details on the used raw file. The next tab called Details with its computer icon will describe part of the process in more detail, and the Additional tab contains further references on the process.
We want to stress that what you read here is a description of our way of doing things, and thereby neither better or worse than any other way.
From Raw to Image
As described in the in-depth introduction to our management and processing of photos in Lightroom, the process starts with a raw file that is imported to become an original. This file is then developed into a negative to later be enlarged into an image for Internet publication or print.
So let’s break this process down into a number of steps and see how it works.
From a Raw file to an Original
Assume we start with a file imported using the Adobe defaults for a Leica M Monochrom raw file in Lightroom, then we get the original in Figure 1 (left). However, since we want to make use of existing film emulations, and their characteristics, in the Affinity repository we import it with our Normalization – Affinity LUT for Leica M Monochrom as the Profile instead of the default Adobe Monochrome. This will result in the right-hand view in Figure 1.
As can be seen, the visual difference between the default and our original is that in our case the normalized original looks both darker and duller. The reason is that the normalization applies the inverse tone curve of the Ilford Delta 100 (Affinity) emulation to the imported image to reverse the effect of the Adobe Camera Raw (ACR) process. Hence it lightens the shadows and darkens the mid-tones and highlights.
One may wonder if this step of normalization is needed, especially when we in the Processing tab explain how the film emulation LUTs are created, and the answer is that we only do it to “neutralize” our brains and to be “open” for different emulations. Or, since the Adobe Monochrome profile corresponds roughly to a photo taken with an Ilford Delta 100 film it aims to “capture maximum detail and sharpness” [Ilford] by increasing contrast through darker shadows and brighter mid-tones. Thereby, our mind is biased by this setting in a way that we believe may result in missing interesting other opportunities.

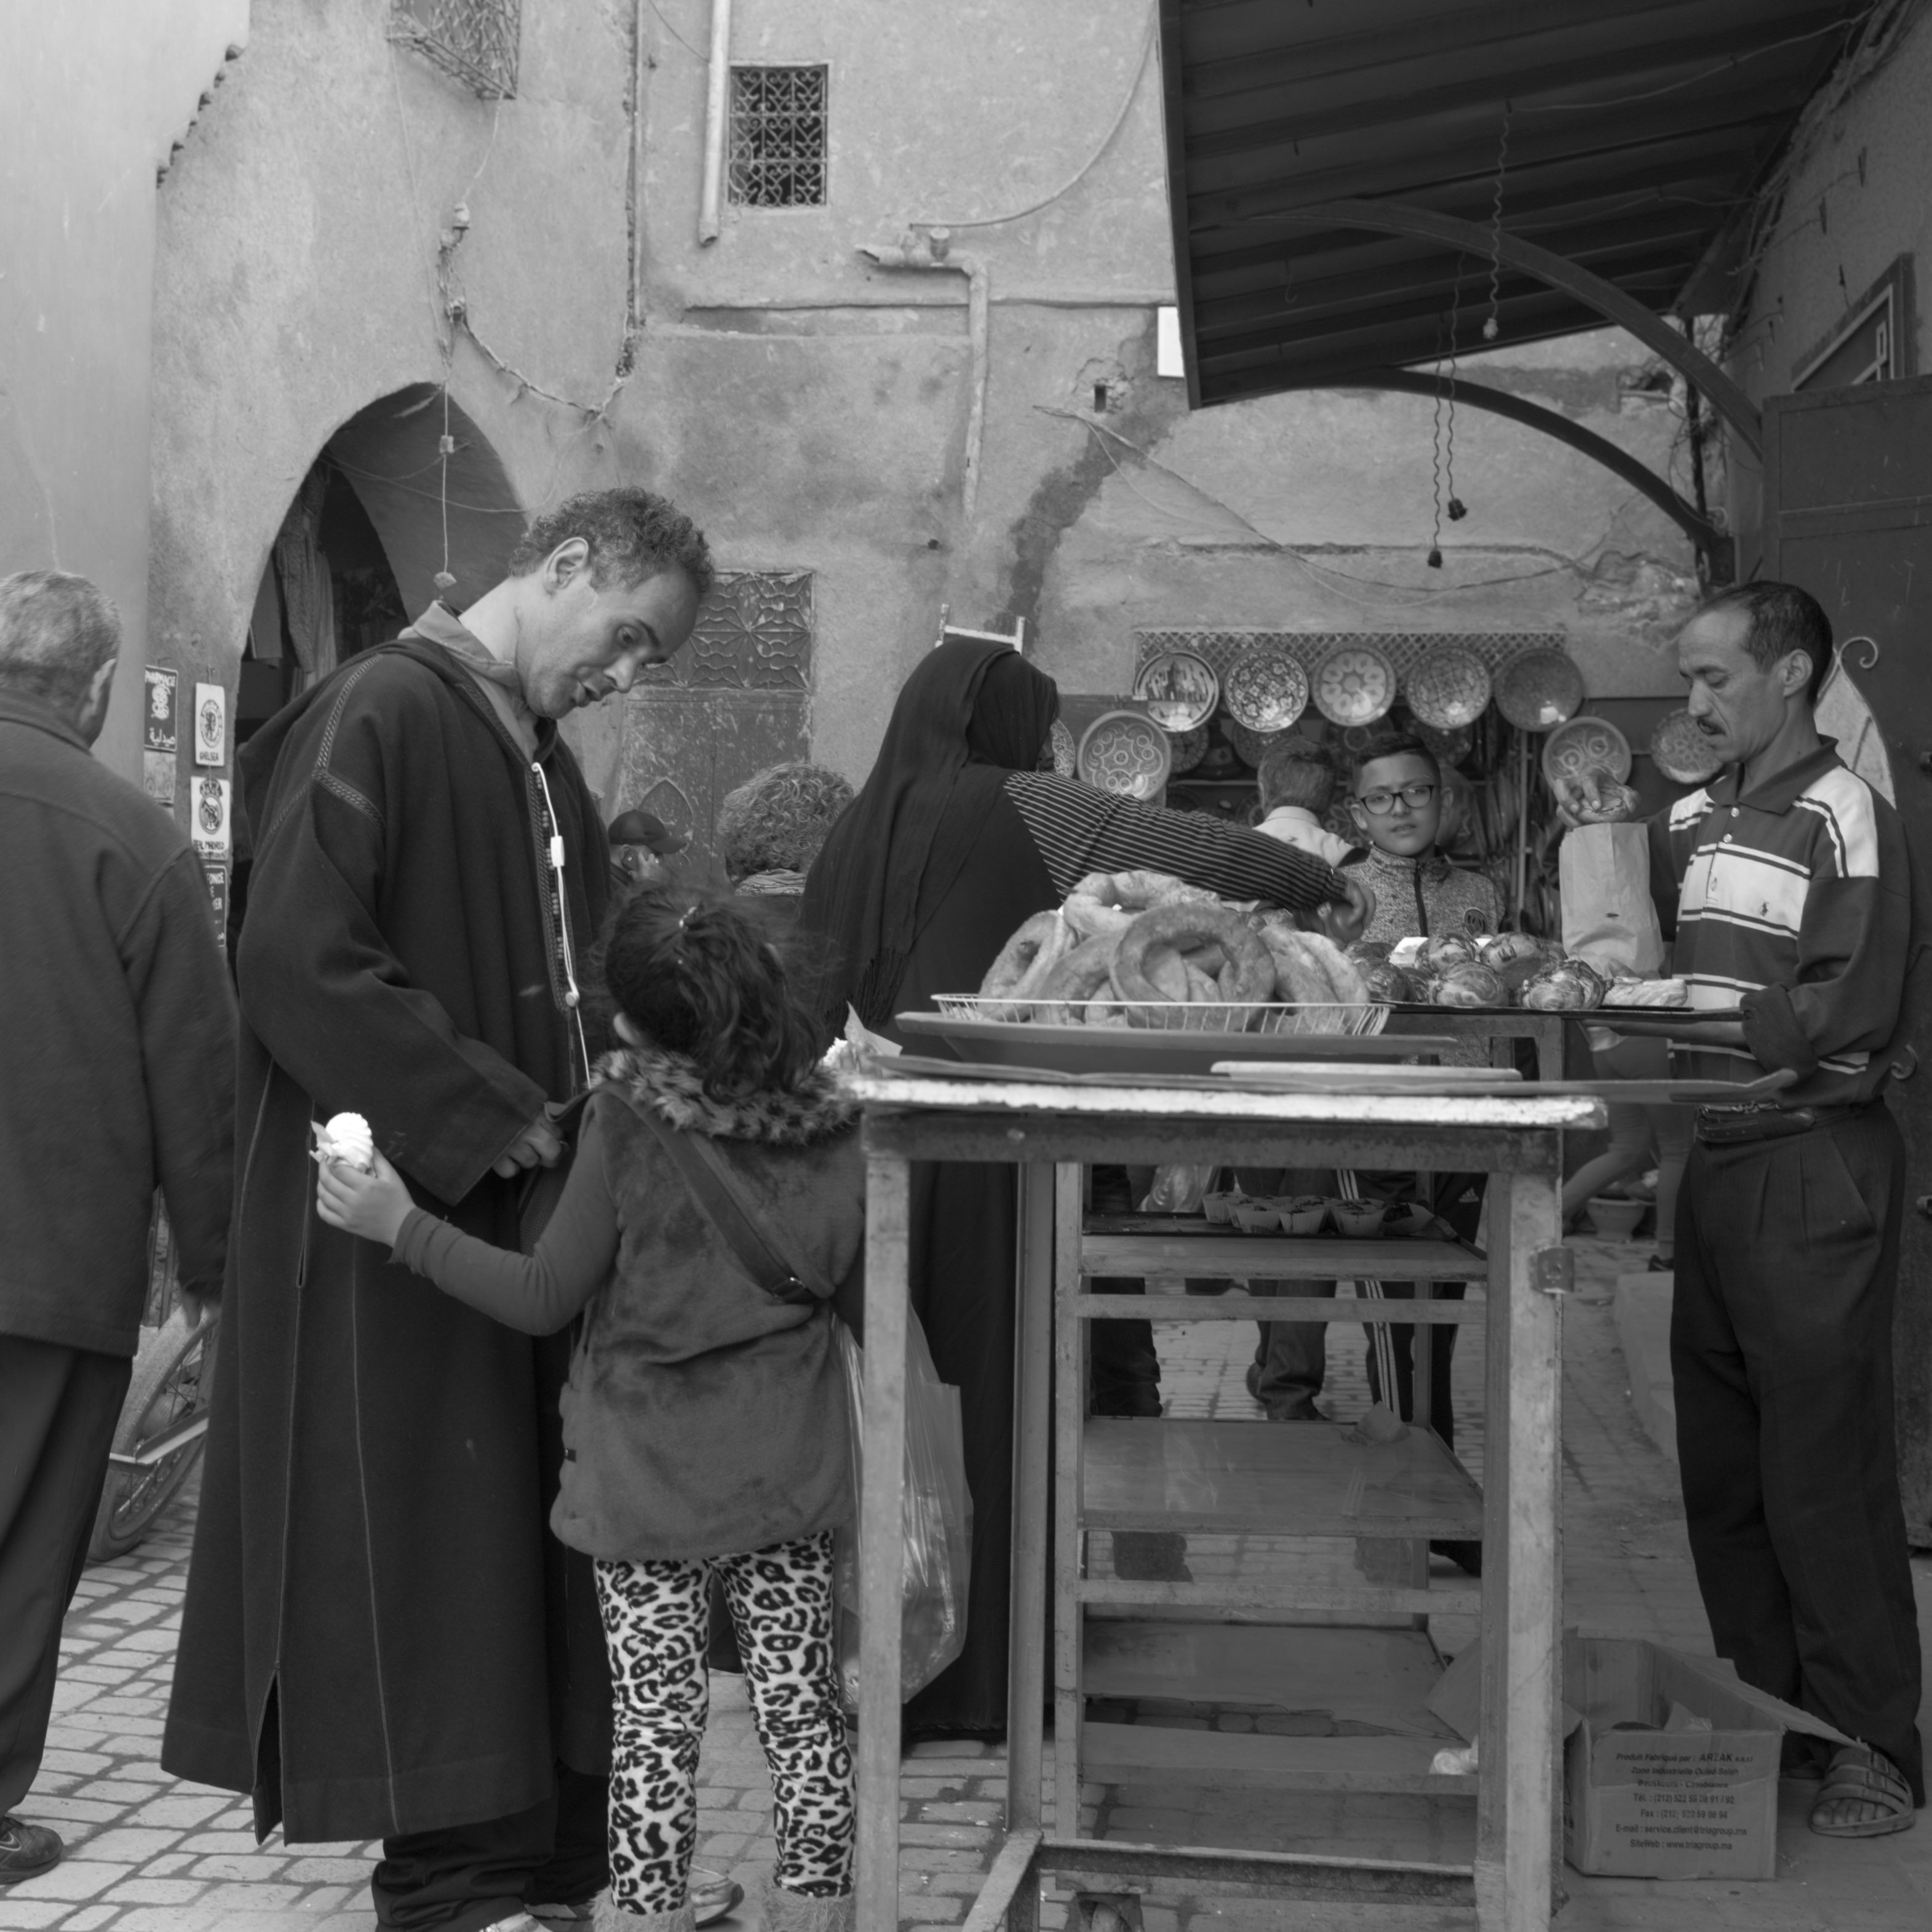
Figure 1: Adobe Monochrome [left] vs Normalization (Affinity) [right].
From an Original to a Negative
The normalized original can now be compared to all our Profiles for different film emulations based on the Affinity repository. Moreover, we have also compiled a document with characteristic curves for the emulations showing how they will affect our original. For instance, the one for the Kodak T-Max 400 emulation is said to in the spectrum from 0% (black) to 100% (white) at 25% darkened the shadows, then at 50% increased the mid-tones the same amount and more or less keep this with a slight increase at 75%. Hence, it darkens the shadows and increases the mid-tones and highlights.
So, if we look at our normalized original and ask ourselves what we want to achieve I would say that the dark clothes shouldn’t look as gray and to make the mid-tones lighter. But not too much, since we want to keep texture in the djellabas (the coat-like garments).
We do obtain this, with the Kodak T-Max 400 emulation (Figure 2 – right), but it fails to retain the garment texture and we could now either pick a different emulation or view this as the correspondence of a film negative and then we have to deal with the shortcomings in the enlargement to an image.
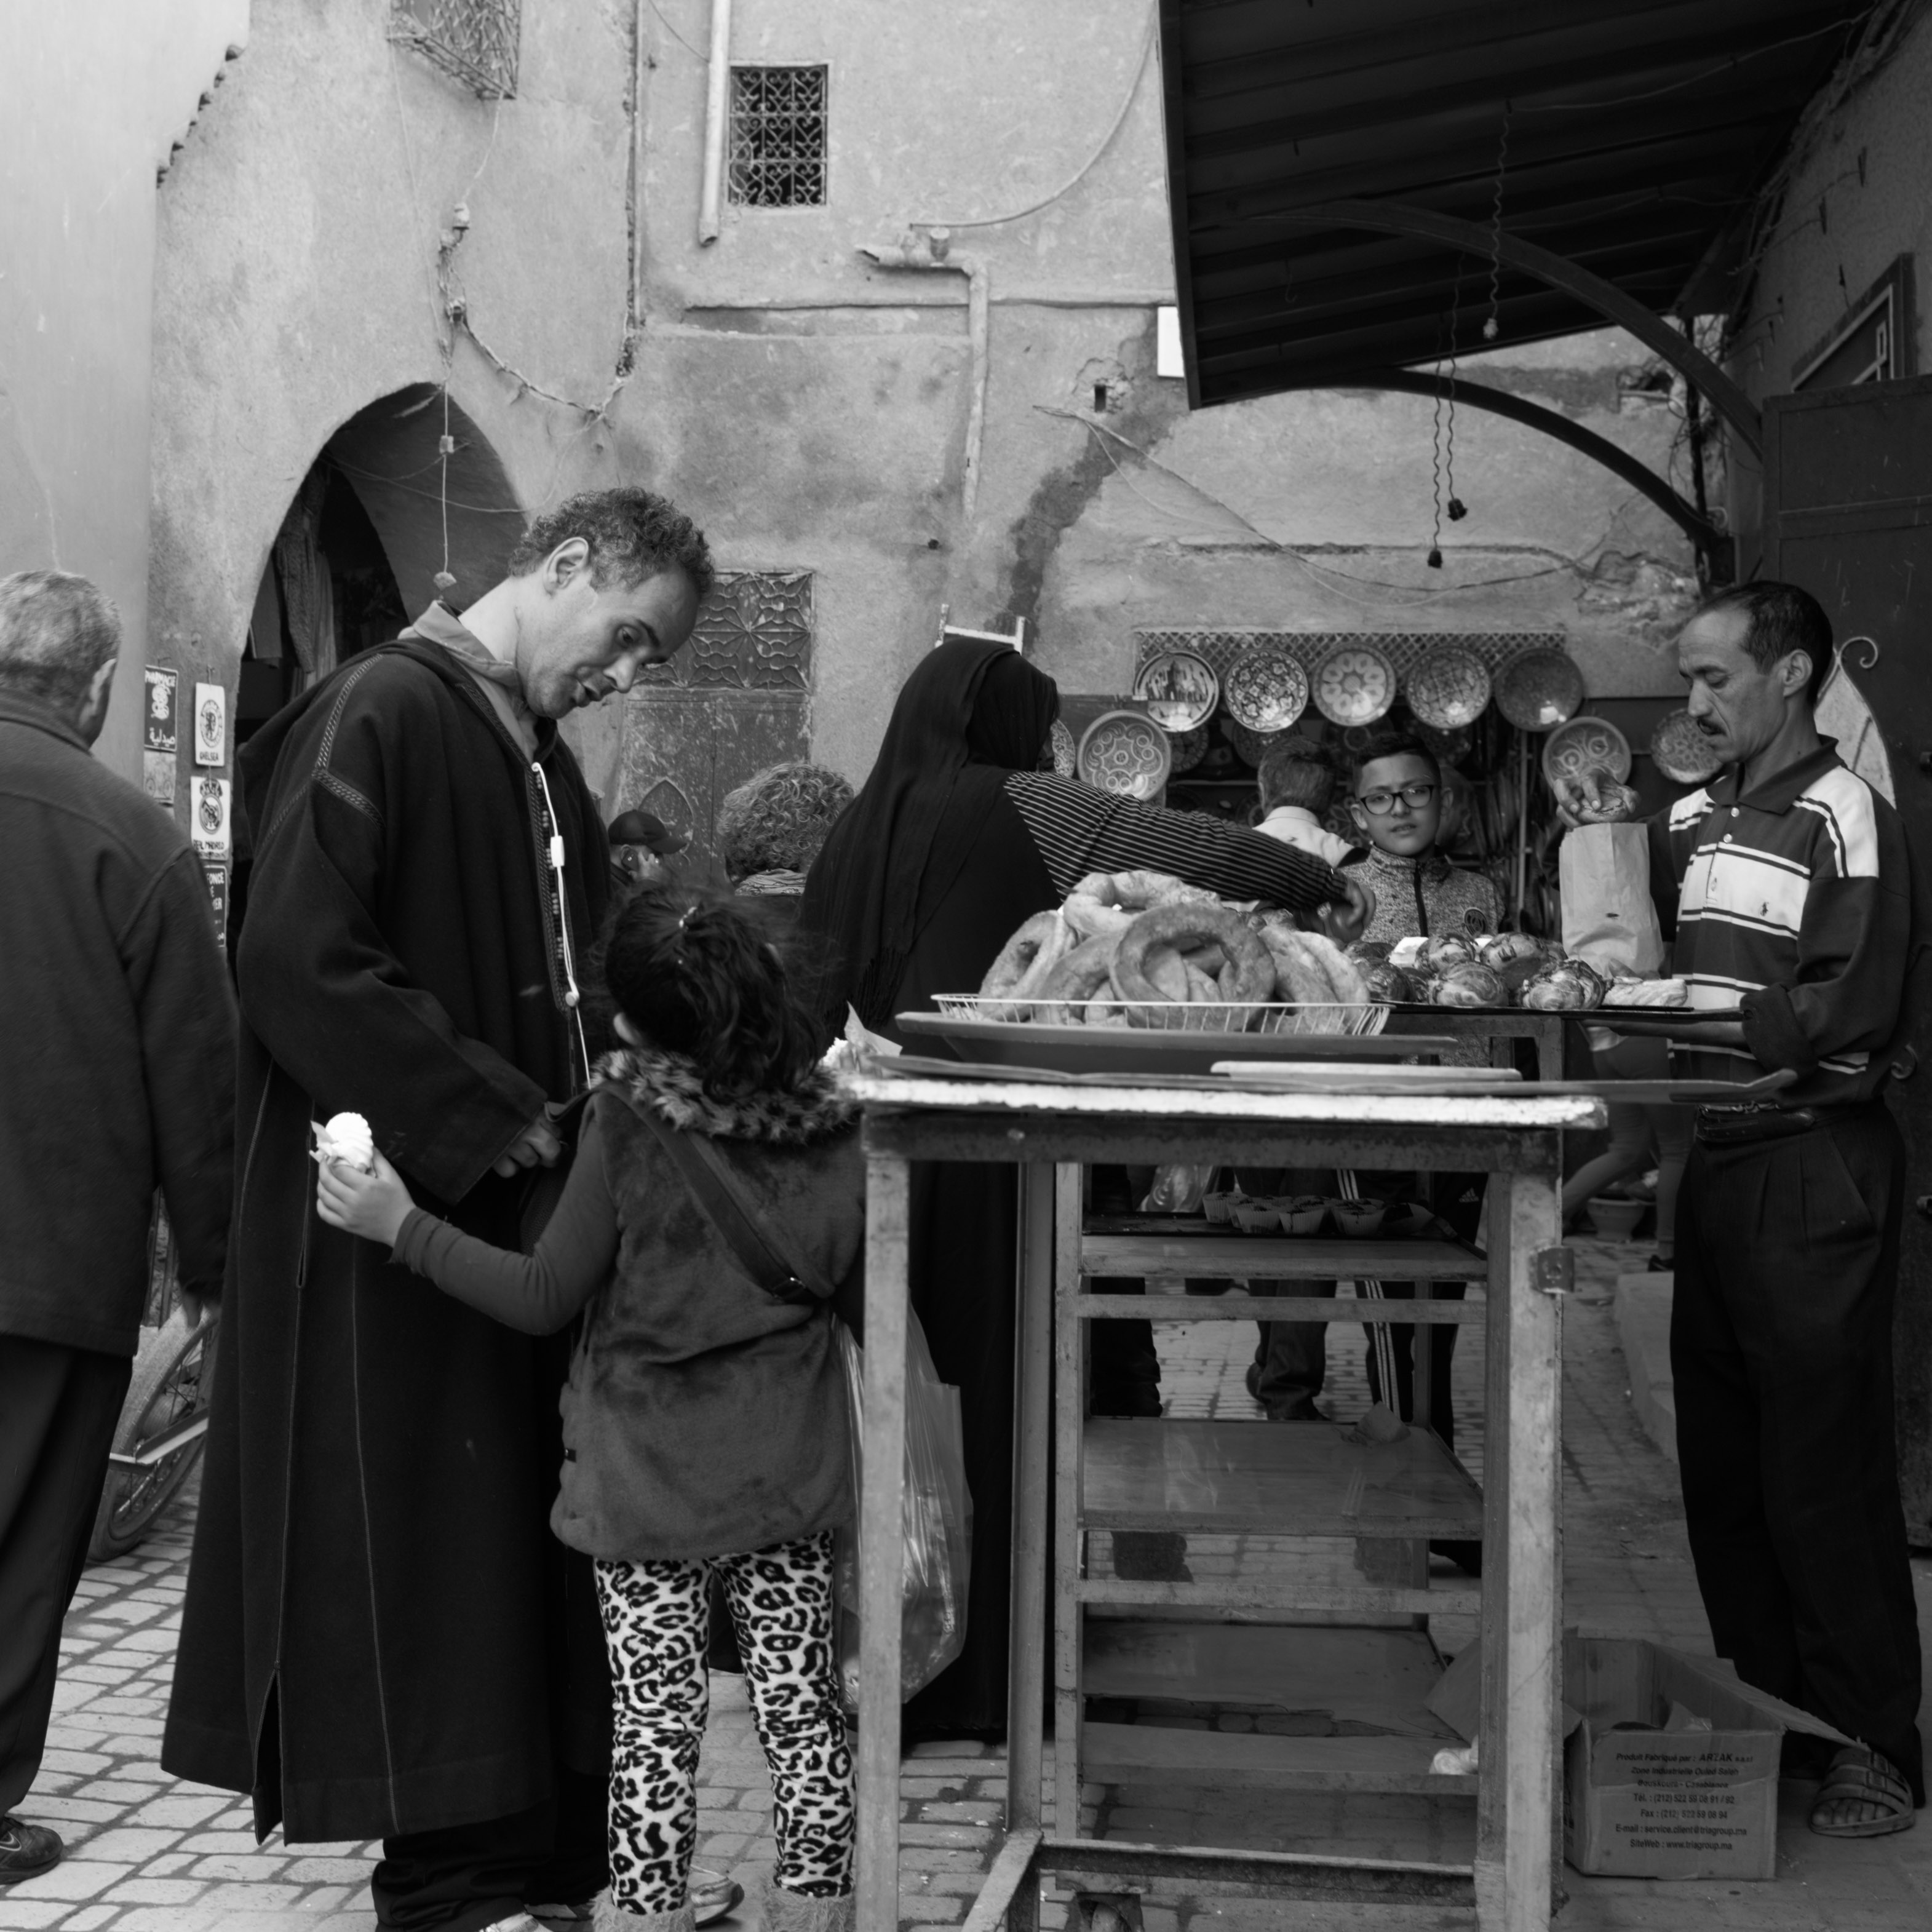
Figure 2: Normalization (Affinity) [left] vs Kodak T-Max 400 (Affinity) [right].
From a Negative to an Image
We did like the theoretical characteristics of the Kodak T-Max 400 emulation, but it turned out to darken the shadows too much. So either we can play with all the Basic sliders, or even the Tone Curve in Lightroom, or begin with applying an auto-toning by Tone/Auto and take it from there.
In the past the auto-toning was terrible, but today it’s much better and we always begin applying it if we think the negative doesn’t look good enough to just enlarge it. If we look at the difference it makes in Figure 3, we have that result looks pretty good and it retains the clothing texture.

Figure 3: Kodak T-Max 400 (Affinity) [left] vs Additional auto-toning [right].
Is emulation really needed?
It’s important to remember that adjustments like auto-toning take place on top of the profile, and in this case, it’s easy to claim that it will completely undo the effect of the emulation. However, by Figure 4 we have that it’s actually the emulation which adds the punch to the image. Hence, the right-hand side of the figure is the final outcome of this process that normally takes just a few minutes from the memory card to the final image.
Yes, we could always have taken another route starting with default import followed by auto-toning. But, we feel we lose our mental power over the process, and would end up tweaking sliders for hours for every single original.

Figure 4: Normalized with auto-toning [left] vs Final image [right].
To conclude
There’s not just one way to achieve a wanted outcome, and even the goal may differ among different photographers. Hence, you have to find your way and stick to it to be able to find time to leave the chair and take photos.
Figure 5 presents the difference between a setup with Adobe default import and auto-toning to our Kodak T-Max 400 emulation, and both are good outcomes where our process results in a more punchy result in this case.
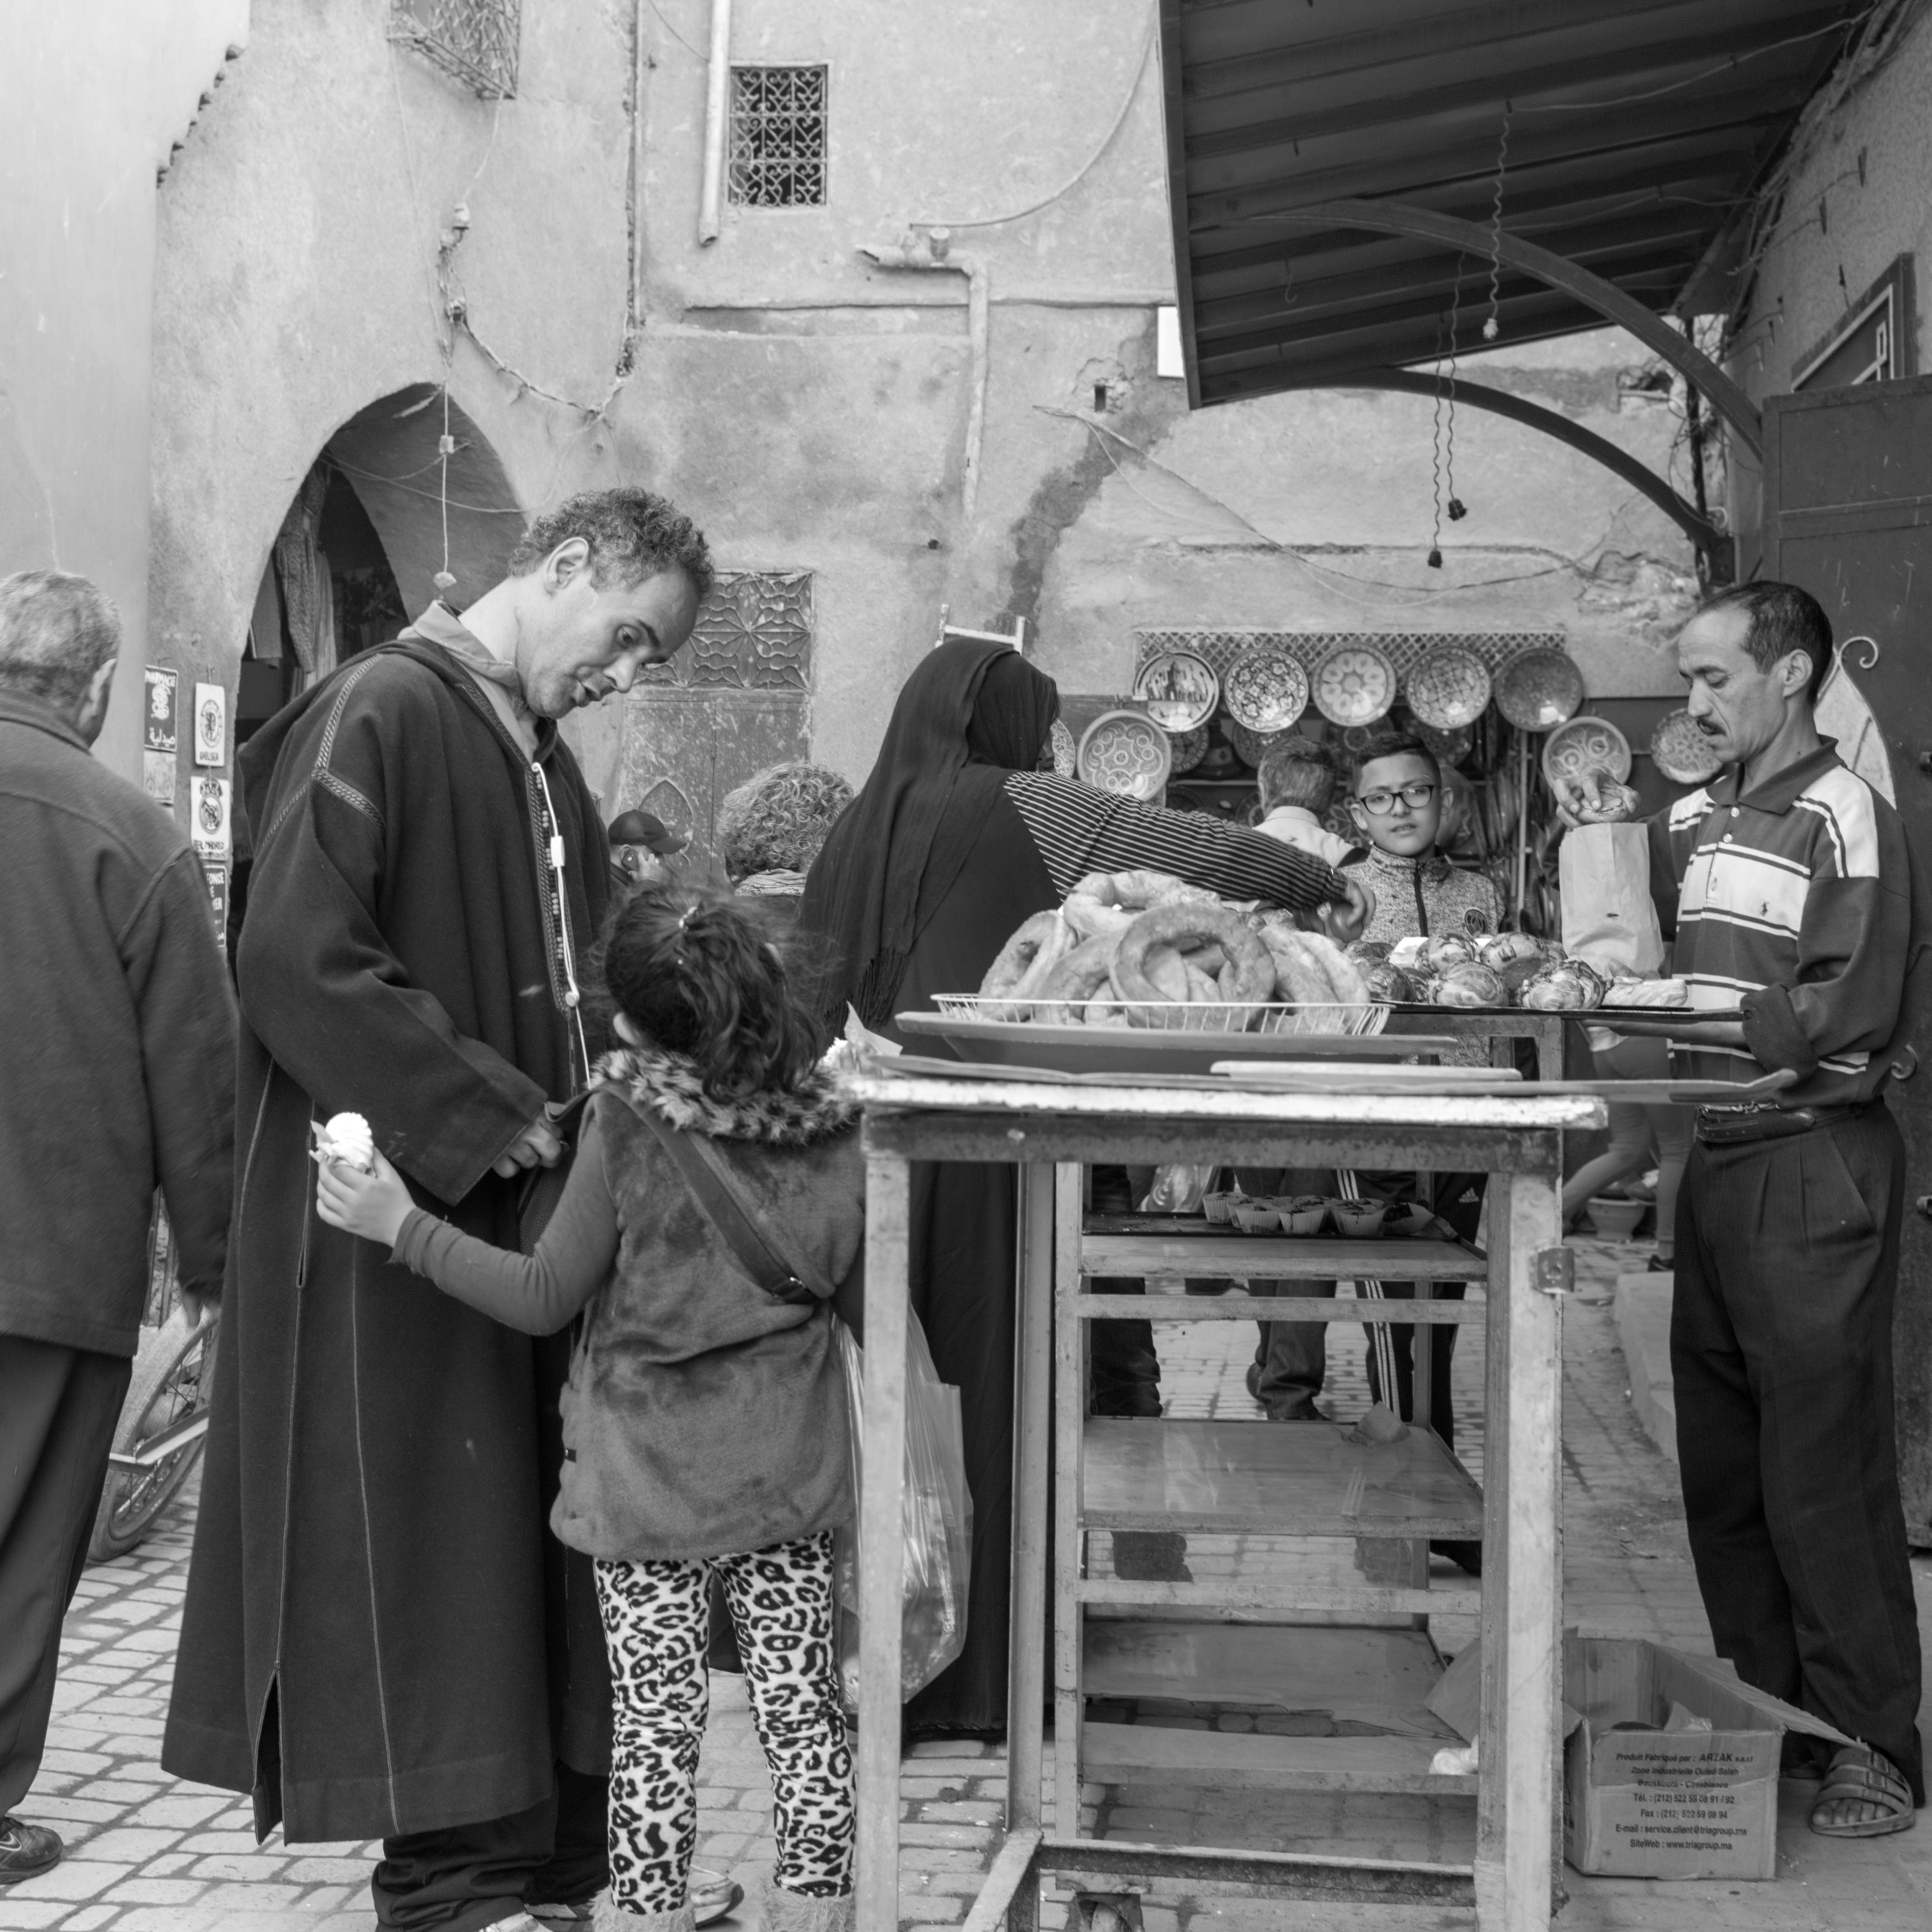
Figure 5: Default process [left] vs Our way [right].
Gear
Camera: Leica M Monochrom (M9) (Leica)
Lens: Leica Summilux-M 35 mm f/1.4 ASPH (Leica)
Filter: No
Medium: Memory Card Panasonic SDHC 16GB Gold Pro (Panasonic)
Flash:
Scanner: No
Settings
Shutter speed: sec
Focal length: mm
Aperture: f/
Exposure bias: EV 0
ISO rating:
Our process…
As discussed in the first part of this post, there is no right or wrong way to do things to achieve a wanted outcome. Here we will try to briefly describe some details of the processing of this image from the Marrakech Medina.
Comments
This is just a summary of our efforts, and in a series of forthcoming posts, we will present all the ins and outs of our process.
A normalized original
Since we always begin with importing the raw file in Lightroom as a normalized original with respect to the Affinity collection of film emulations, let’s recap that using the Leica M Monochrom experts have concluded that the default import mechanism based on the Lightroom Profile called Adobe Monochrome results in an original roughly corresponding to an Ilford Delta 100 negative. At the same time, the Affinity repository offers a profile for this film and thereby if we apply the inverse of the profile as part of the import profile we would get something that roughly mimics the Affinity reference image.
So, let’s assume we’re completely wrong about the Adobe process, what would it imply? Nothing more than that the name of one of our emulations will not reflect the actual outcome of using the corresponding traditional analog film. Still, we have the encoded characteristic curve for the film, thereby how it will affect a file independent of its origin.
The normalization curve
In our opinion, the best tool to use for any kind of color grading is the 3D LUT Creator toolbox, and if we import the Adobe Monochrom original Figure 1 presents the histogram from 0% (black) to 100% (white) and the overlay curve is the characteristic one from the Affinity collection for Ilford Delta 100. Hence, if we apply the inverse of the curve as a LUT it will change the histogram as seen in Figure 2.
If we compare the two histograms we see that the normalization has the most impact on the mid-tones, and for our image making it darker and less contrasty. It’s also important to note that it does not turn any pixels completely black or white.
If we believe in our assumptions of the Adobe process and the Affinity repository, the resulting histogram would resemble the “look” of the Affinity reference image. Hence, applying the characteristic curve in Figure 1 would then hypothetically result in an image looking like it was taken using an Ilford Delta 100 film if we only focus on the tones in the image. Moreover, this also provides the opportunity to by combining the inverse Ilford Delta 100 curve and any other emulation curve from the repository obtain a Profile for that film.

Figure 1: Histogram with Ilford Delta 100 characteristic curve.
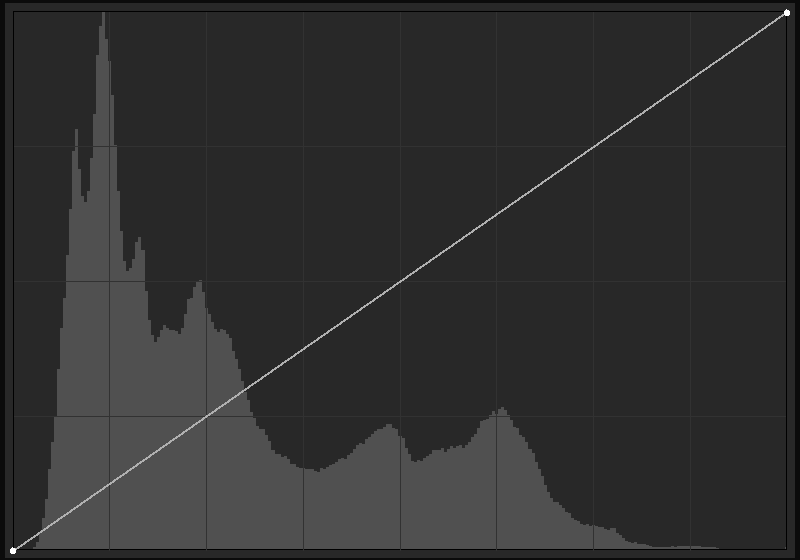
Figure 2: Normalized histogram.
The emulation curve
If we combine the normalization curve in Figure 1 with the one in representing the Kodak T-Max 400 in Figure 3, we will get the histogram in the figure.
As seen, and discussed at another place, this setting increases the contrast in the image, but at the same time, you may guess that so much is turned dark that there is a risk of losing texture in, for instance, dark garments.
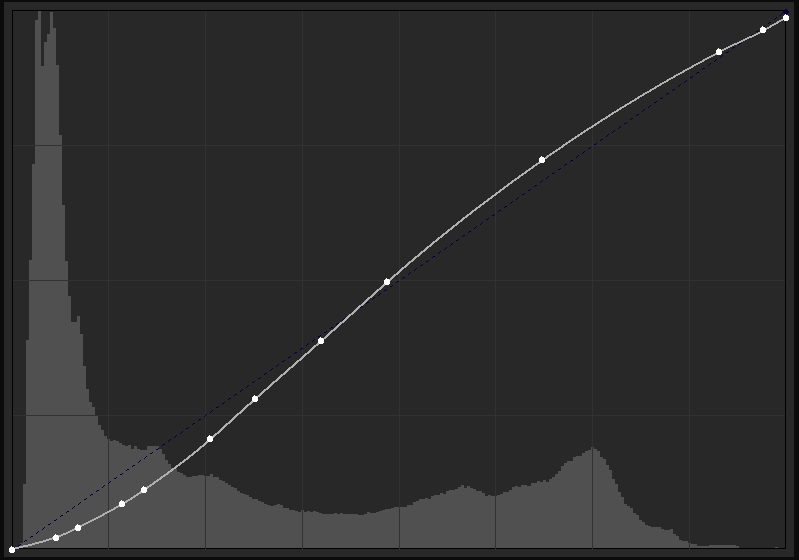
Figure 3: Kodak T-Max 400.
Combining emulation and auto-toning
If we add Lightroom’s auto-toning to the Kodak T-Max 400 emulation we get, in our opinion, a much better histogram and image (Figure 4). It looks like the combination of these will reduce the contrast, but at the same bring more diversity into the histogram and a broader spectrum of dark and shadow areas. However, it does not change the darkest parts, nor the upper highlights.
If we compare this to Figure 5 with the histogram of an instance of the photo that was imported with the default Adobe Monochrome profile followed by an application of an auto-toning, the main difference is that it seems like this approached pushed the lower and upper parts of the histogram towards the middle. Thereby, one may assume the image would become less contrasty than in the first approach.
But, by the end of the day, the only thing that counts is what you as a photographer want to share as your “view” of the moment in time you captured.
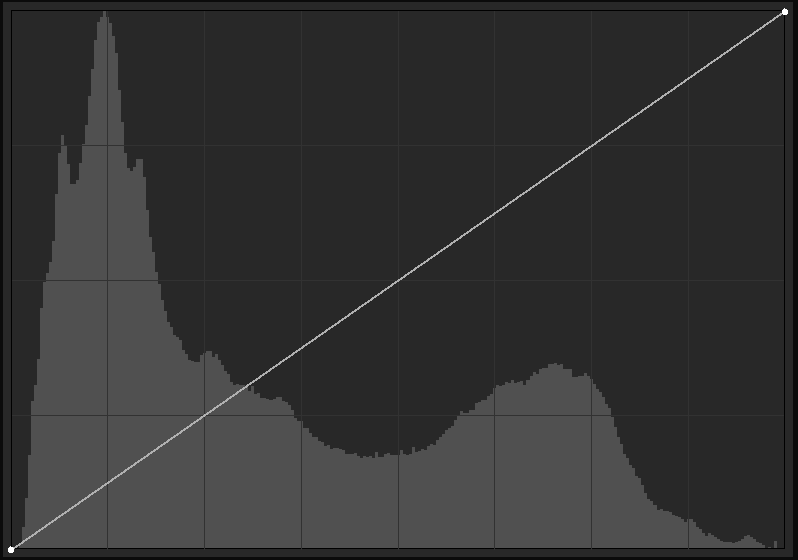
Figure 4: Kodak T-Max 400 with auto-toning.
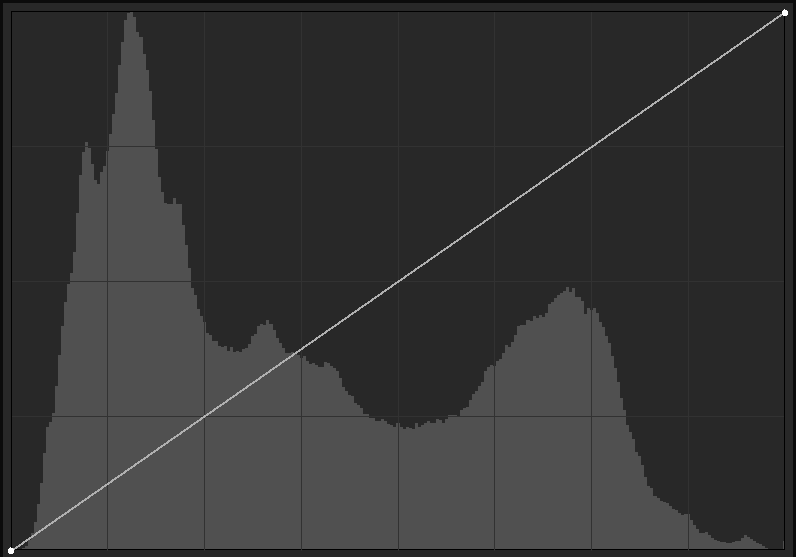
Figure 5: Adobe Monochrome with auto-toning.
Feedback
If you like our work, you are more than welcome to follow us at Instagram or have a look at Fotosidan (Swedish site for photographers) or LFI (international site for mainly images captured by Leica equipment). You are also welcome to contact us at info@anderssoneklund.se for questions about our work, and to share links to this post.